The RC Geek Blog
By: Chris Wolfe
Small details create big results on the JHH A-7 Corsair II!
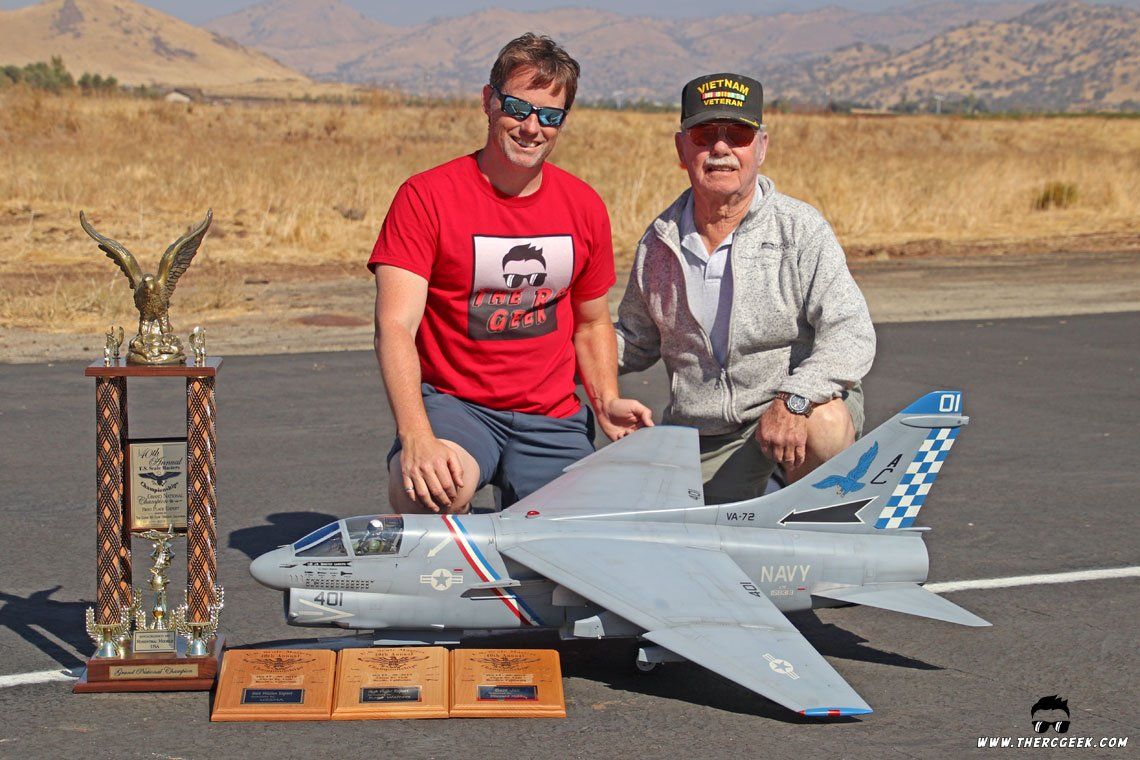
As mentioned in my 2019 US Scale Masters Championships write-up, scale competition is something that I really enjoy in this hobby. Like many, I grew up wanting to be a fighter pilot, but when I had to get corrective contact lenses in Jr High School to see the white board, those dreams ended and so that's when I decided to go the aero engineering route. Well, a big part of why I enjoy scale modeling so much is that it provides me the opportunity to fly and experience the airplanes I would otherwise never get to fly in full scale. So, when the Scale Masters Championships came back to California in 2019, I knew that I wanted to give it another go. In the absence of a fresh new competition airplane, I wanted to give the championships a try with my Jet Hangar Hobbies A-7 Corsair II. However, it needed a few upgrades (or should I say "SLUF-grades?") to get it to where I wanted it for the competition. Most notably, I really wanted to build a new cockpit for it with proper ejection seat, and it needed some additional details on the landing gear and around the airframe.
Truth be told, the A-7 Corsair II is really not the most ideal subject aircraft for competition. The perfect competition airplane is one that you can document well but also flies well in all weather conditions (rarely do you get perfect weather!). With the A-7 Corsair II, I absolutely love flying it, but it's no secret that it can be a pretty challenging airplane in adverse wind conditions, especially crosswinds. The high anhedral wing combined with the large dorsal really feel a crosswind and scraped wingtips are a regular occurrence even in the lightest crosswinds. So, in preparing for the competition, there were a few upgrades that the airplane needed to hopefully maximize the static score as much as I could since I really didn't know what the weather might be like. Plus, these upgrades were things that I've been wanting to do on the airplane for quite a long time anyhow, so it was a good excuse to get them done at last. You know what they say, a scale project is never done…you just stop working on it! ;)

ABOUT THE JHH A-7 CORSAIR II
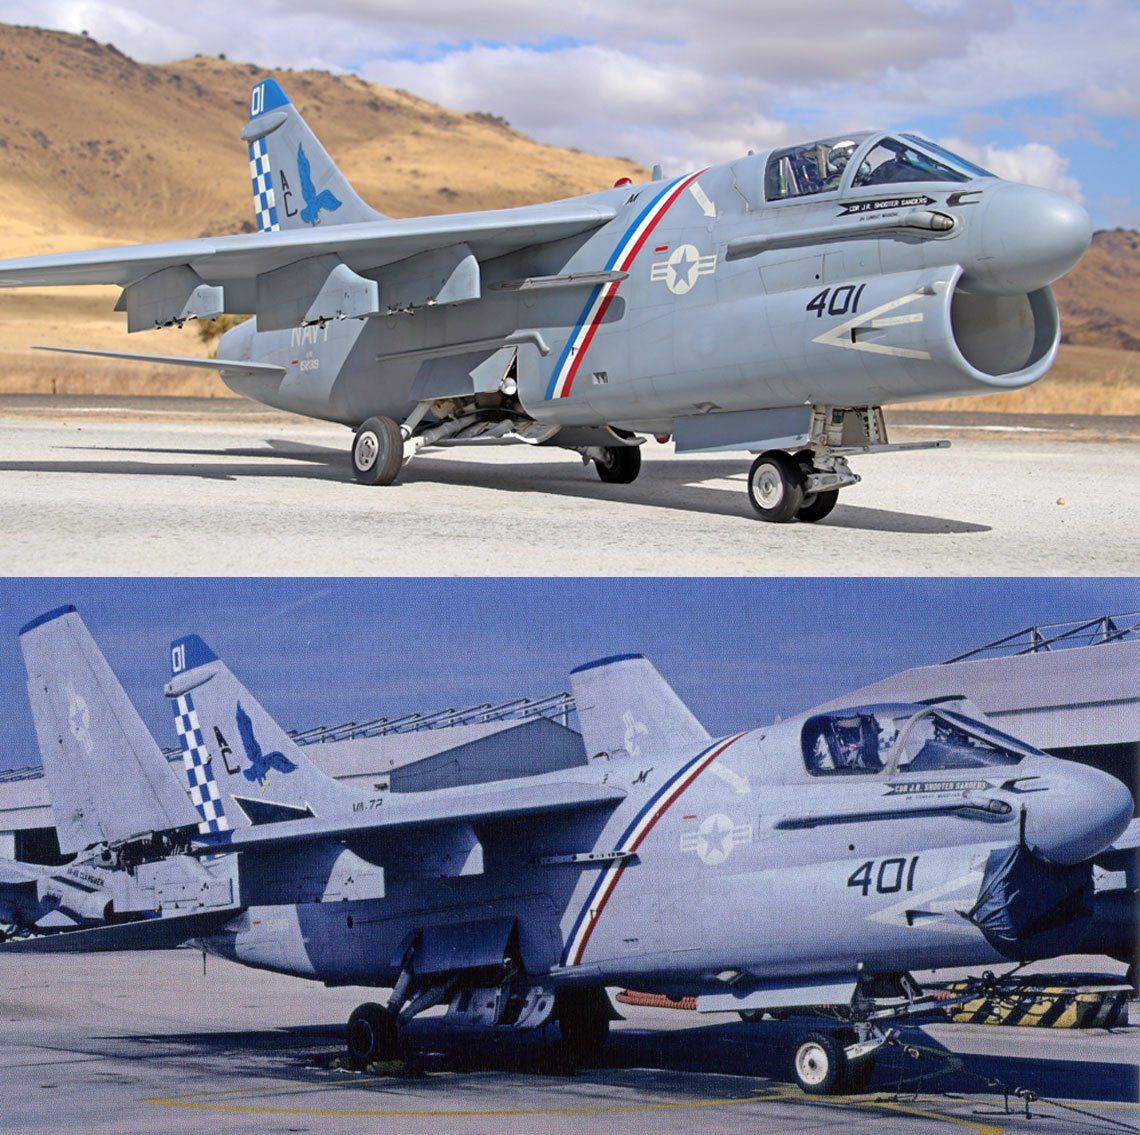
Regarding the A-7 itself, the kit was originally designed by my dad (Jet Hangar Hobbies) in the early 80's. In fact, the original mold was taken directly off of the LTV wind tunnel model (with their permission) when my dad was tasked to do a refurbish on it under contract. The design was offered as an ARF for some time in the mid-late 2000s, but unfortunately since that time, it's the one kit that my dad now no longer has available. This particular model is one that I've been flying off and on since around 2006. Originally the model was flown with an MW-44 "Gold" 10lb thrust turbine engine in it. I did originally build it for competition and did compete at a couple Scale Masters qualifiers (never a championships). Always having the fire danger in the back of my mind (San Diego has had it's fair share of them!) plus most of the local events I frequent don't even allow turbines, so I ended up swapping the power system over to a 90mm EDF a few years later (with the help of a friend, we designed a full duct for it) and have really enjoyed the airplane so much more ever since. Originally the fan installed was a WeMoTec Midifan which worked well, but following a crash (mostly my fault) and subsequent repair, I swapped it out for a JetFan90 with Neu 1415/2y motor which has really pushed this airplane around fantastically! It's been extremely efficient in the airframe which has been ideal and that's not to mention that the airplane is quite fast at full speed. My full 5+ minute competition routine only required about 1/2 the capacity of the 12s 5800mah packs being used. This is attributed to the airplane mostly flying partial throttle except for two maneuvers (takeoff and immelmann).

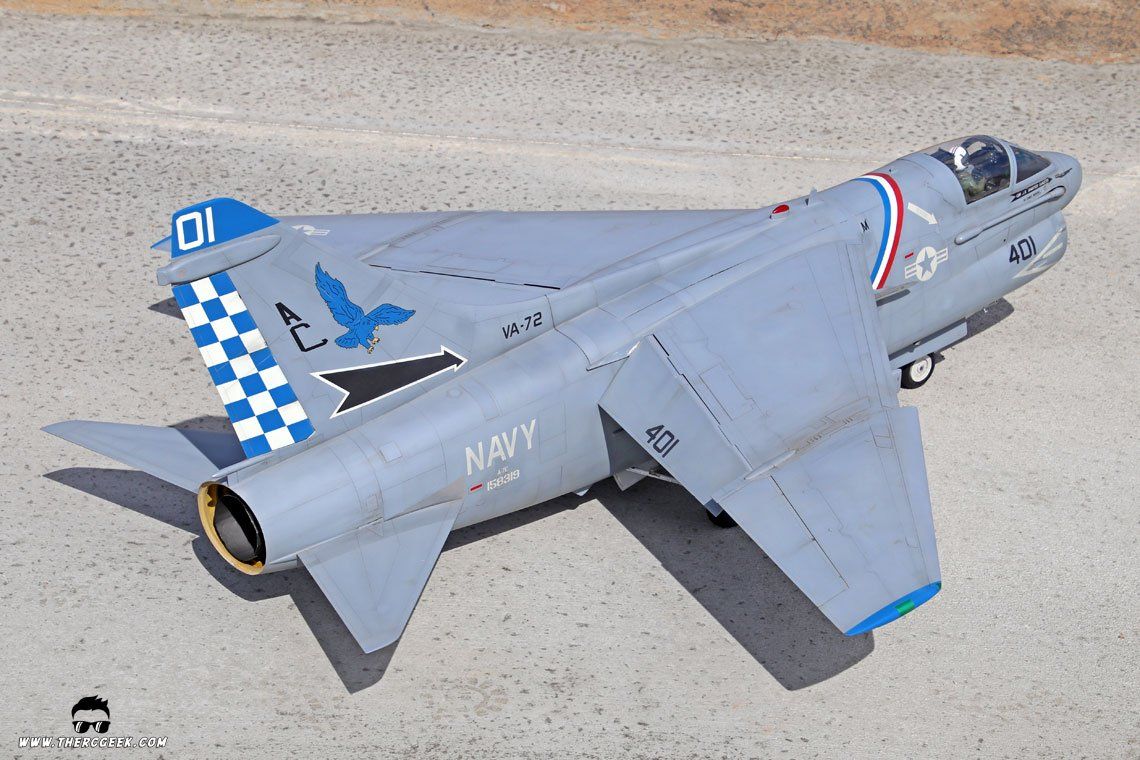
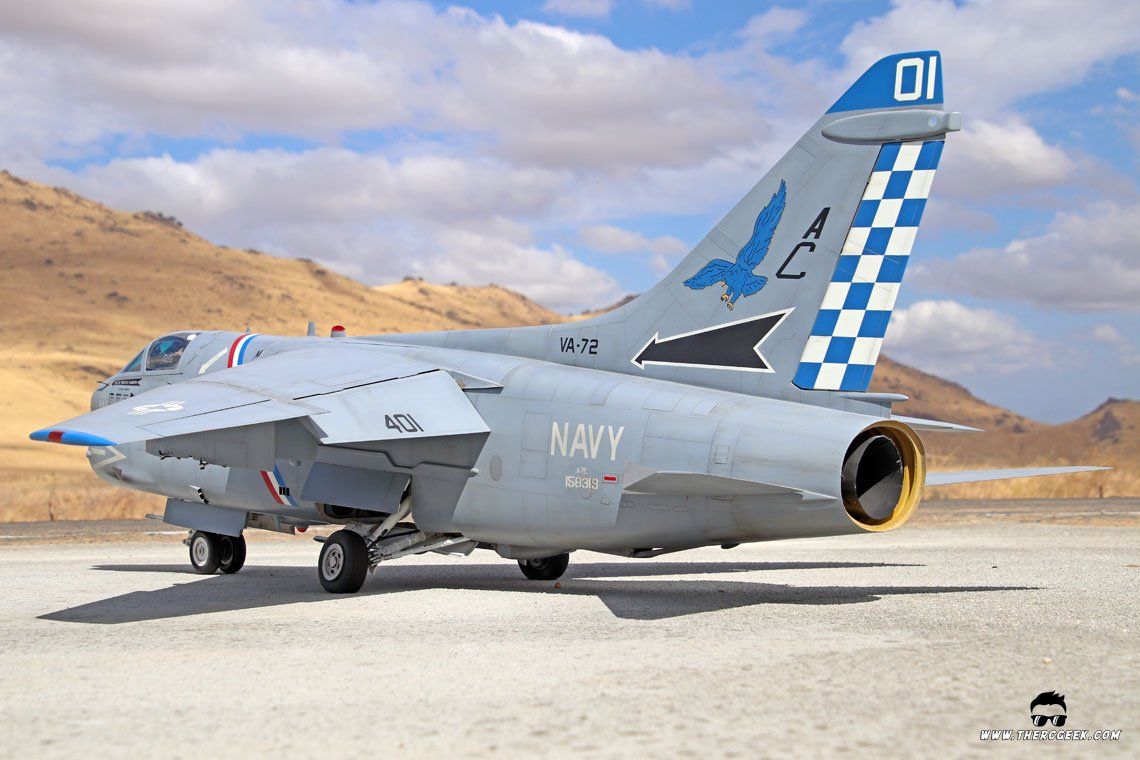
The paint scheme comes from Attack Squadron 72 (VA-72) known as the "Blue Hawks" and represents what the airplane wore on its final cruise home from Desert Storm. In fact, the airplane participated in the National Victory Celebration fly over in Washington DC on June 8, 1991. At the start of the desert storm conflict, there were two remaining Navy A-7 Corsair II squadrons left which were all due to be retired and decommissioned. However, the A-7 proved to be an instrumental part of the ground strikes during the conflict taking part in most of the ground strikes that occurred.
GETTING THE SLUF READY
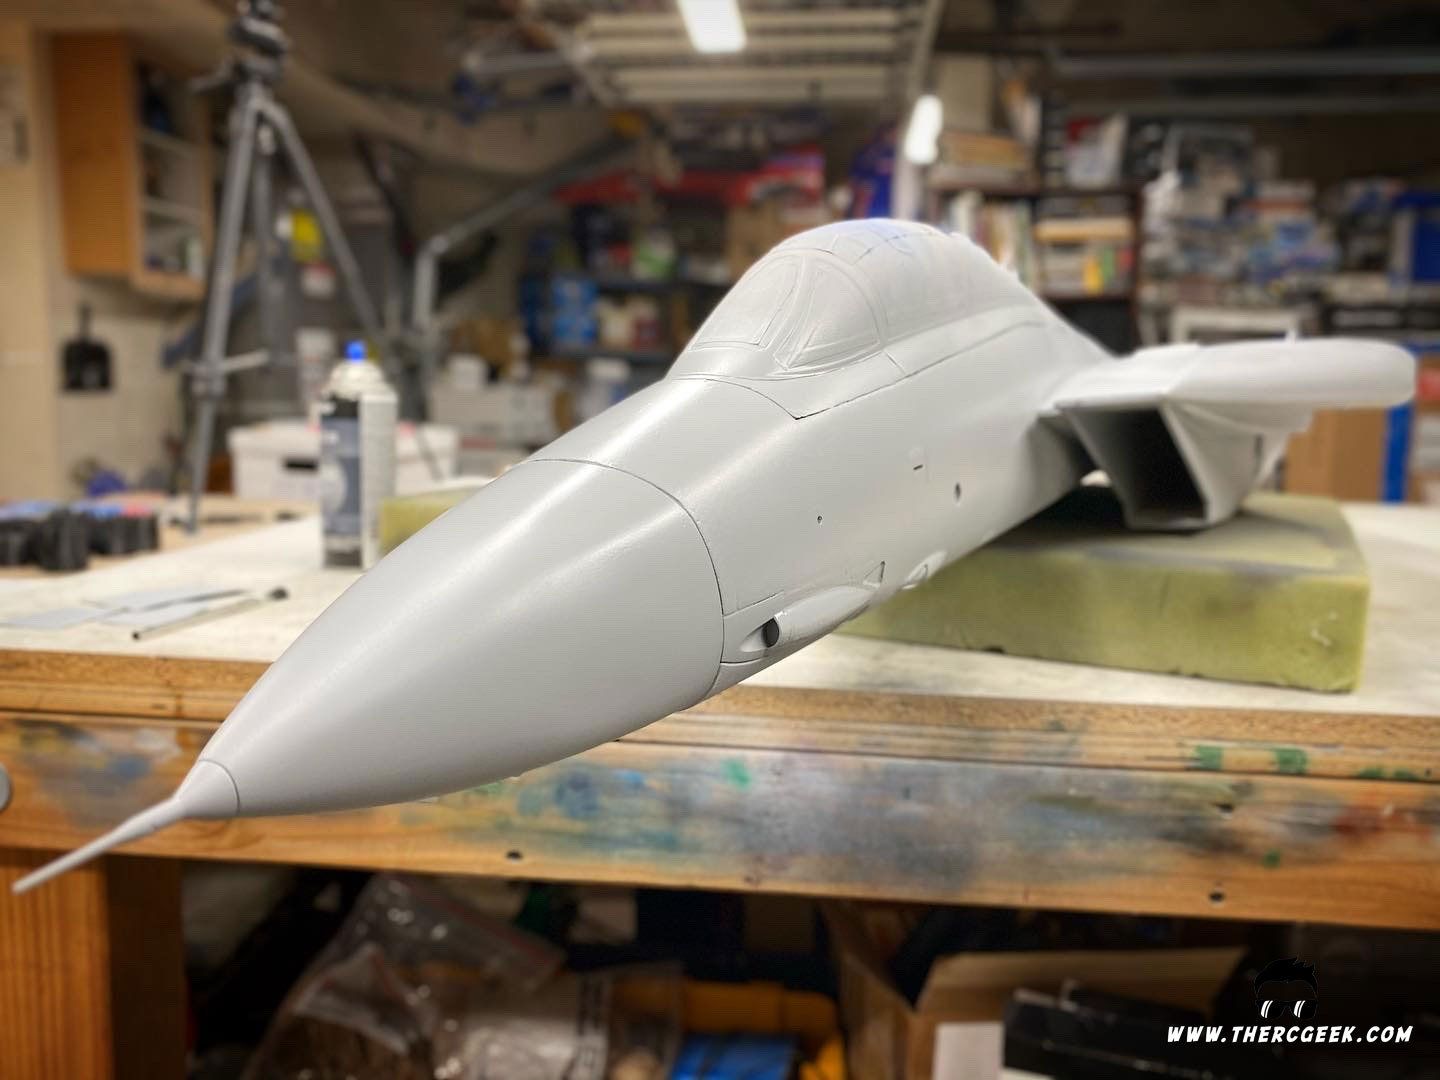
In getting the SLUF ready for the competition, as mentioned, there were certainly some things that needed to be added to make it championships material. They were relatively small things, but provided huge payback in the looks and realism of the model on the ground.
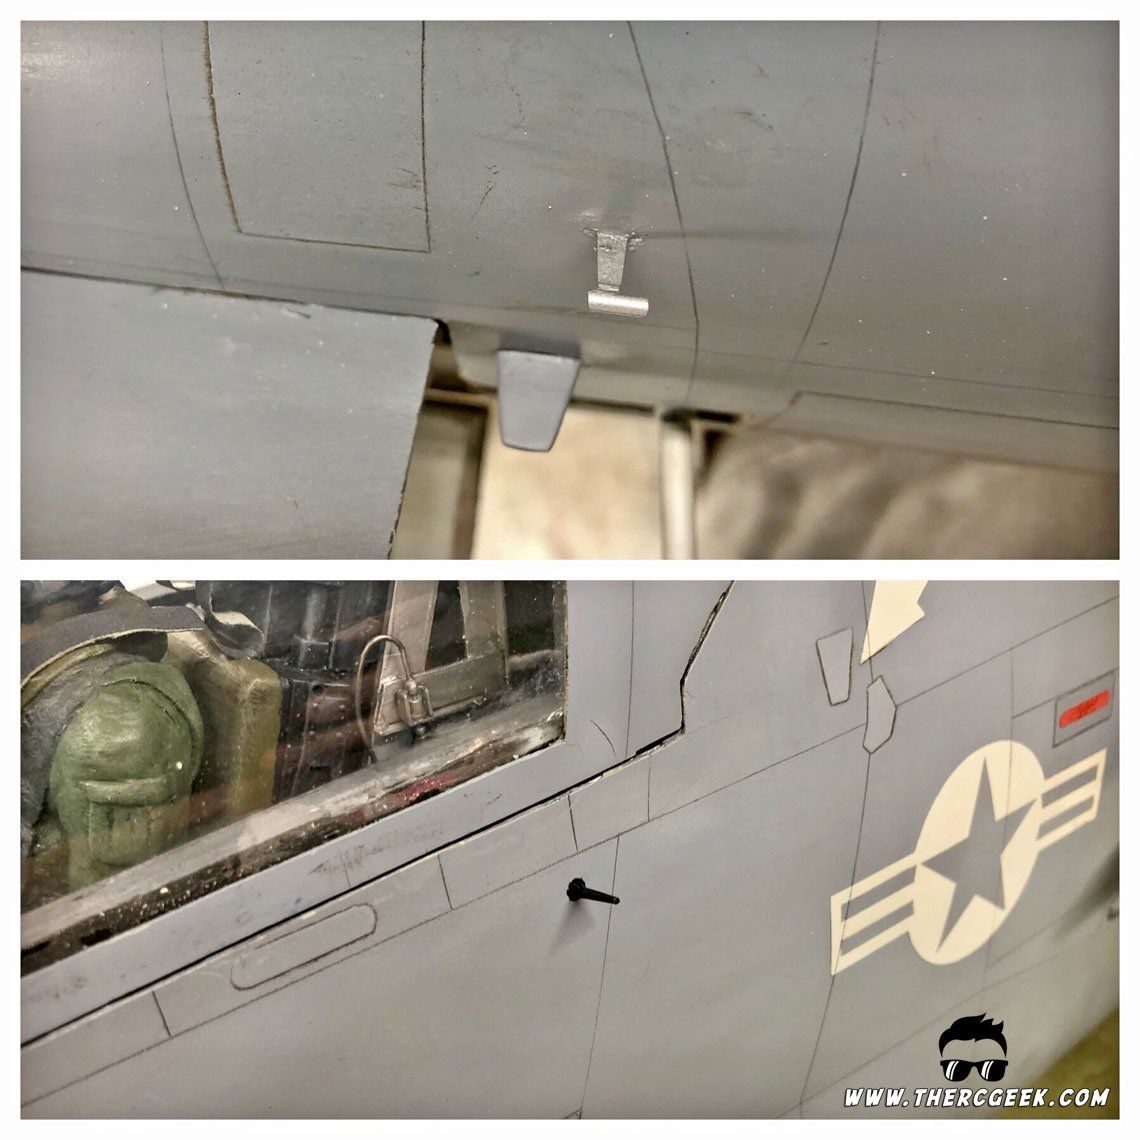
A New Cockpit
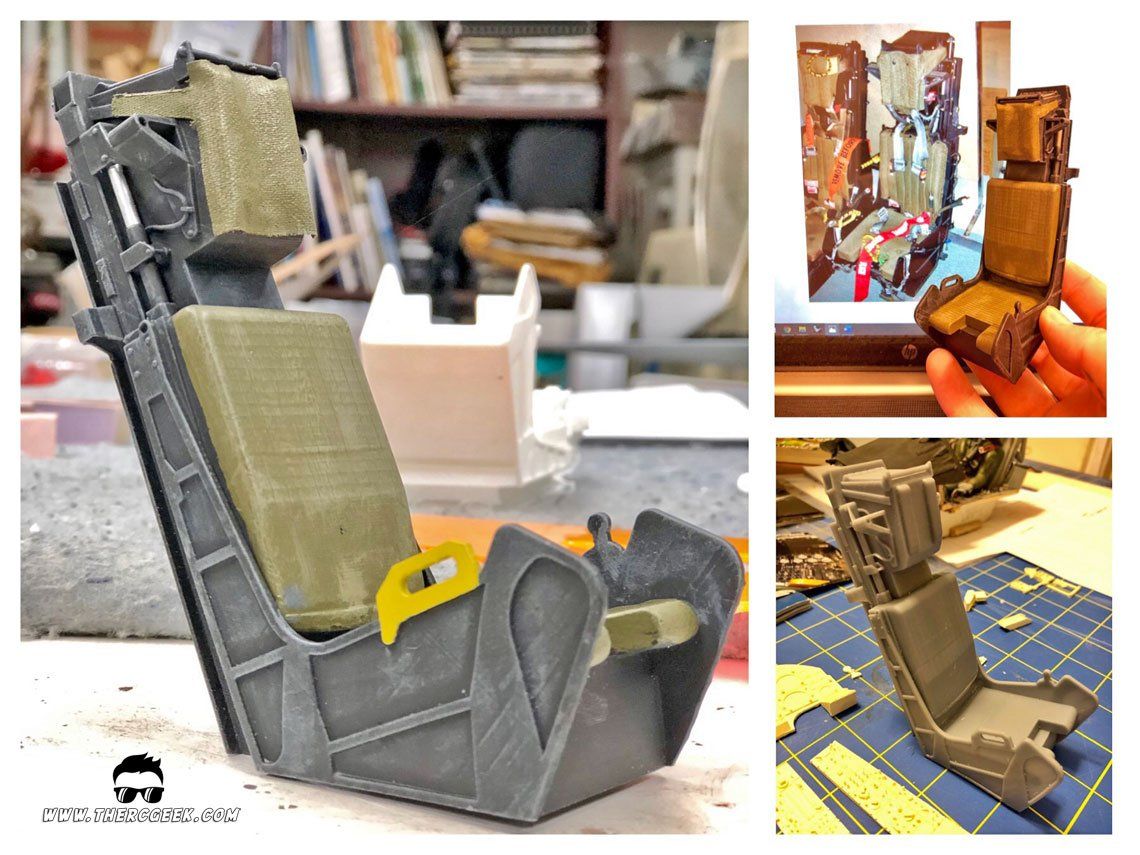
First off, the airplane needed a new cockpit. Though, not a part of the airplane that is static judged heavily, I was never happy with the original one that I had built. It was something that I had rushed to put together originally. Plus, with the model representing a late A-7 Corsair II from Desert Storm, the seat that I had in there was the earlier Escapac seat which was completely wrong for the airplane. Not that anyone would ever know (including a panel of judges)…but the problem is that this guy with two thumbs knew! ;)
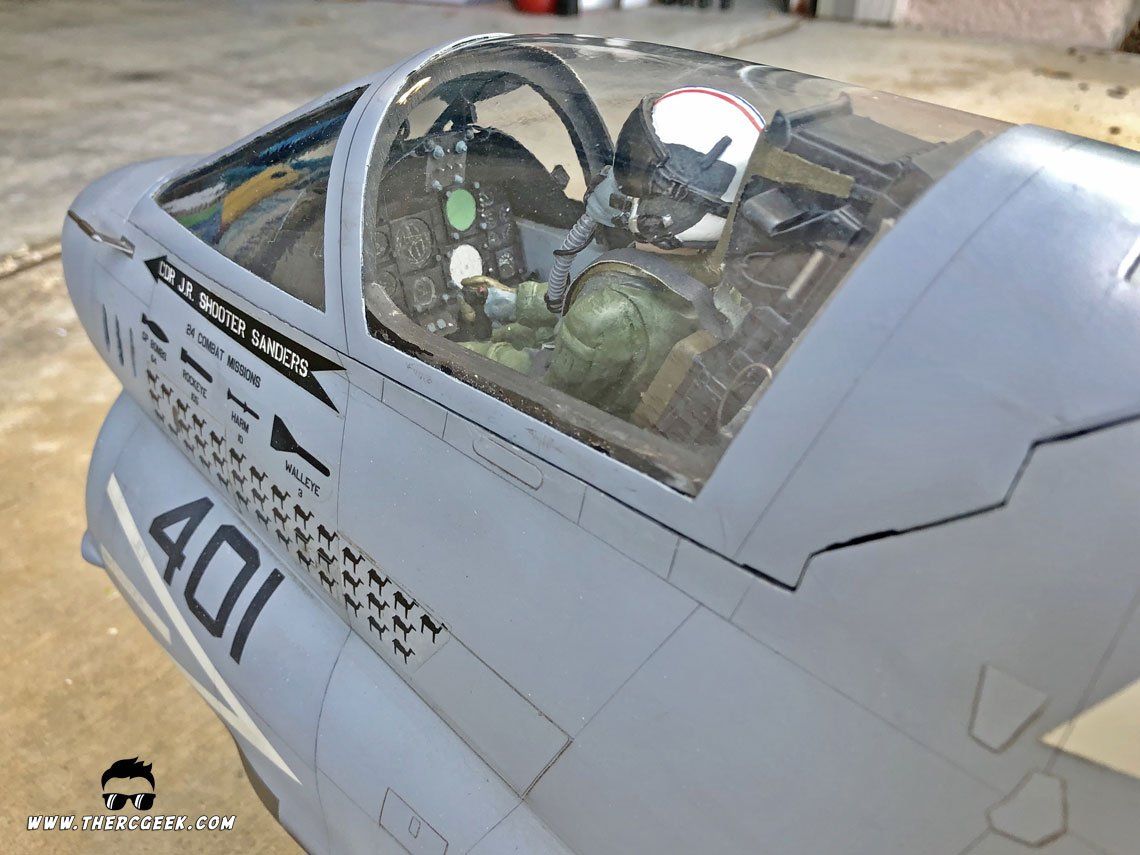
So, to start the process, I dusted off some old silicone molds for the cockpit panels that a friend had given me many years ago (he scratch built panels using parts from an ESCI F-104 cockpit kit) for the airplane as well as some additional molds that I had made for some of the additional detail parts. Additionally, I modeled up in Rhino 3D the correct SJU-8 ejection seat for the late Navy A-7 Corsair II and went to work on a new cockpit. I had started this process years ago and actually had a 2d drawing made of the seat in CAD already (originally intended to laser cut parts years ago). So, that saved me quite a bit of time and I was able to get a 3d representation of the seat made in about a weeks' time working in the evenings.
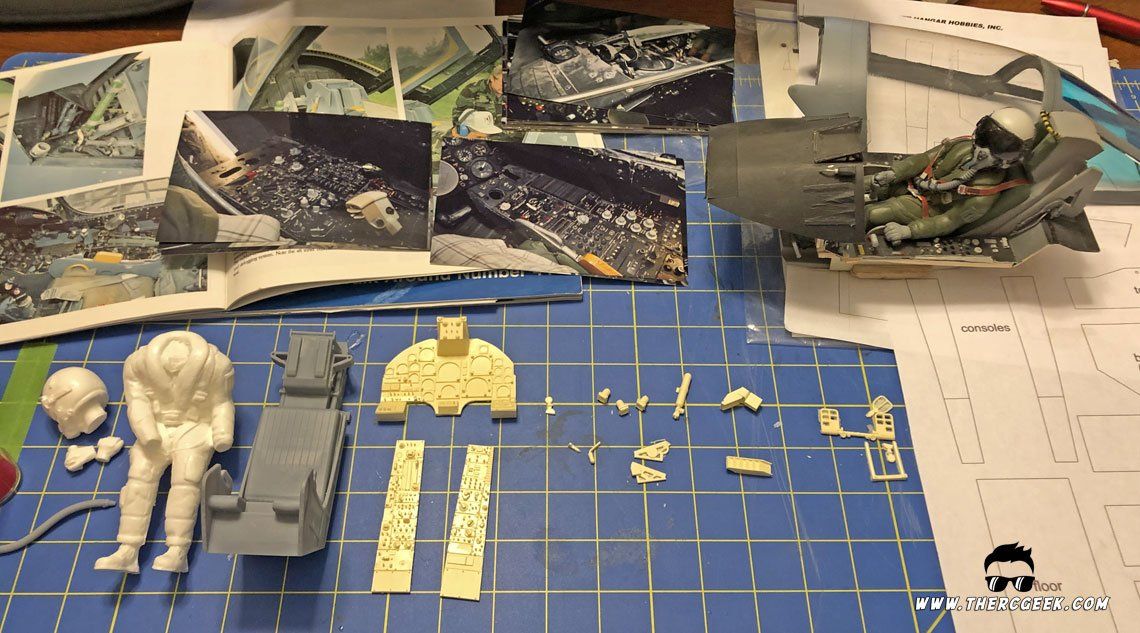
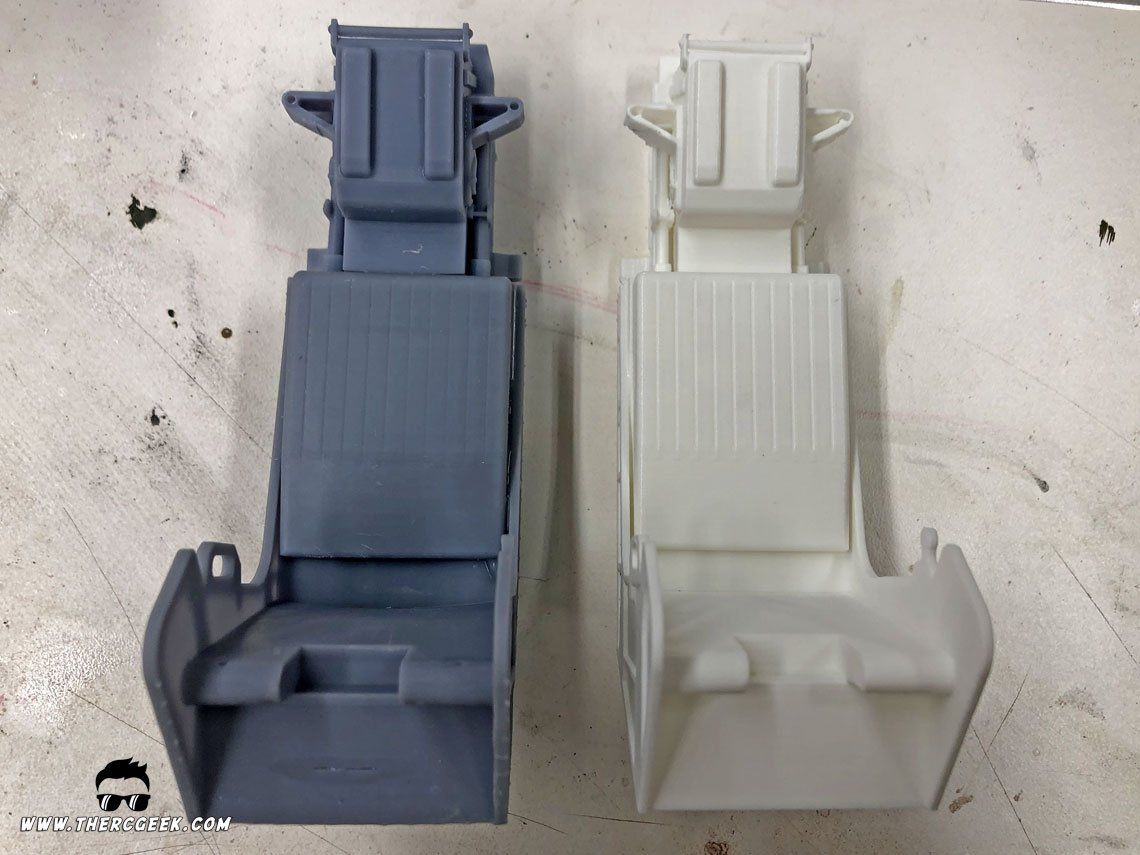
3D Printing and Painting an Ejection Seat
The ejection seat was printed on my Anycubic Photon Liquid Resin SLA 3D printer. The beauty of resin printing is the extreme level of detail that can be captured compared to a traditional FDM printer. It's a smelly and messy process, but the results are pretty incredible as you can get a considerably smaller layer height in the print compared to an extruded plastic print (FDM) and you also don't get the striations in the parts either so the finish is very smooth. I printed an additional seat on one of my FDM printers as a comparison which is shown in white below.

To paint the seat, it was first painted flat black using Model Masters Enamel spray paint. From there, the seat cushions were brush painted Olive Drab (again, model masters enamels) and then allowed to fully dry. To bring out the detail while also give the seat a weathered look, some flat white was mixed with some flat black to create a dark grey color. Using this color, the black areas of the seat were dry brushed all around. For the green areas, a mixture of white and olive drab was used for dry brushing. This really transformed the look of the seat considerably.
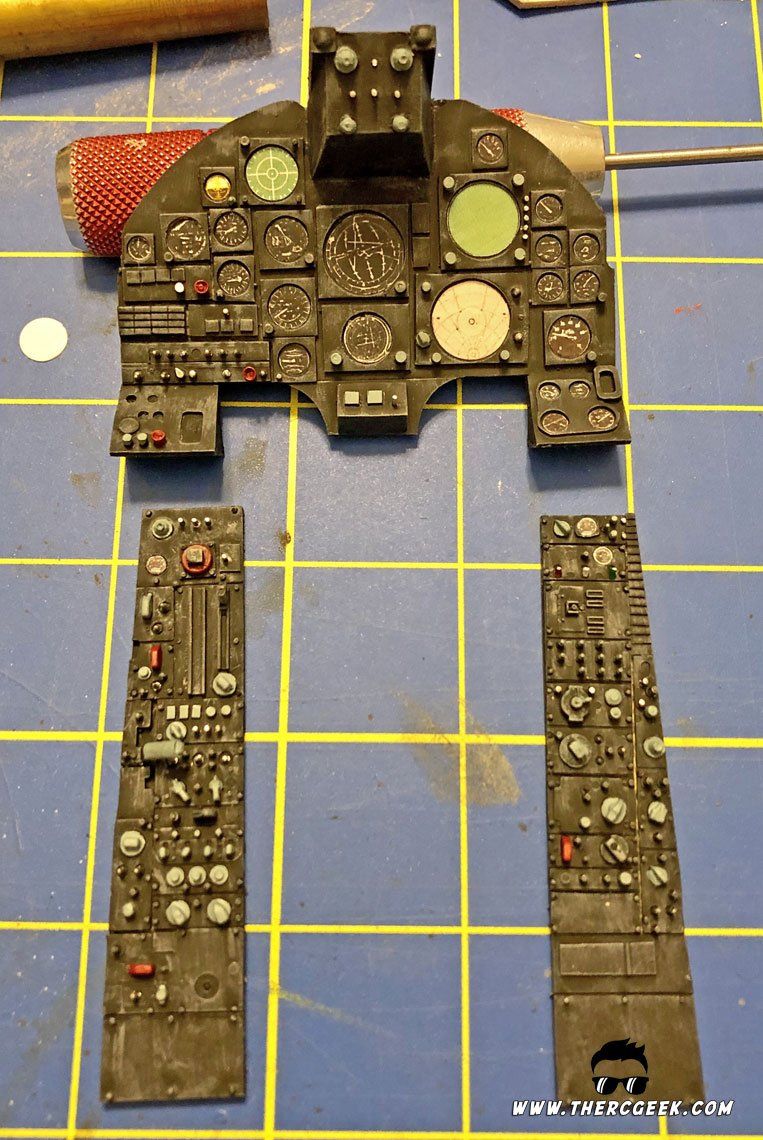
Building and Painting the Cockpit Tub and Instrument Panels
The cockpit tub was built from 1/16" balsa wood to keep it light. I had templates available already from a previous cockpit build which allowed me to engineer the tub previously, so cutting the parts was quick and easy. They were assembled and glued up and the wood was sealed simply by smearing medium CA around the exposed wood on the tub interior. It was then lightly sanded smooth with some 180 grit sand paper and then primered. The primer was sanded and reapplied a couple times to get a nice smooth finish.


With the tub built, it was a matter of painting the cockpit panels and then getting them glued in. The resin cast panels have all of the details molded in, so this simplified the work quite a bit. For painting, they were all painted a base color of black. From there, the panels were all dry brushed with the dark grey mixture mentioned previously to bring to life all of the details. In addition, specific panel details were brush painted using the appropriate colors based on some reference pictures. It's all about just spending the time get it all right. The painting alone took a few hours for everything (including the pilot).
To finish off the instrument panels, the instrument dials were added. This was accomplished by utilizing a laserjet printable white vinyl that I discovered in the process of looking for white water slide decal paper. It ended up working out great! Each of the instruments were sized in MS powerpoint, printed and then cut from the sheet utilizing various sizes of brass tubes that I sharpened on one end (used a bench disc sander to sharpen the OD and an xacto knife to sharpen the ID).

Putting it all Together
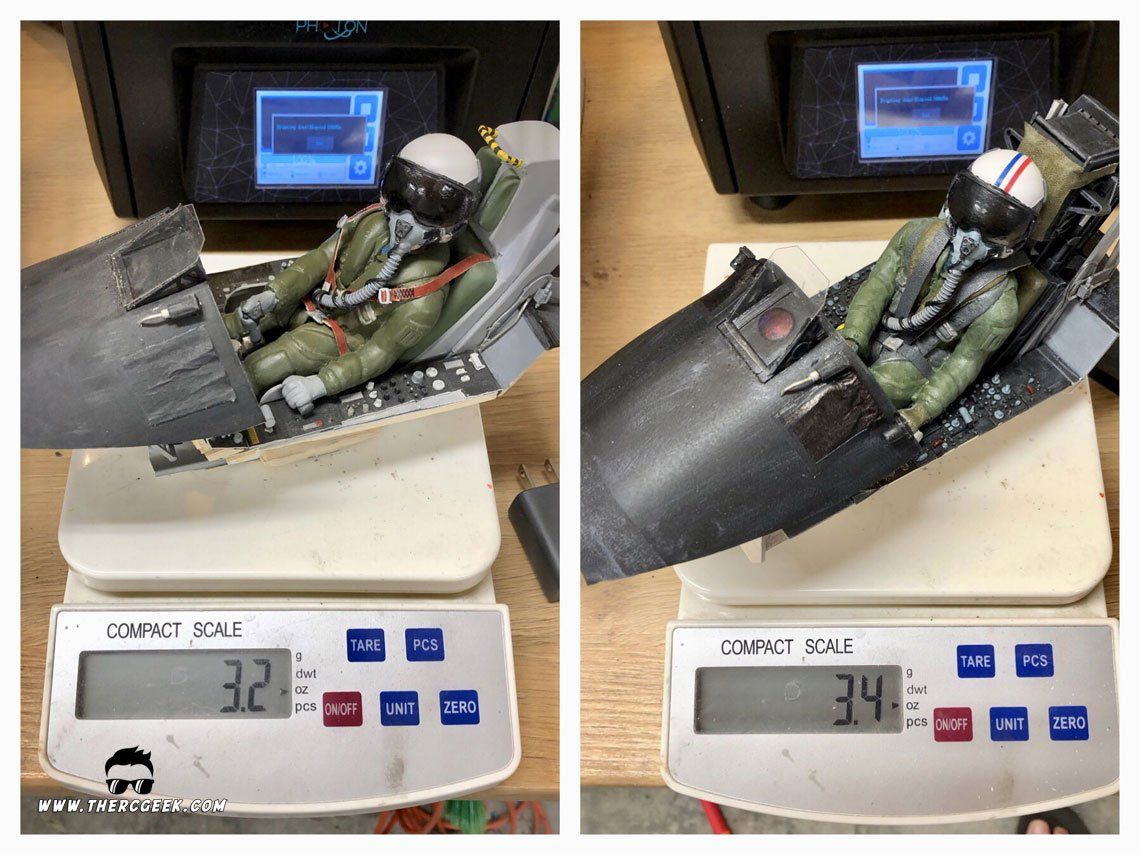
With all of the cockpit components painted and finished, it was a matter of putting it all together into the cockpit tub. The seat and panels were all glued in and then the final details were added. The seat rails were built from some strip styrene and all of the other small details were resin cast from molds that I had made many years ago and then painted. Lastly, the pilot was added (Jet Hangar Hobbies 1/10 Scale Full Body) following paint completion and some seat belts made. The seat belts were made from gaffers tape that was painted dark gray and cut into thin strips (the head rest cover was made from this as well). Note that the pilot was painted in the same manner as I showed in my Kfir kit bashing series (video below).


The goal in building the cockpit was to come up with something that looked better but didn't weigh appreciably more. At first glance, the weight was close between the two. However, to get the new cockpit into the fuselage properly, quite a bit of trimming to the tub and seat was necessary which ended up helping reduce the weight even further. Following this, the weight ended up virtually the same as the original which I was extremely happy about!
LANDING GEAR DETAILS
In my mind, when talking about scale models, landing gear can make or break the looks of an airplane. So much of the observation of a model is spent with it on the ground with the gear down and so if the gear don't look right, it can tend to detract from the looks of a scale subject. Plus, with scale competition, a small feature missing from the model (landing gear or elsewhere) could mean the difference between places in the final results. So, with the aft actuator strut and door missing from the main landing gear of my A-7 Corsair II, it was a must to get that added for the competition!
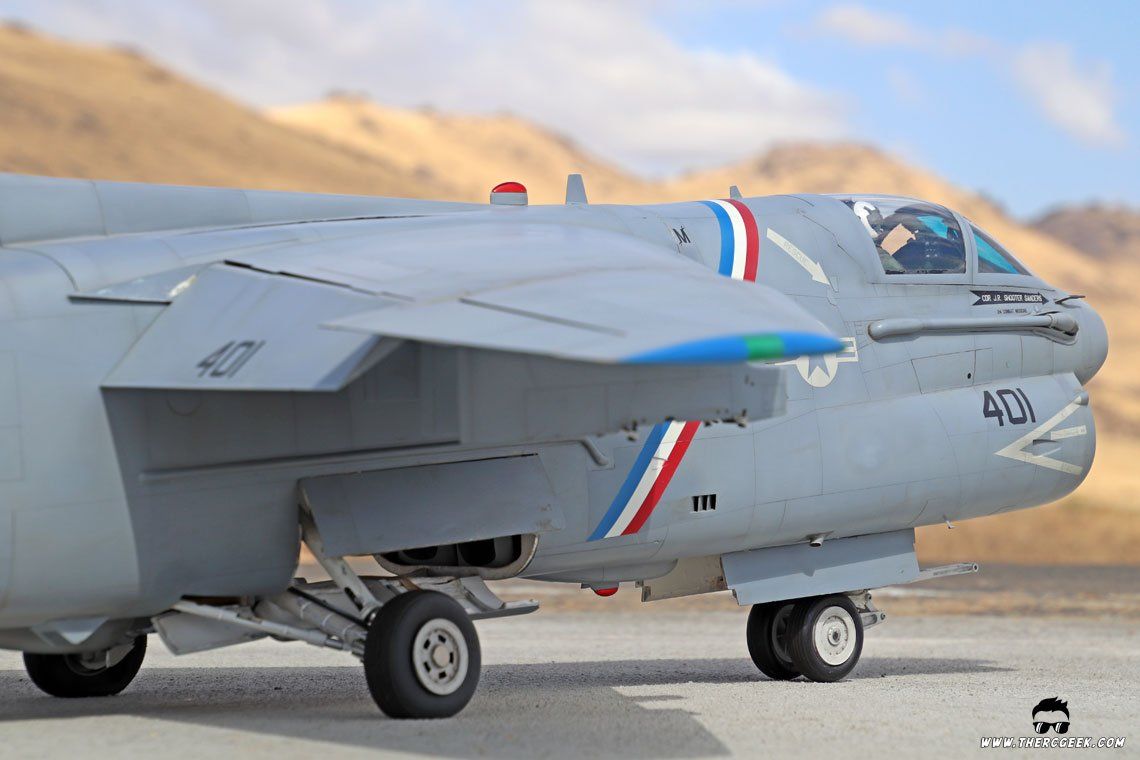
Actuator Strut Doors
To start the process, the aft strut door needed to be cut from the airframe. The original panel line that was on the fuselage was incorrect, so that was painted over and then using a scale drawing that was scaled up to the correct size and used as a template on the model, the correct door shape was drawn and the outline taped on the airframe. A razor saw was used to carefully cut the doors from the fuselage using the taped edges as a guide.
From there, the doors were hinged using DuBro flat pin hinges. They were glued such that the pin centerline aligned with the hinge line to help ensure minimal interference. With the hinges glued to the doors (prior to gluing into the fuselage), the interior of the doors were lined using some 3/32" thick balsa wood and some fiberglass sheet to stiffen the door while also create a more scale look as well. Note that the process described is exactly the same as for any gear door I would cut out of a fiberglass airframe. The hinge type might change (offset vs pin hinge), but otherwise no other differences typically.


Aft Actuator Strut
With the door made and installed, it was on to the actuator strut details. When originally thinking this through, I had thought about using concentric tubing where one tube slid inside of the other. However, the difficulty with this based on the geometry and available space meant two things, 1) a very long rod that would potentially stick into the exhaust ducting in the gear down position and 2) the potential for hanging up the gear if the tubing encountered dirt or debris or any kind of bias based on the geometry. So, to avoid all of this I determined that the actuator strut could remain a single piece, but could move along a slider with the landing gear.
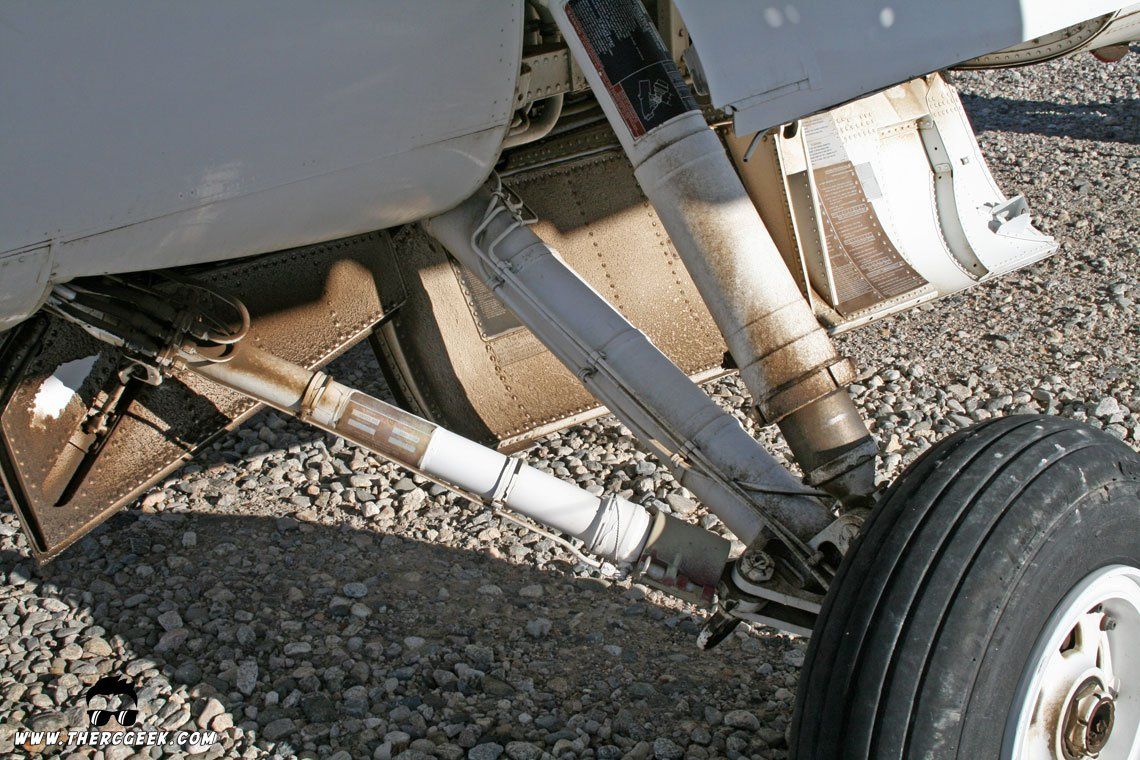
The landing gear came stock ready to accept a rear strut which really simplified things from the get go. Based on this, the first thing made was the strut from concentric brass tubing (different sizes used for details, etc.). A ball link was glued to one end which was the attachment for the main gear strut. For the slider, the strut needed to move in two axes, so I ended up designing and 3D printing a track in which a 1/16" wire pin in the actuator strut would follow the track during the retraction cycles.
The result of the above work is something that looks accurate and functional, but is completely a façade that moves at the will of the main gear retracts with no chance of hanging up. Some fiddling was necessary to get the geometry correct, but once everything was installed, it worked flawlessly. To finish it all up, some of the placards were added to the struts and doors which were made from pictures of the full scale aircraft and printed on laserjet printable vinyl.


ANTENNAS AND PITOTS
To finish it all up, there were some antennas and pitot tubes that were added. These were made from a combination of basswood and brass tubing depending on which type and location. A couple years ago, I provided an in depth discussion on my methodology for making things like this which you can find here as well as in the below video. These kind of things aren't hard to do and add greatly to a models realism.
FINAL THOUGHTS
Well, that was a little bit of the journey in getting to the 2019 US Scale Masters Championships. The A-7 Corsair II is one that I've had for a long time and I plan to keep for many years to come. It's such a unique and fun flying model and I'm so pleased at how well it has done in competition. While, I'm most certainly done working on it, I enjoy flying the airplane now so much more than I ever have! Time to get some building done on the next scale competition projects now. :)
The RC Geek Blog is your place to learn about all aspects of the RC hobby. Learn to build, design, drive or fly that RC project you’ve always wanted to build, but have been intimidated to try. This blog is here to help you on your journey and provide tips and tricks as you go! My hope is to inspire builders both experienced and new! So, welcome, please look around, it’s an exciting beginning! I’m currently documenting my latest competition scale RC jet build, a Mark Frankel F4D Skyray, along with some other fun tips and videos. If you can’t find what you’re looking for on this front page, click on any of the categories to the right and it will show just posts related to those categories. Please feel free to add comments and/or contact me directly if you have questions, I’m here to help! And don’t forget to check out my YouTube Channel, I post new videos every week!
Subscribe To Our Blog Now