The RC Geek Blog
By: Chris Wolfe
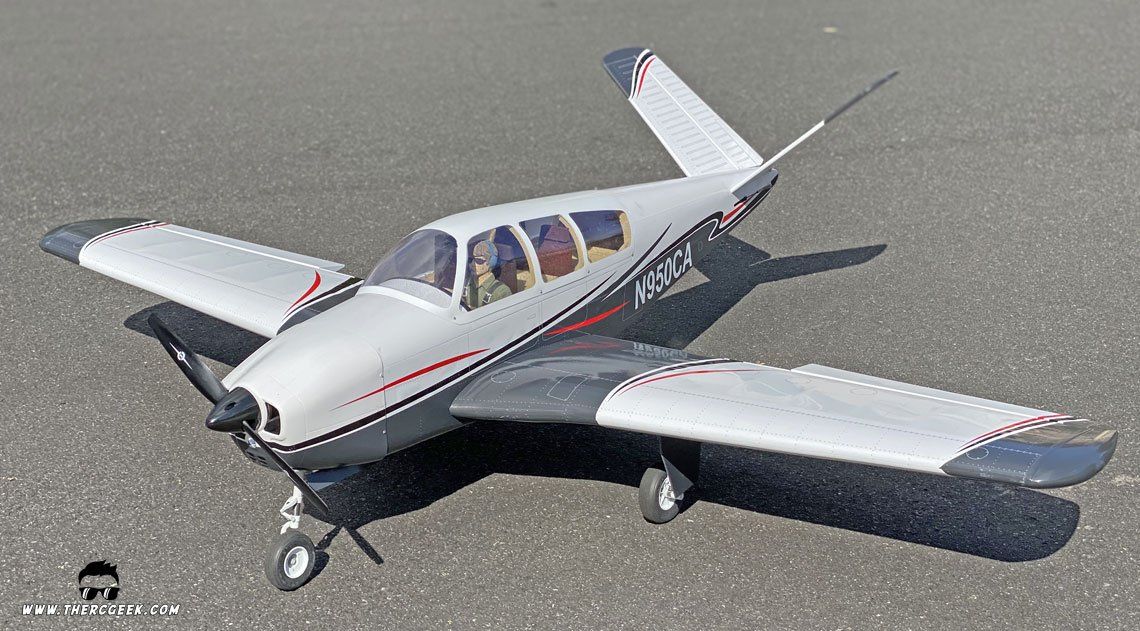
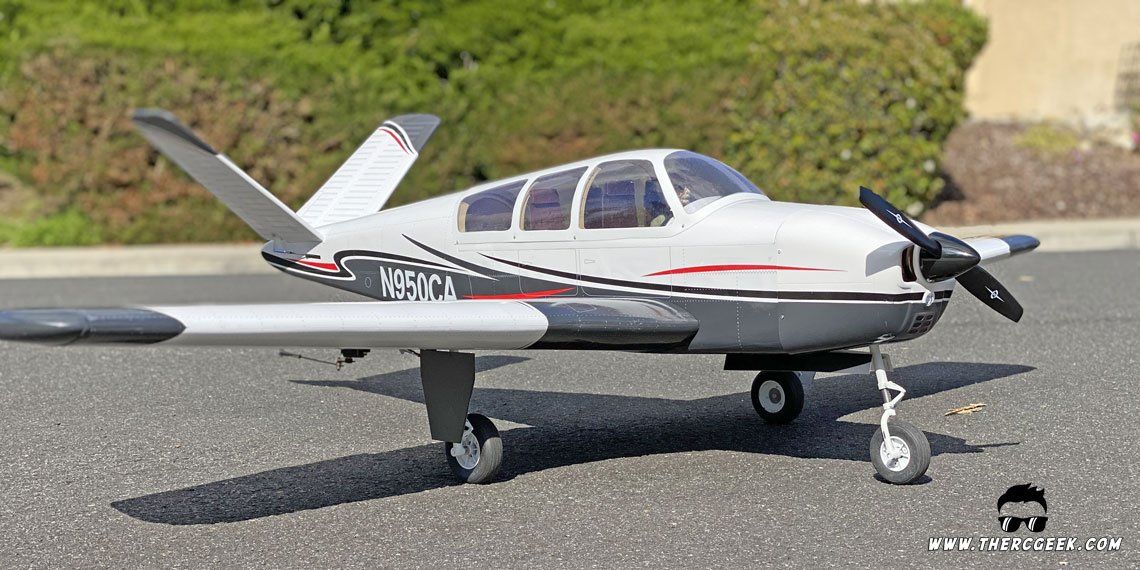
Bonanza V-tail for the win!
There's something about the less traditional aircraft designs that really draw me in. Most notably they are the v-tail and the delta wing/tailless aircraft. Maybe it has to do with the less conventional nature, I'm not really sure, but when I saw the VQ Warbirds Beechcraft Bonanza Vtail, I was pretty excited about the model. The bonanza is an icon in the private aircraft world and one of the few production aircraft I'm aware of that features a vtail into its design, especially in the private aircraft industry.
Though, commercial and private aircraft aren't typically in my wheelhouse (I love my military aircraft!), the Bonanza Vtail is one that I do really like the looks of. The Vtail gives an unconventional look to an otherwise conventional airplane and the proportions of the wing and the long tail moment really should make for a really good flying model. Add to that the really nice covering and look of the VQ Warbirds Bonanza Vtail model, it was not a hard sell to get this one in my hangar.

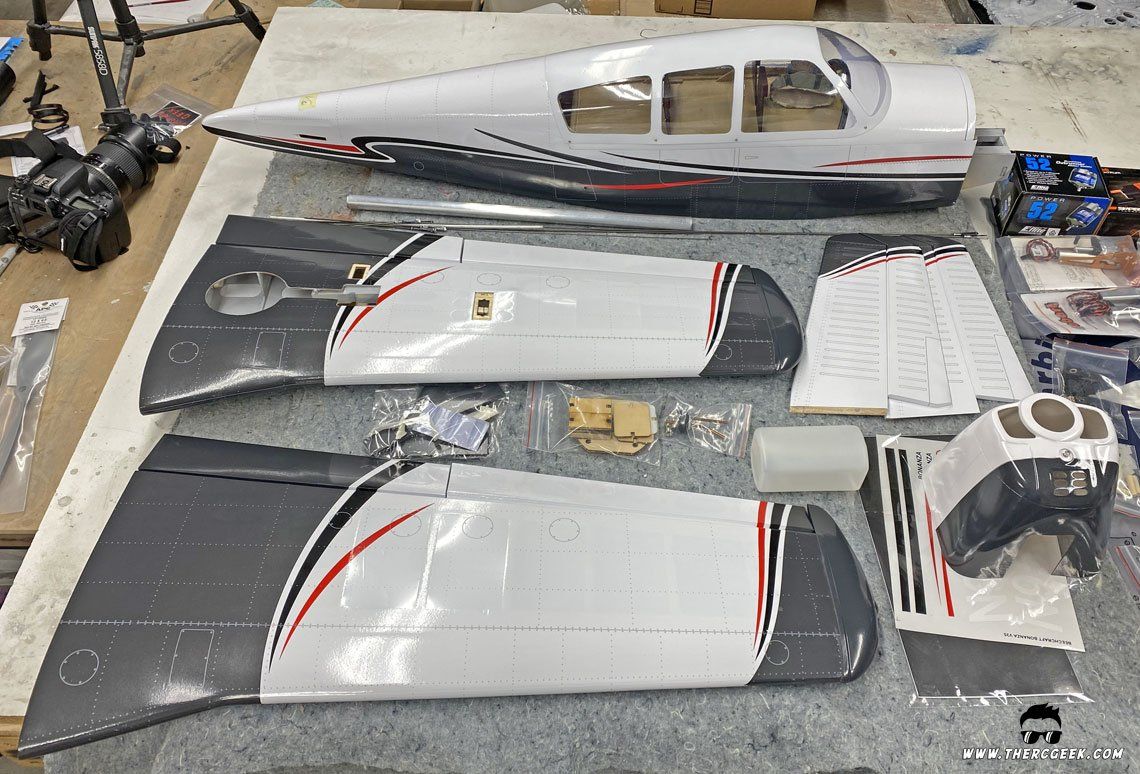
WHAT'S IN THE BOX
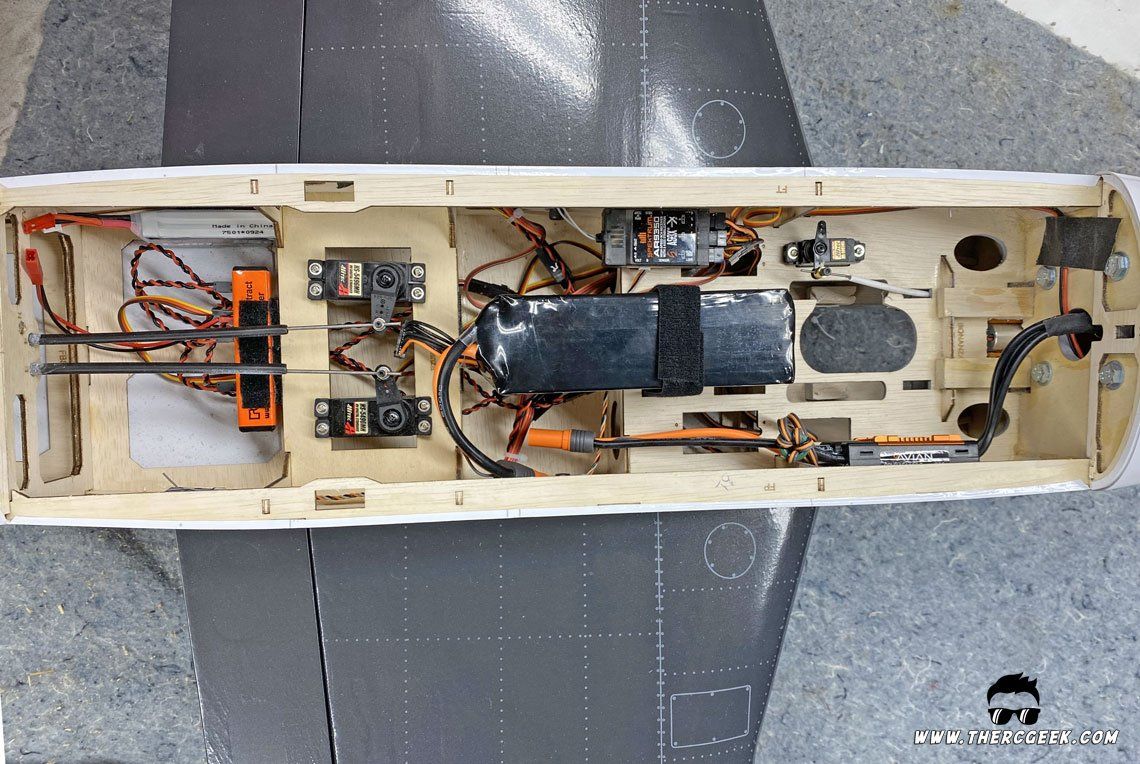
This is the second VQ Warbirds airplane I've had the pleasure to assemble (first was the B-24 Liberator) and in each case, I have been thoroughly impressed with the quality of the build of the airframes. Pulling this airplane from the box, I was reminded of this as the airplane was a beautifully built and finished representation of the Bonanza. The parts count is generally low, but there is quite a bit of hardware included for pushrods, etc. One of the nice things that became readily apparent was that all of the control surfaces were pre-glued at the factory, so that alleviated one extra step in the assembly process which was nice!


In addition to the airframe, I picked up my power system and servos of course which are listed and linked below. I love keeping the looks of a scale model intact and though a 4 stroke glow motor would have sounded awesome in the Bonanza, it would be a shame to cut up the cowl for a cylinder and muffler. So, I knew from the get go of this project that it would be electric. I generally go that way primarily to preserve the looks of a model and for simplicity as well since I don't really have any glow support equipment anymore (haven't flown glow in a really long time).
SERVOS & RECEIVER
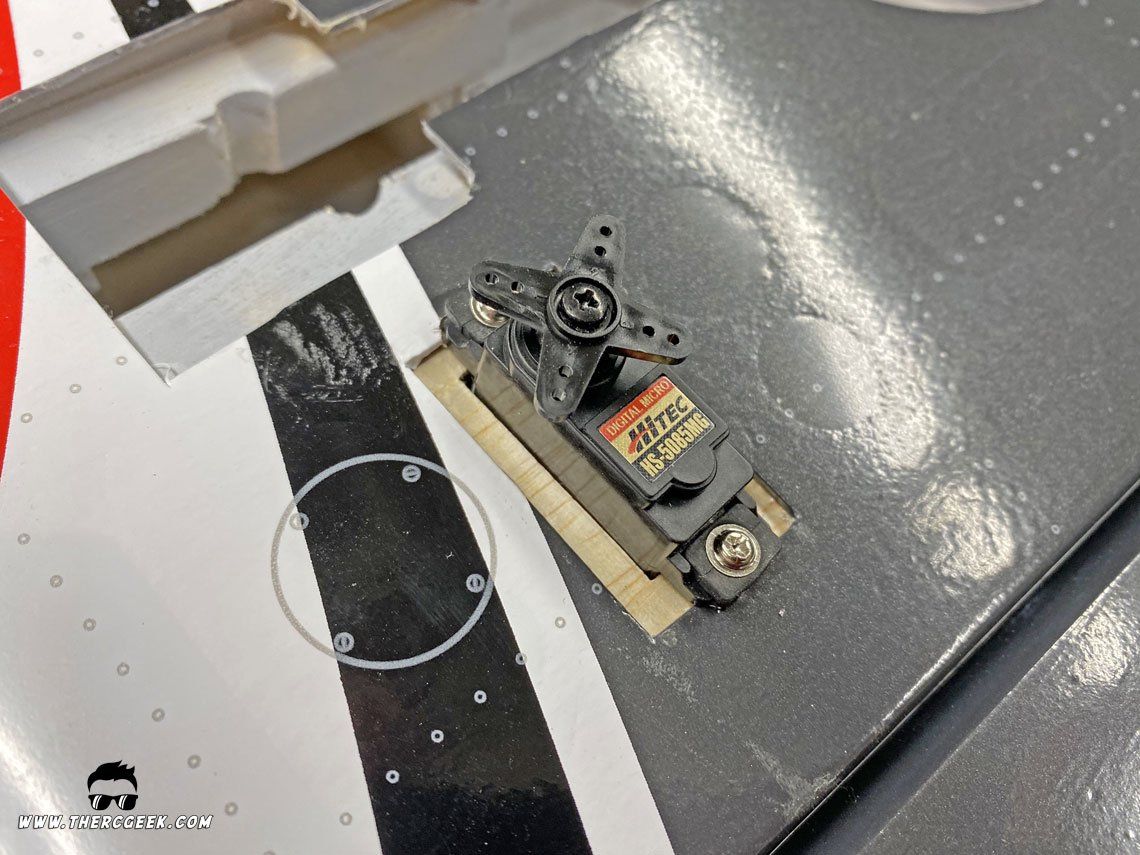
- Ruddervators - Hitec HS5496MH
- Flaps, Ailerons, Steering - Hitec HS5085MG
- Receiver - AR9350 9-Channel AS3X (I had intended to use an AR6610T Smart 6 channel Rx, but due to the vtail, I needed an additional channel to setup the steering)
POWER SYSTEM
- Motor - E-flite Power 52
- Speed Control - Spektrum Avian 100 (a bit of overkill, but it's one I already had)
- Battery - Spektrum Smart 6s 5000 mah
- Propeller - Master Airscrew 12x8
When I first started this, I had intended to use an AR6610T 6 channel Smart receiver. However, once I had the model together, I realized that I needed an additional channel to accommodate the steering with the v-tail setup. So, I ended up using an AR9350 9-Channel which is an AS3X receiver. Though I'm not usually a gyro guy, I thought it would be fun to play with the gyro a little bit in the airplane and it was a good learning experience in setting up AS3X on a non-conventional configuration.


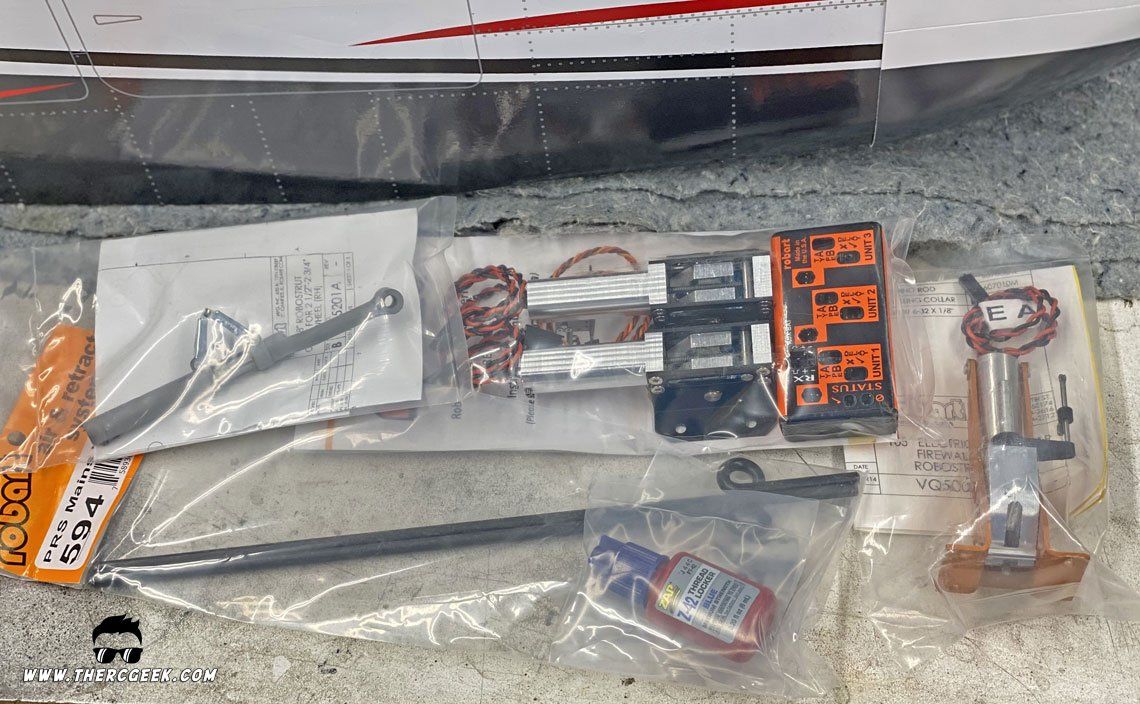
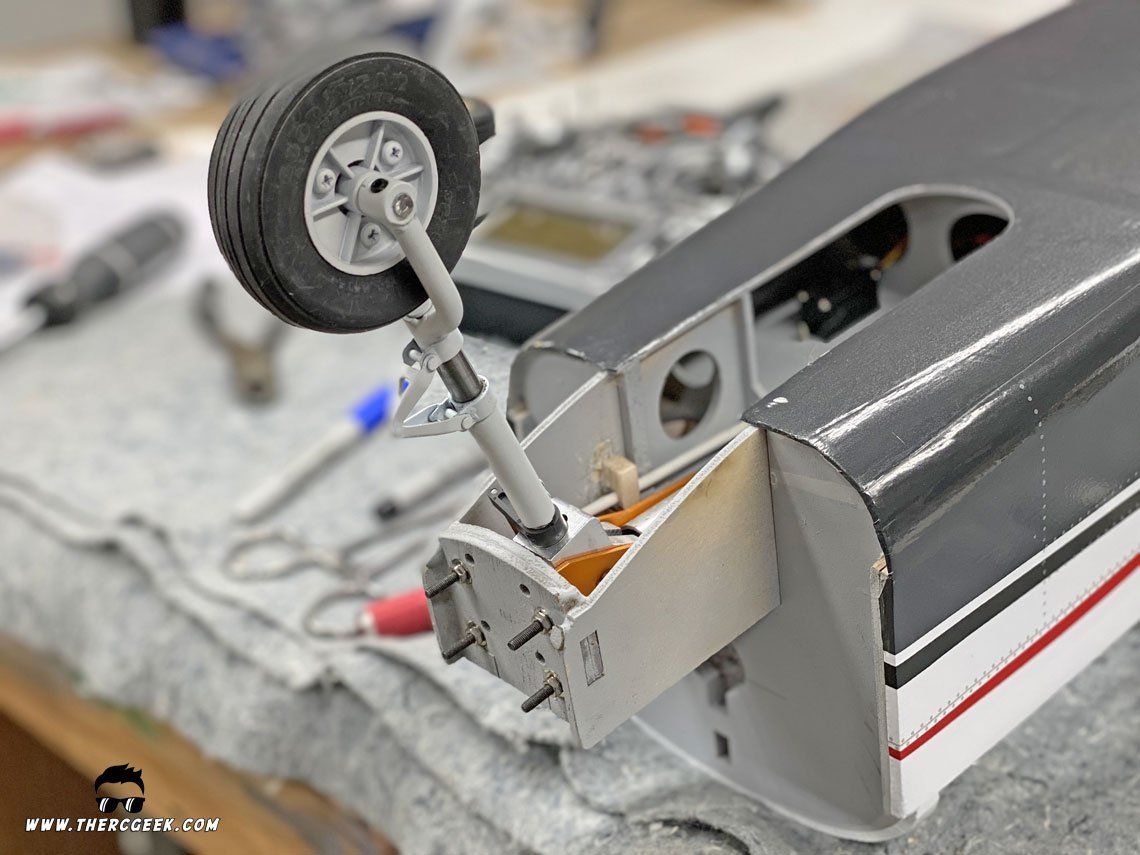
Lastly, the airplane needed retracts and the best option by far are the Robart scale retracts and struts available through VQ Warbirds. They provide a scale looking and very well made solution for the model. The retract set comes with wires for the mains, so I took it one step further and ordered a pair of Robart 650 Robostruts so the mains would be shock absorbing as well. Also, I picked up a Robart 2.5" dia tire for the nose and 3" dia for the mains.
ASSEMBLY
With everything unpacked and unbagged, it's time to get right into the assembly! As a whole, the assembly was quite quick and easy based on the level of pre-fabrication and the simplicity of the model. It really builds into a great looking representation of the Bonanza Vtail once completed!
I generally like to start with the wings first when assembling an ARF (even when building from scratch), so that is where I started, followed by the fuselage work and then wrapping it all up with it together on the bench.
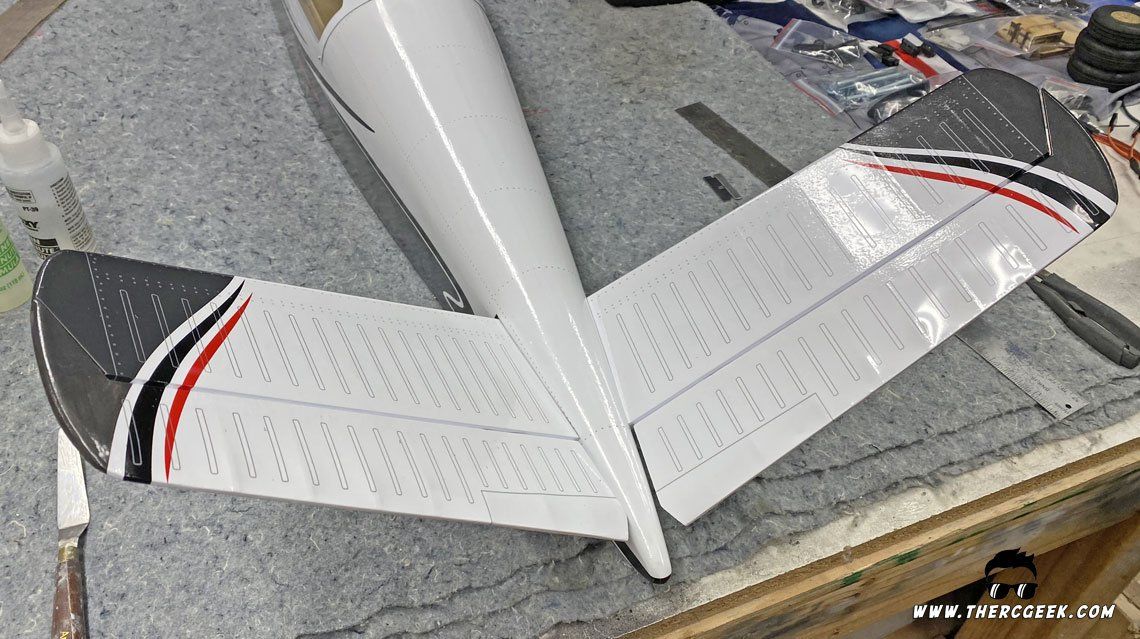
THE WINGS
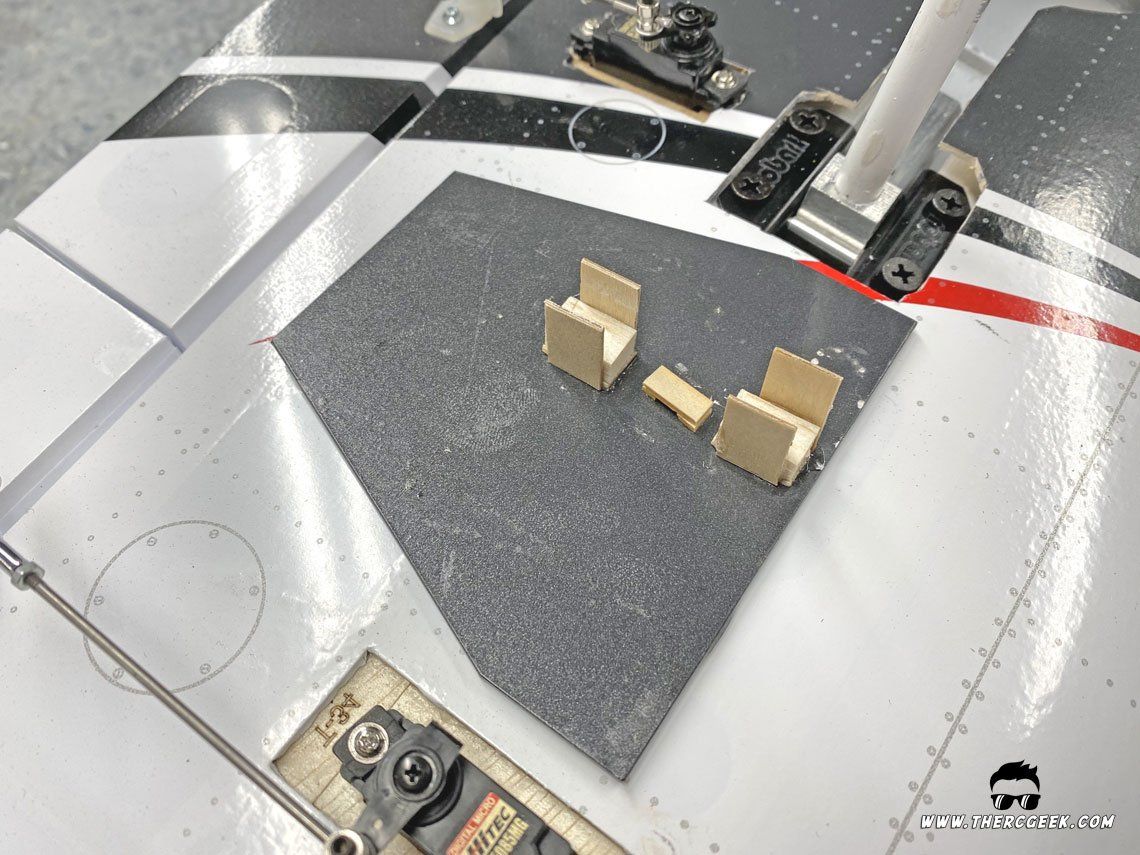
First things first, the servos were installed into each of the Bonanza wings and the control surfaces hooked up. All of the servos are surface mounted, so installing the HS5085MG servos was easy enough to do. In the process however, it was found that there was insufficient material to hold the aileron servos in place. So, to rectify this, I cut and glued a piece of 1/8" light plywood to the underside of each end of the servo aileron mounts to harden up the area and give the mounting screws good bite to hold the servo. For the flap servo installation, this wasn't an issue.

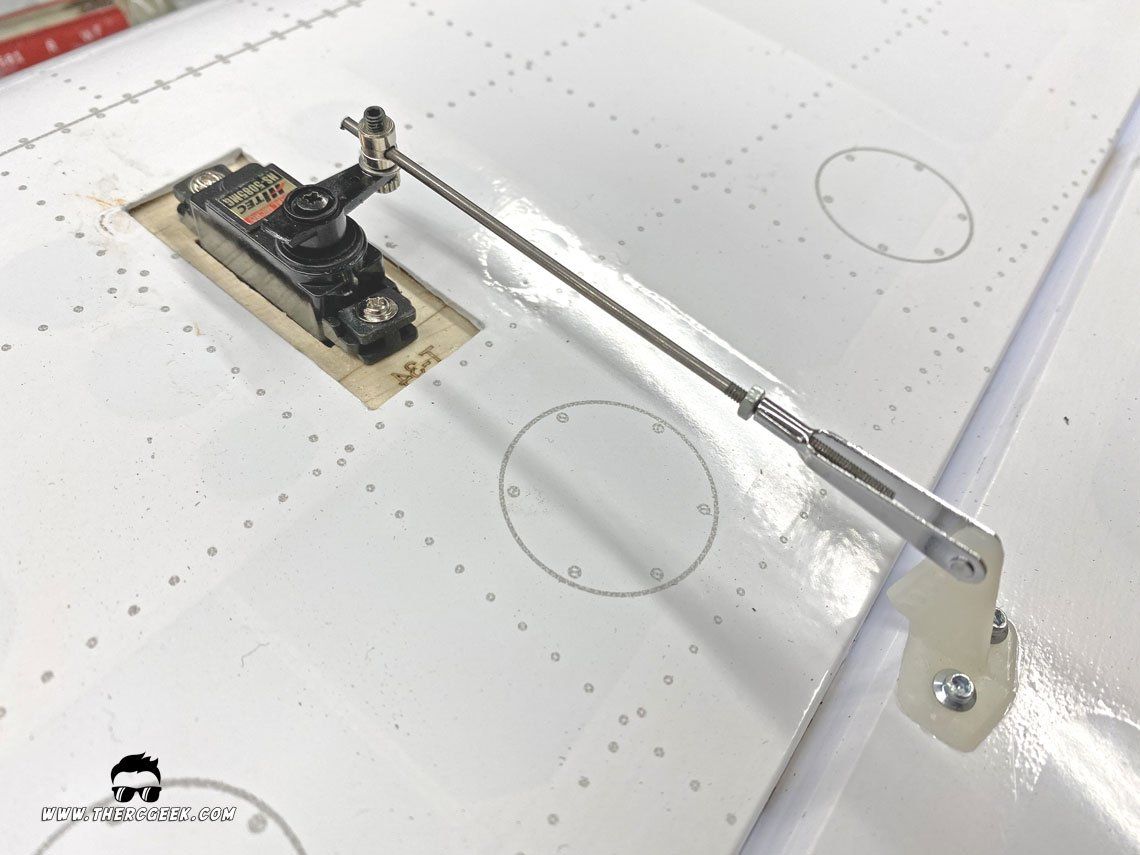
With the servos in, the control horns were installed and the push rods setup. On the control horns, the stock hardware includes the typical two piece capture setup. I'm not a huge fan of this mostly because I want to ensure the integrity of the upper surface. So, I actually use wood screws for the control horns. Once the screws are threaded, I will back them out and wick the holes with thin CA and then put the screws back in place while the CA is still wet. This hardens the threads while also locks the screws in place. I actually do a similar process for fastening the servos as well.
For installing the pushrod hardware, I simply used what was provided in the kit. Though, I usually will go with all Dubro Products for this stuff, I'll be honest, I was a little lazy. All of the hardware provided is all metal which is what I always look for anyhow and with some proper considerations I knew that it would work just fine. The pushrods come with threaded clevis' on one end and the servo attachment is an EZ type of connector. The key is to ensure that everything is held in place well. So, the lower captures on the ez connector I placed a little glue on and then the set screws holding the pushrods I made sure were extremely tight. I plan to go through them all again before the maiden flight just to double check.


THE BONANZA VTAIL
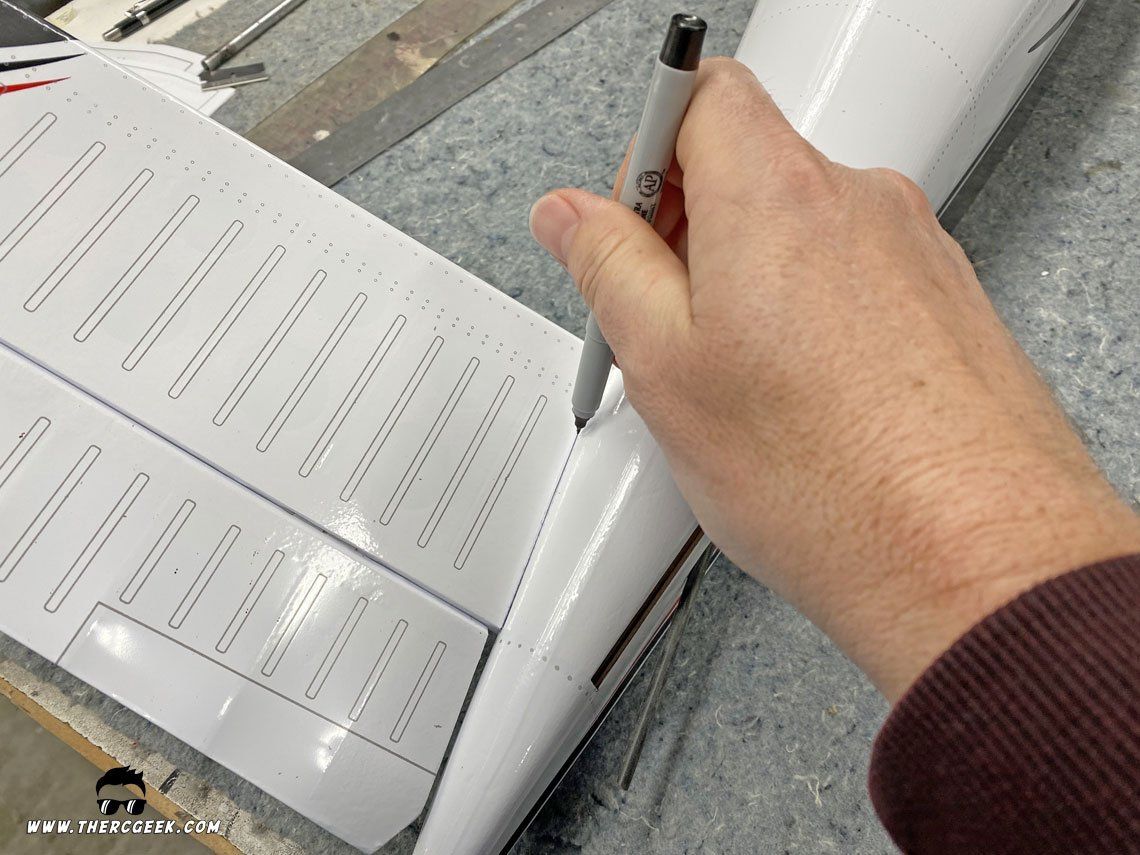
The tail install always starts with a dry fit of the parts to check the fit and understand the installation. From there, the covering material was removed from the interfacing parts with the fuselage (during dry fitting, mark the fuselage line). I use a sharp Xacto knife and simply score the material as you want to avoid cutting into the wood to avoid weakening the structure. Once that was all done, the tails were glued in place with 30 minute epoxy. It's important to allow sufficient working time to ensure that the tails can be checked and set for symmetric alignment. I checked the span dimensions and the tail tip dimensions from the hatch rear corners to make sure the tails were properly aligned. The dihedral is set very effectively by the fuselage, so that doesn't need to be worried about as much.


With the tails in place and fully cured, the ruddervator servos were installed and setup. The control horns were installed on the ruddervators in the same manner as mentioned previously and again the kit hardware was used with the same considerations as mentioned. The HS5496 servos were installed into the servo tray and the clevis' and pushrods installed to connect each individual surface to each individual servo. The radio was setup as "V-tail," which automatically mixes the rudder and elevator channels to provide the combination "ruddervator" function. Note that the instructions show only an elevator function setup using a single servo to drive both elevator surfaces with the second servo used to drive the steering.


RETRACTS, STEERING & GEAR DOORS
The next step was to get the retracts and struts into the airplane to get it sitting on its wheels. The retracts used were the optional electric Robart retracts and scale struts which really provide a great look on the airplane. They can be powered by the receiver, or via a separate 2s lipo battery. I've opted for using a separate 2s 1300 mah battery to isolate the power draw of the retracts from the receiver power. This also provides more voltage to the gear, so they have greater retraction torque as well.
MAIN LANDING GEAR INSTALL & DOORS
The mains were installed in the process of outfitting the wing and were quite simple to get into the airplane. A slight amount of the lower wing sheeting did need to be cleared away around the gear mount to drop the retract into the mount, but that was primarily it.
Once the retract units were in, the main gear struts were fitted. The retract kit came with wire gear for the mains, so I ordered a pair of Robart 650 shock absorbing struts to use in their place. To fit the struts, the tires were installed and the tire was centered in the wheel well. The pivot block location was marked on the strut and then the struts were trimmed using a dremel and a cutoff wheel accounting for the necessary length to mount the strut within the retract pivot block (needs about 1/2" additional length).


For landing gear doors, there are some provided in the kit which were used and work well enough. They are a single piece material of about 3/32" thickness that are covered in a matching material to the model underside which when installed remain attached to the strut and simply rest against the underside of the wing. To set them to the struts, balsa standoffs were made and glued to the doors by lightly tack gluing the standoffs to the strut with the landing gear retracted (the standoffs should be flush the underside of the wing). With the gear retracted, glue was applied to each of the standoffs and the gear doors set in place. Once the glue was cured, the doors were lifted up (balsa lifts from the struts and remain perminently glued to the door). From there, two small rectangular pieces of 1/32" plywood were glued on either side of the standoffs to increase the contact area on the strut. Once made, the doors were glued onto the struts with CA. Lastly, a small channel was made with some 1/32" plywood which was glued to the door and allowed a ziptie to run through it and provide additional holding force for the door against the strut.


NOSE GEAR INSTALL & DOORS
The Robart nose gear is a vertical/firewall mount type which is held in place via 4 bolts and 4 locknuts. The hole pattern requires redrilling in the mount for the Robart retract, so to accomplish this, an extra long 1/16" drill bit was used to drill 4 pilot holes while the retract was held in place in the mount. Once set, the retract was removed and the pilot holes were drilled out to allow for the mounting bolts to slide through. Additionally, the area around the retract motor in the horizontal shelf at the top of the wheel well was dremeled away to avoid any kind of impingement being imparted into the retract (if you find the retract is locking in one position, this is the issue). To finish the installation the retract was mounted in place while double checking the retraction cycle to ensure everything works perfectly without binding as the bolts were tightened.


The Bonanza retract kit comes with a shock absorbing nose strut which is installed over a wire. The wire is preinstalled in the retract, but does need some trimming to get the strut to sit fully. Additionally, flat spots were ground at the location of the set screws to provide a solid, no rotation possible, connection.
To finish up the landing gear installation, I made some nose gear doors using balsawood and fiberglass sheet. To make the doors, I first plotted and created balsawood runners that would set the door contour shape to match the fuselage. Once made, these were glued to a fiberglass sheet that was cut to the desired width and length of both nose doors. 4 total runners were made and glued and then balsa was glued at each end to create a wood perimeter for each door. To finish making the doors, fiberglass sheet was used to cap each of the wood perimeters (significantly stiffens the doors) and then the whole assembly was cut in half longitudinally to create a left and a right door.


Once the doors were made, they were all hinged using a pair of Dubro flat hinges on each door. The hinges were glued into the doors and then were fastened into the airplane after some balsa mounting blocks were glued in place in the wheel well. From there, a small "Z" shaped spring was made for each door from 0.032" wire to spring load the doors open in the down position. Lastly, a bit of braided fishing line was used across the two doors (looped around a screw on one side for adjustment) which is used as a catch for the nose gear doors to be pulled closed by the nose strut as it retracts.


I did a live stream on the Bonanza nose gear setup which goes into greater detail on the door setup and actuation which is available below.
NOSE GEAR STEERING
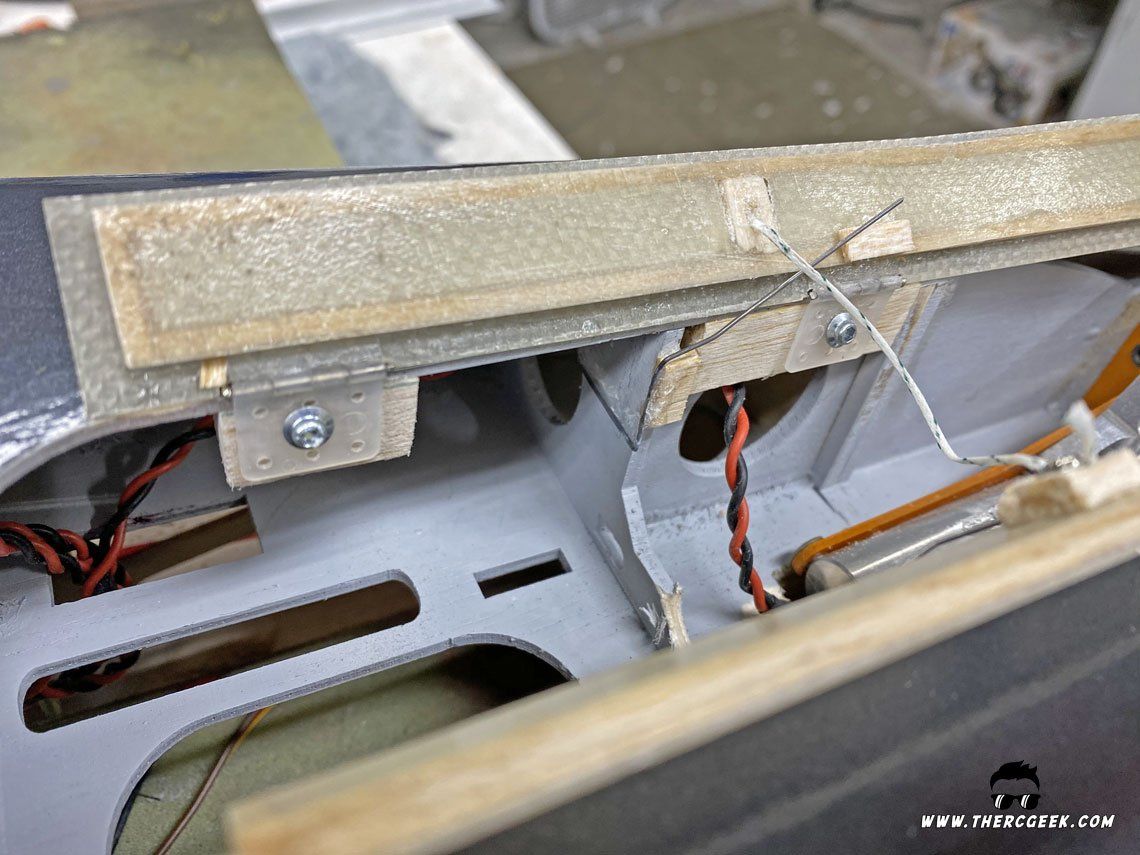
The Robart nose retract comes with a slider bar steering setup which works well enough (though I generally prefer pull-pull). An HS5085MG was installed in the forward hatch area and a pushrod and sleeve fed through the structure down to the steering arm. To ensure minimal slop in the setup, it's important to support the sleeve near the retract to ensure there's no slop or movement that can occur. I accomplished this by gluing a balsa wood block in the wheel well to secure the pushrod sleeve in place.


PROPULSION SYSTEM & COWL
The final item of business to complete the basic assembly of the Bonanza was installation of the propulsion system. I opted for a 6s electric power system on this one using an E-flite Power 52 motor. The motor gets installed onto a wood plate which is in turn installed onto 4 large bolts. The plate gets captured between two nuts which allows the plate to be adjusted to suit the motor and prop adapter used to obtain the necessary spacing for the motor to mate up with the cowl properly. The intention is for the plate to be parallel to the firewall, so I cut a piece of 1/4" square balsawood at the appropriate length to check the spacing all around. One thing to note is to be aware of where the wires are exiting the motor and install the motor in an orientation that avoids these being in the way of the large motor mount bolts (I had to mount the motor twice after discovering this…).


This is another one that I did a live stream on which walks through the whole installation process which is available below.
Once the motor was permanently set, the cowl was installed ensuring the spinner was centered as necessary. The cowl was set, held in place with tape so that 4 holes could be drilled and screws placed. Note that the cowl has an LED landing light in it which I have wired through an LED light controller (also placed it into a 3d printed light bezel I had on hand). Running it straight through the receiver without any kind of resistor in the loop results in burning out the LED. The controller makes it simple. In addition, I have it wired through an electronic switch which is connected through a y-harness to my retracts. This turns the light on with the gear down and off with the gear up.
PUTTING IT ALL TOGETHER
With the Bonanza Vtail completed and on the bench, it really is a great looking model. The covering looks good and it all just cleans up really sweet. To finish getting the model ready for the maiden, a final check of everything was done including all of the servo connectors. The power system was checked to ensure I was getting the expected power. Using a clamp on ammeter, I was seeing about 60-65 amps with the 12x8 prop giving about 1500 watts which was right in the target zone.

The Bonanza controls and CG were set according to the manual with options for a higher and lower rate available on elevator and aileron. Ultimately, the rates will be tuned completely once the model is flown. Interestingly, to obtain the CG, the battery required being placed about as far back in the hatch area as it could realistically go which put it just forward of the CG. A light plywood plate was glued in the appropriate area with velcro and a cable strap to hold the battery in place. Also, the retract controller and retract battery were placed as far back as was practical in the hatch area. This put the CG just forward of the recommendation in the manual, so should be a good starting point.
As previously mentioned regarding the Bonanza Vtail radio setup, the model was setup as a "v-tail" configuration in the radio to take advantage of the ruddervator function. Setting this in the radio automatically takes care of the mixing for the elevator and rudder channels. Everything else (flaps/ailerons, etc.) was set normally. Additionally, to get the steering to work, it was required to plug the steering servo into an additional channel and that channel was assigned as "rudder" in the channel assignment menu. This provided a pure steering function at the nose wheel. Otherwise, if you try and setup the steering with a y-harness to channel 4, it'll move with both rudder and elevator inputs due to the mix.
One additional note is that this particular model has an AR9350 9-Channel AS3X receiver in it. This took some additional considerations in the setup. First of all, the configuration in the physical radio required being set to a standard tail configuration. The v-tail configuration was then set in the receiver using the AS3X phone app and the Bluetooth connection device. Additionally, I thought it would be fun to play with some gyro settings, so I have setup individual gains for elevator and aileron so that I can select them individually via my flight mode switch and then tune them in flight. Once happy with those gains in flight, I will explore and tune the rudder and then setup the switch with them all together while still having the option to turn them all off (always a good thing in my mind). I'm not a huge gyro guy typically, but I thought it would be fun to play with on this one. At some point, I need to put together a discussion on gyro tuning and setup I think.
FINAL THOUGHTS
At last, there we have the VQ Warbirds Beechcraft Bonanza Vtail assembly. This is a really sweet looking model that fits together great and is a really fun and straight forward assembly. Now to get out to the field and get her flown! I've not flown too many vtails, so I'm really looking forward to it…plus, I can only make airplane noises while rolling the airplane around in my garage for so long… Until next time, I'll see you at the field!
The RC Geek Blog is your place to learn about all aspects of the RC hobby. Learn to build, design, drive or fly that RC project you’ve always wanted to build, but have been intimidated to try. This blog is here to help you on your journey and provide tips and tricks as you go! My hope is to inspire builders both experienced and new! So, welcome, please look around, it’s an exciting beginning! I’m currently documenting my latest competition scale RC jet build, a Mark Frankel F4D Skyray, along with some other fun tips and videos. If you can’t find what you’re looking for on this front page, click on any of the categories to the right and it will show just posts related to those categories. Please feel free to add comments and/or contact me directly if you have questions, I’m here to help! And don’t forget to check out my YouTube Channel, I post new videos every week!
Subscribe To Our Blog Now