The RC Geek Blog
By: Chris Wolfe
Cruisin' into town and looking all around…in my Spad…
Having grown up in the hobby, there are certain models that I recall seeing as a kid that have inspired a fascination for that aircraft well into adulthood. One such aircraft for me is the A-1 Skyraider. Having seen two immaculate representations with folding wings at the US Scale Masters in the late 80s/early 90s (built by Diego Lopez & Gene Barton), it started a long fascination with the Skyraider for me. There was something about the airplane that I just liked and having since seen the full scale Skyraider fly, they are an impressive beast! Being a piston driven attack aircraft in the jet age, the Skyraider was a flying anachronism and was affectionately nicknamed the “Spad” after the WWI French biplane.
So, needless to say I was very excited to see the Legend Hobby A-1 Skyraider came to market! At 1/7 scale sporting an 86” wingspan, it offers a very nice sized ARF with an accurate scale outline. It also includes some really nice details through a fully detailed cockpit and an assortment of external tanks and rockets. A Skyraider isn’t a Skyraider without external stores afterall! Additionally, each of the three external tanks pylons come setup to accept E-flite payload releases which means the external tanks can be made droppable very simply. So, with a little 3D printing the sky’s the limit as to what this model can and will carry! More on that to come as for this article, we're talking through the assembly of the model. I have a full repaint planned which we'll talk through next where I'll touch on the stores mods I made and then we'll finish it up with a full flight review…but, spoiler alert, this model flies incredible! (see my first flights video at the bottom of this article)
ABOUT THE MODEL
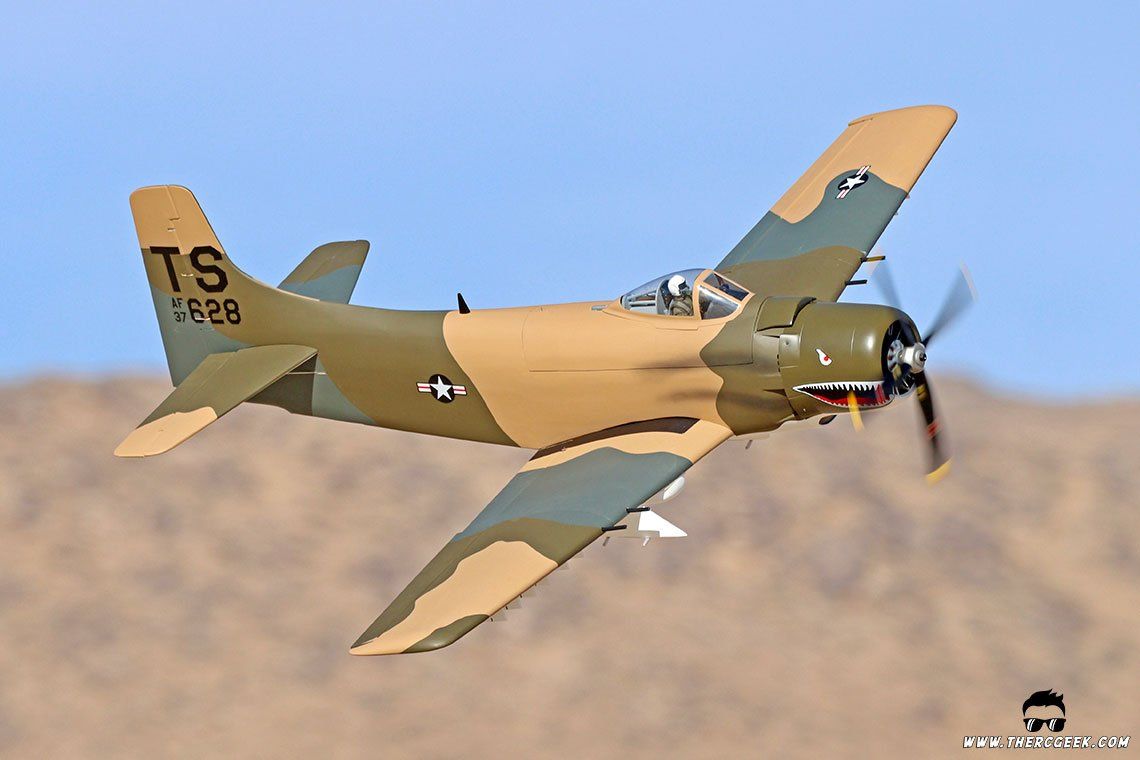
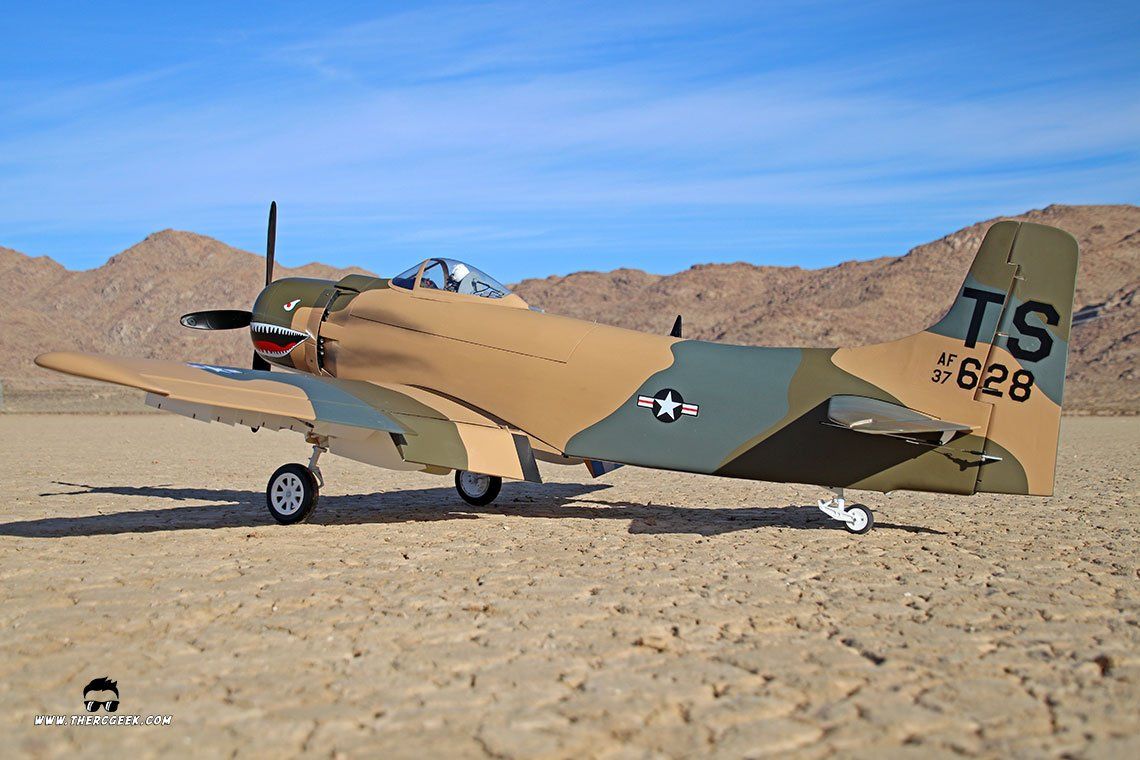
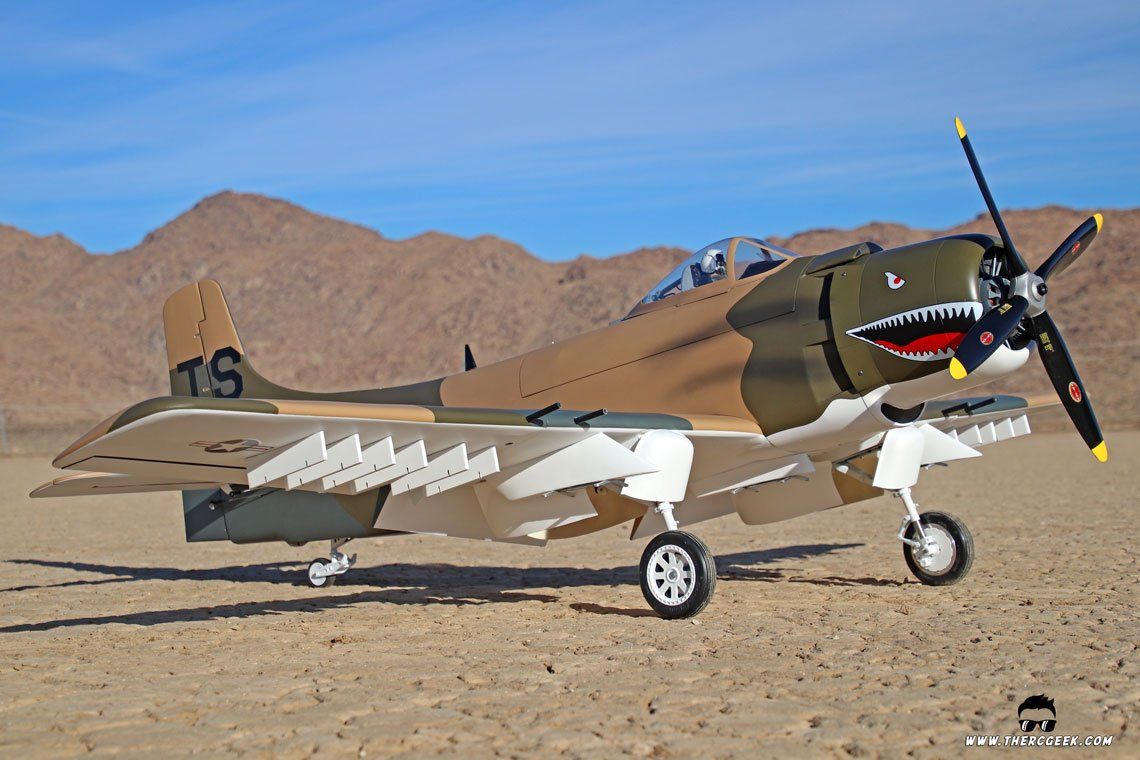
The Legend Hobby Skyraider kit comes available in multiple color schemes (US Navy Gray/White, US Navy Blue, AF Camo) without any markings applied or as an ARC. Of course, markings are included, but coming as a blank canvas, this also allows for full customization and there are so many great color schemes for the Skyraider to choose from! This particular model is the Southeast Asia camouflage ARF and was dressed in the kit supplied markings for the initial flights. Having a very unique and characteristic shark mouth, the model represents Skyraider BuNo 137628 which was assigned to the 22nd Special Operations Squadron (SOS), 56th Special Operations Wing (SOW) that flew from Operating Location Alpha-Alpha (OL-AA) at Da Nang, South Vietnam.


In the process of assembling the Skyraider, I decided to go with Hitec digital D645 servos for all of the primary surfaces and analog HS-645MGs for the remainder. The HS-645MG servos are plenty sufficient for the entire model, but I wanted to higher resolution and programmability for the primary controls. Additionally, instead of the kit supplied hardware, Du-Bro 4-40 hardware was purchased and used throughout. Here's the full run down on equipment used in the model.
- 86" A-1 Skyraider ► https://bit.ly/A1Skyraider
- Retracts ► https://bit.ly/SkrdrGear
- Motor ► https://bit.ly/Scr5535-160
- ESC ► https://bit.ly/CC160HV
- Flt Battery ► https://bit.ly/Smt6s7000
- Prop ► https://bit.ly/Biela20x14
- Receiver ► https://bit.ly/SpkAR20310
- Rx Batteries ► https://bit.ly/Life3000
- Transmitter ► https://bit.ly/SpktmiX20
- Servos ► https://bit.ly/HtcD645
- E-flite Payload Release ► http://bit.ly/Efl405
- Pilot Head Controller ► https://thercgeek.com/RSMG
- Markings ► 22nd Special Operations Squadron, 56th Special Operations Wing (kit supplied)
CONTROL SURFACE HINGING
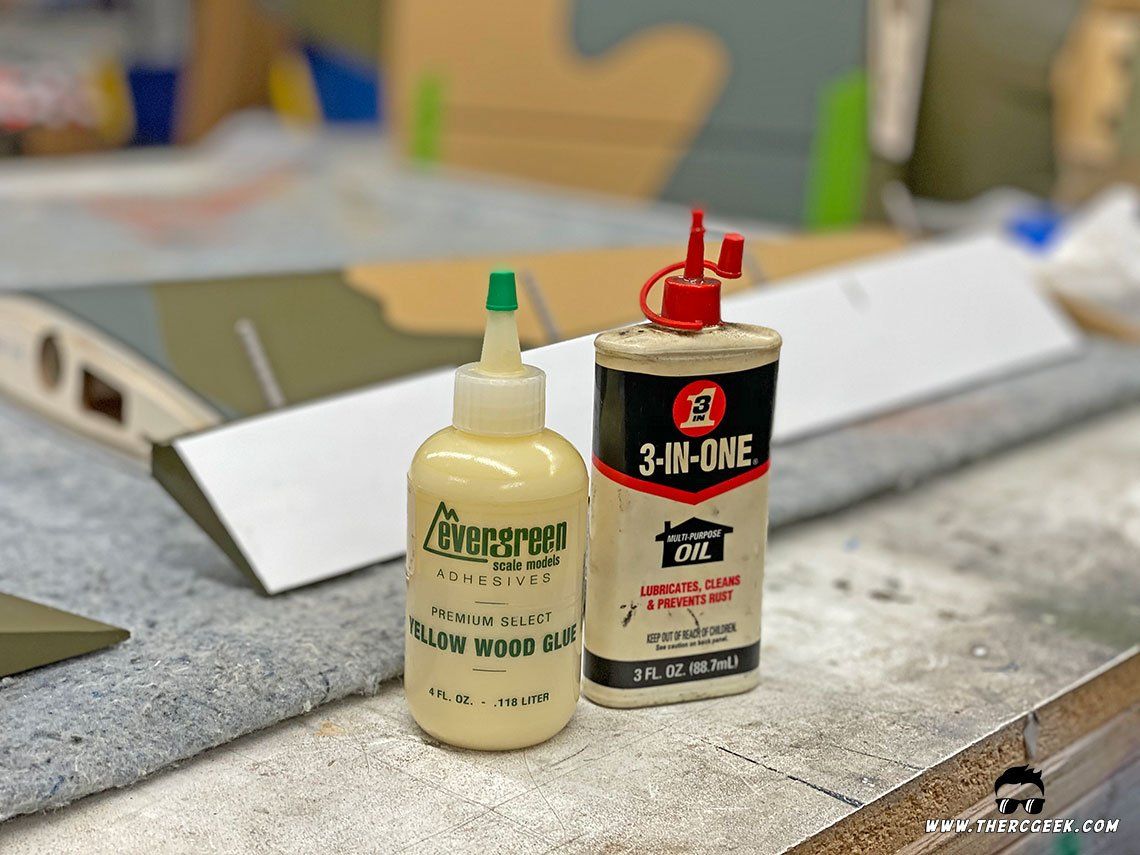
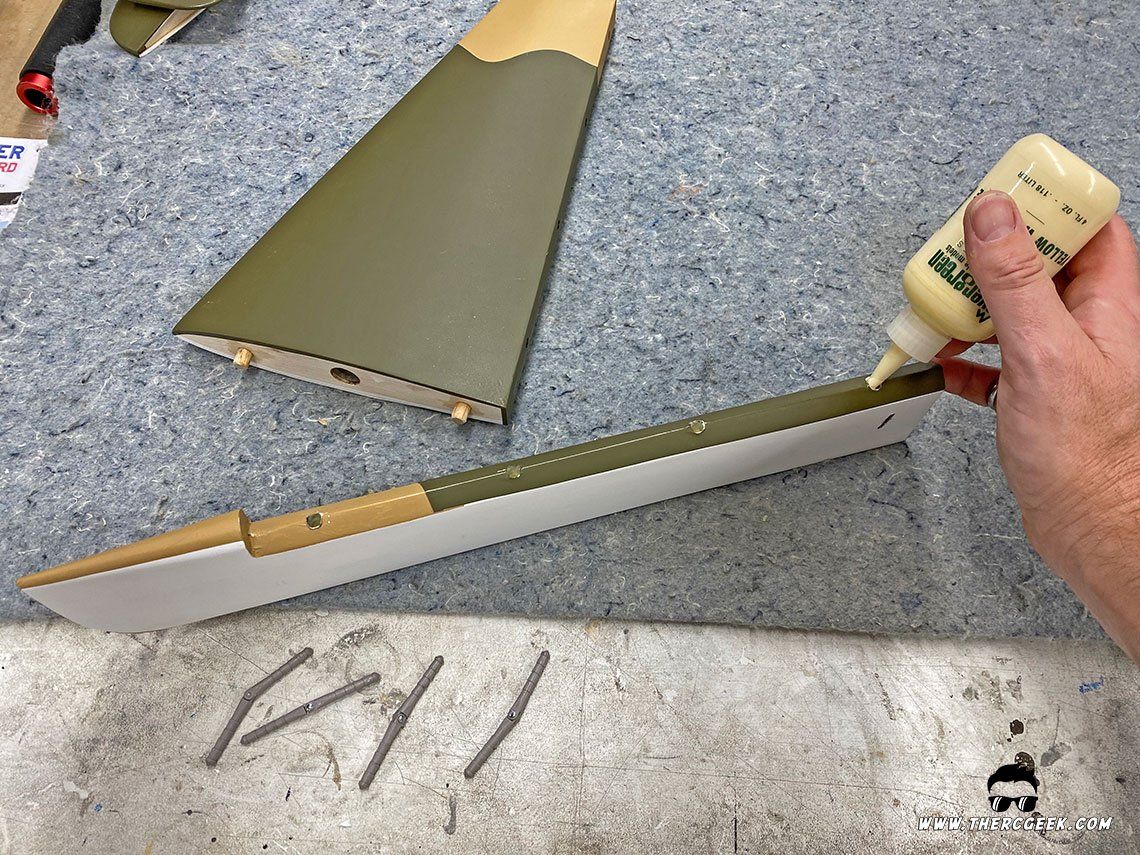
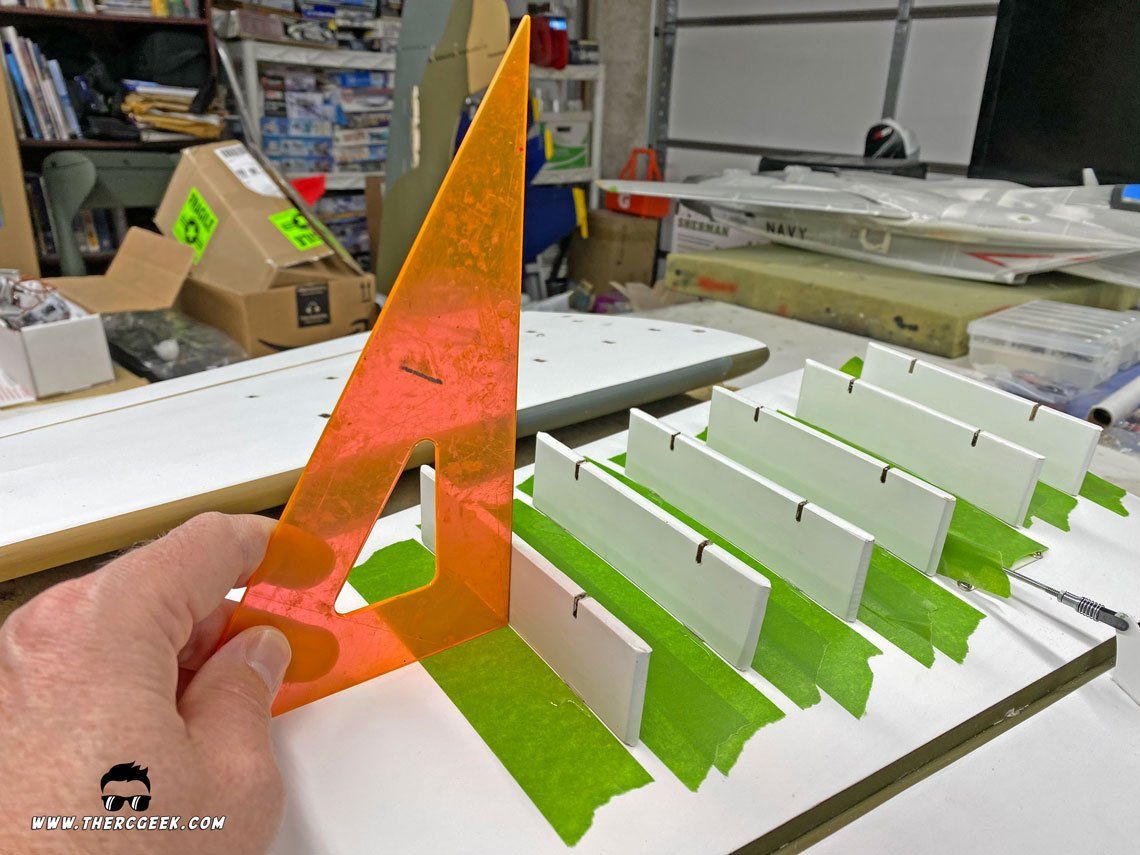
Assembly begins with gluing hinges into all of the control surfaces. The kit comes with Robart style hinge points and to glue these, I like to use a good quality wood glue (eg. Titebond alphatic resin). This allows a ton of working time to get the hinges set as desired. This is especially helpful when you're doing scale centerpoint hinging. In gluing the hinges, the hinge points were first oiled with 3 in 1 oil and then glued into each of the control surface first. Glue was squeezed into each of the hinge holes in the surface and on the hinges as well and the hinges were placed. Holding the hinges with a sanding block against the edge of my work bench, the alignment of each hinge was checked by moving the surface up and down. When satisfied, the surfaces were set aside to dry hinge side down to ensure the glue runs towards the glue interface. Once dried, everything was checked and then the surfaces were glued into the main flying surfaces (wings & tails) in the same manner.


WING ASSEMBLY
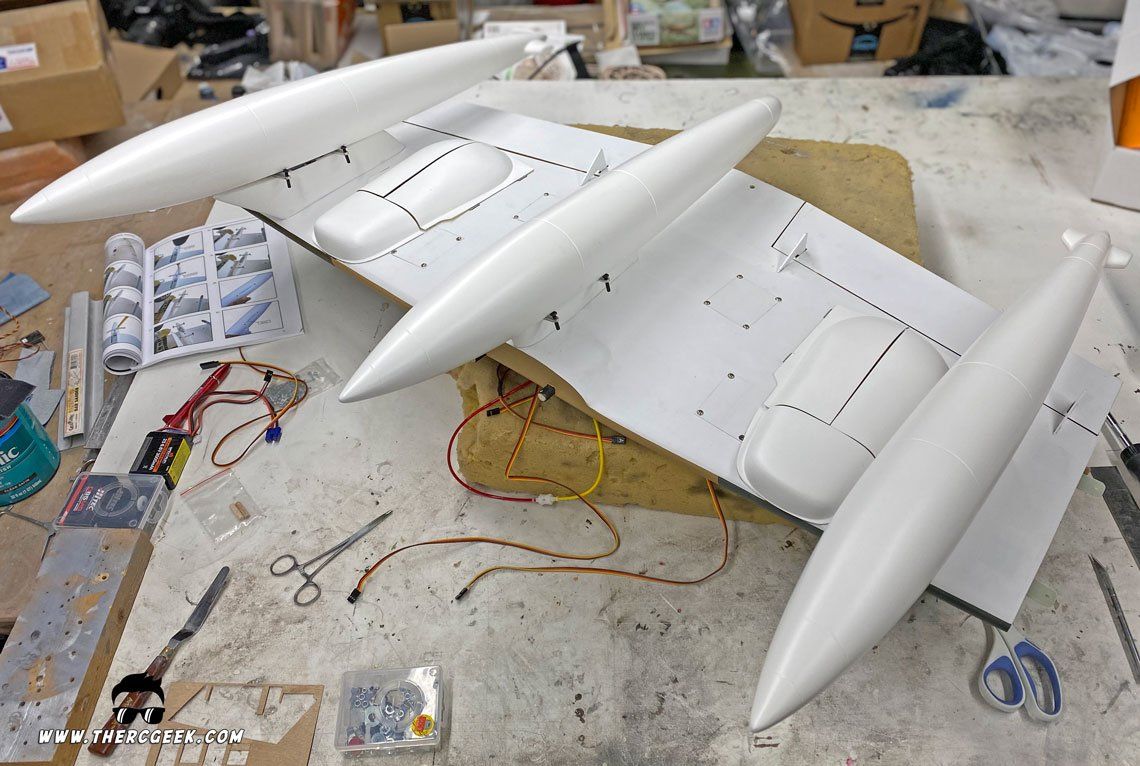
Assembly of the Skyraider starts with the wings and there's definitely a bit of work there. The wing center-section was tackled first (flaps, retracts, pylons) followed by the outboard wing sections (ailerons and pylons). The model features droppable wing tanks and rockets on the outboard pylons. For assembly, the tanks were setup, but when the repaint comes, the intention is to also 3D print a full weapons load as well that's representative of the subject model. As a result, the rockets weren't installed.
FLAPS AND AILERONS
The flaps feature an internal linkage which is a nice touch. A Hitec HS-645MG was installed which fit perfectly into the mount in combination with a Du-Bro 4-40 pushrod. The pushrod was connected to the servo and the servo inserted into the wing and then the clevis was connected to the flap. Note that I found in the process of setting up the wing, removing the flap servo hatch provided great access for routing wires and air line tubing.


For the ailerons, a Hitec D645 servo was used in combination with a Du-Bro 4-40 pushrod. The nice thing is that once the outoard pylons are installed, the external linkage is hidden pretty well.


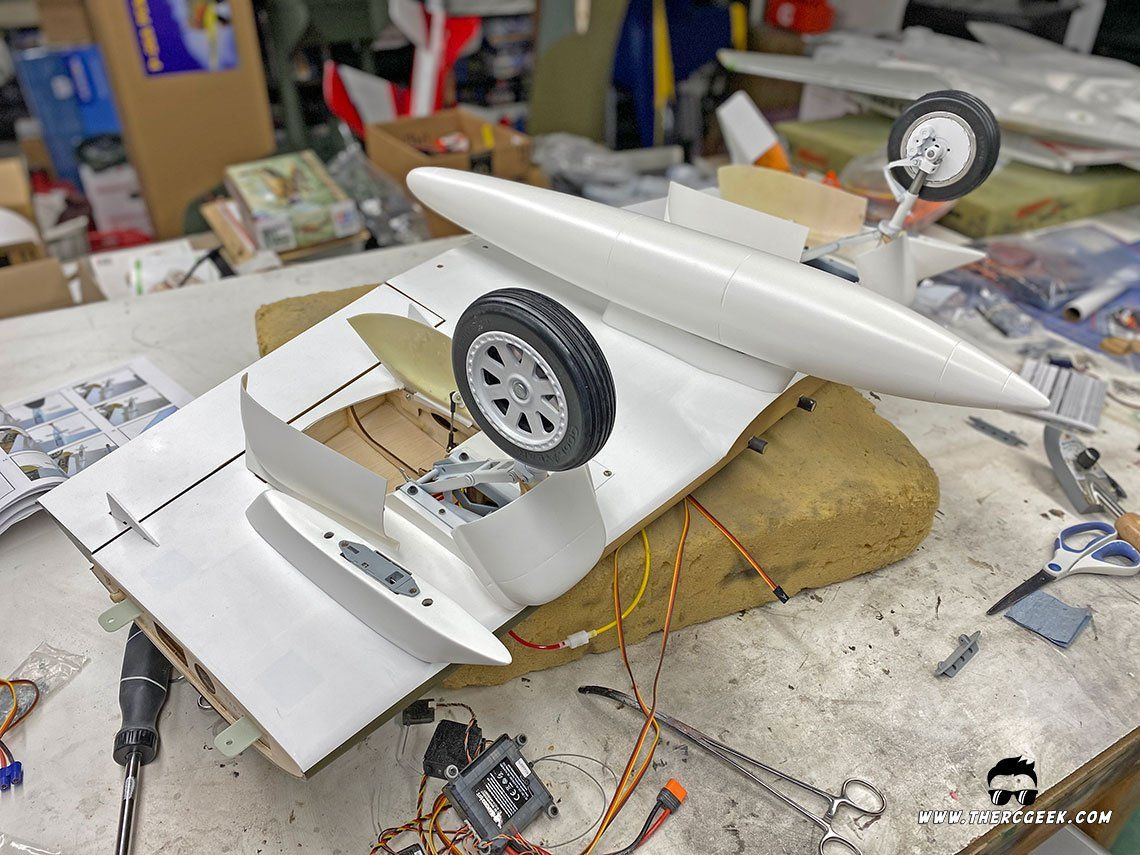
AIR RETRACTS
For a project of this size, reliable gear are essential and I can say that I've had greater reliability with air retracts than electric, so I went for the Robart Air Retracts on this project. Installation starts with installing the air line onto the barbs of the retract cylinders. To do so, 3 in 1 oil is used at each connection to lubricate and seal the system as it goes together. The retracts themselves drop right into place and are held with 6 kit supplied bolts.
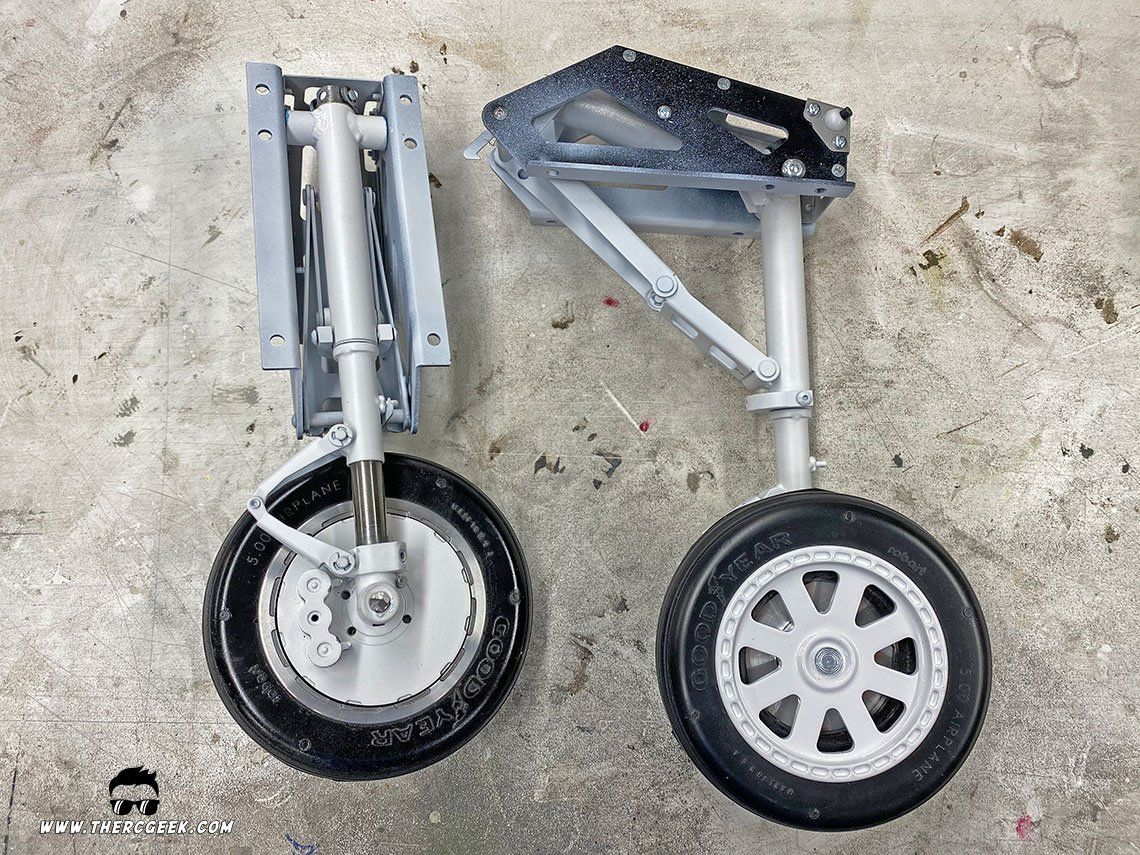
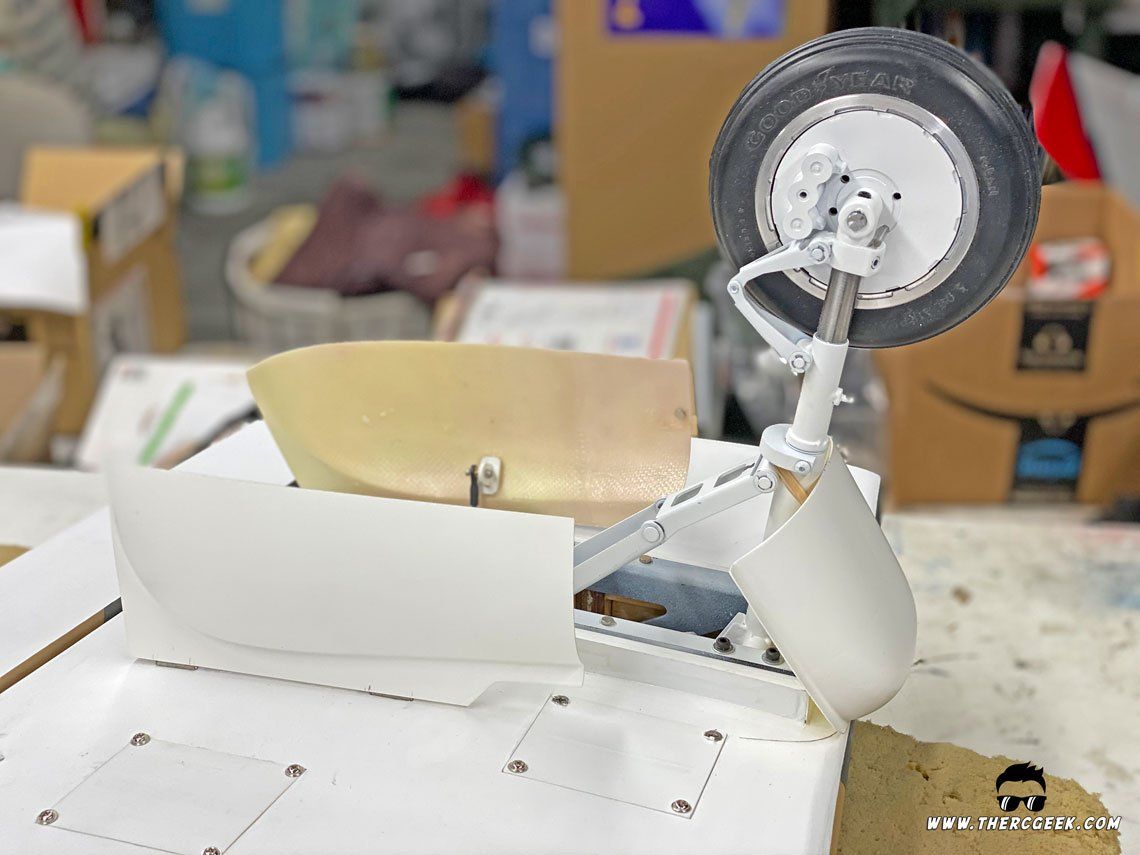
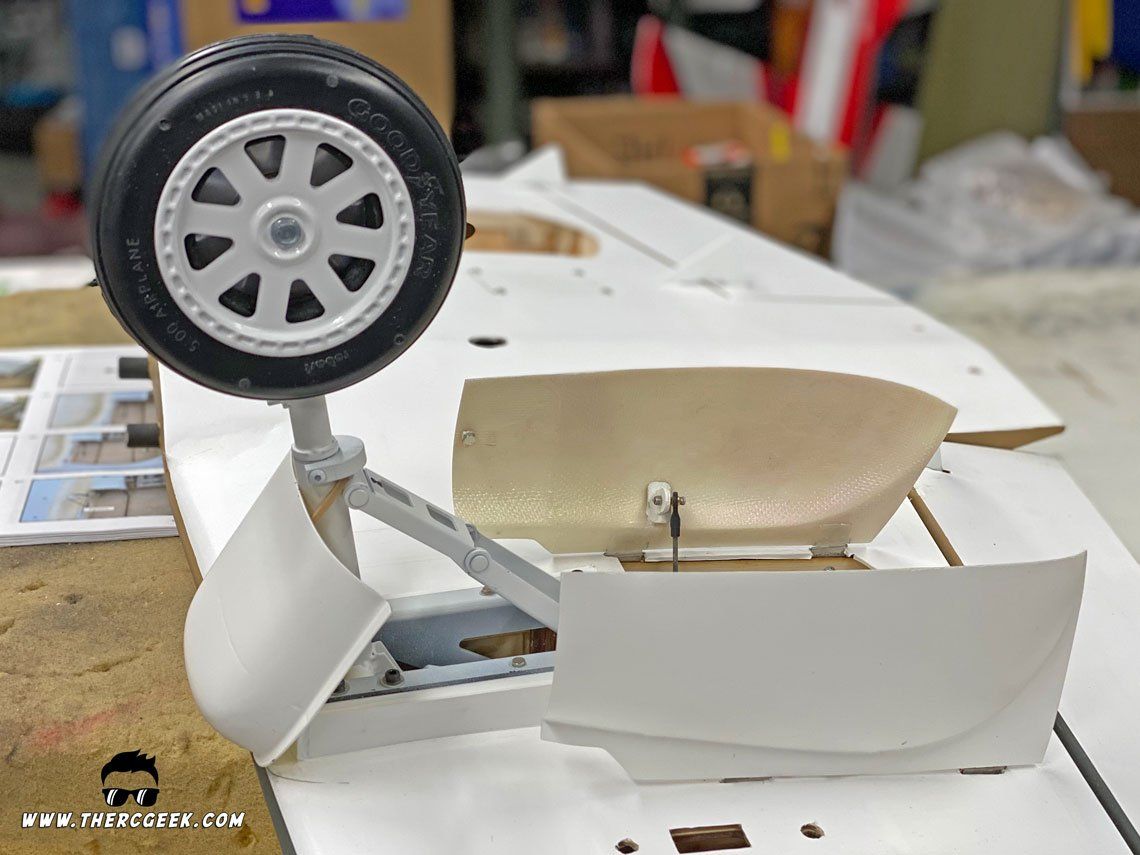
Additionally, the retracts come with some really nice scale tires. There are scale brake rotors machined into the inner wheel and there is an anti-rotation pin that needs to be installed which was lightly hammered into place. Note that the anti-rotation pin should be flush to the inside of the wheel cover, otherwise it will bind. Lastly, the tire was placed onto the strut and the axle pin was cut to length. Note that it's important to put a flat spot onto the axle for the retaining set screw so that it has a nice tight grip.
LANDING GEAR DOORS
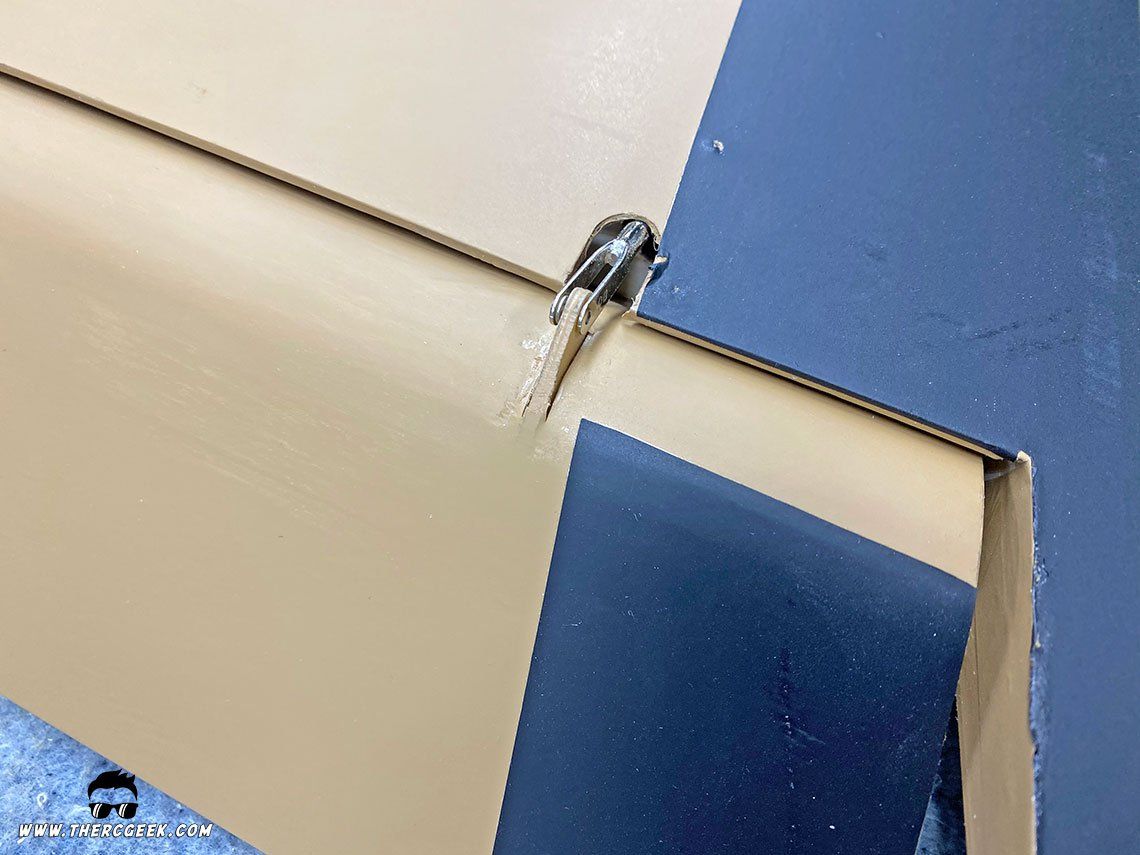
The Skyraider kit comes with a full complement of landing gear doors which is a welcome addition to the kit. The first step is to get the forward strut door installed. This was done by using a Du-Bro flat hinge once the door location is sorted out (spend time sorting the placement before gluing and cutting anything). The hinge was CA'd to the door itself (be sure to oil the hinge point first!) and using an Xacto knife, a slot was cut into the wing leading edge to receive the other hinge half. Lastly, the hinge was glued into the wing with 5-minute epoxy which completed the front door installation. To pull the door closed, two small hooks were glued to the back of the door and a rubber band was looped around the strut. This made it really simple to pull the door closed and provides solid closing force on the door.
For the main doors, there are four slots in the wing for each door hinge. Similarly to the strut door, Du-Bro flat hinges were glued to the doors with CA once the placement of the doors was sorted (again, spend time working out the placement before gluing and cutting. Also, some sanding and custom fitting may be required). From there, the door hinges were inserted into the slots and a 1/16" hole was drilled through each and wood screws were used to hold the door hinges into the wing making the doors removable if ever necessary.


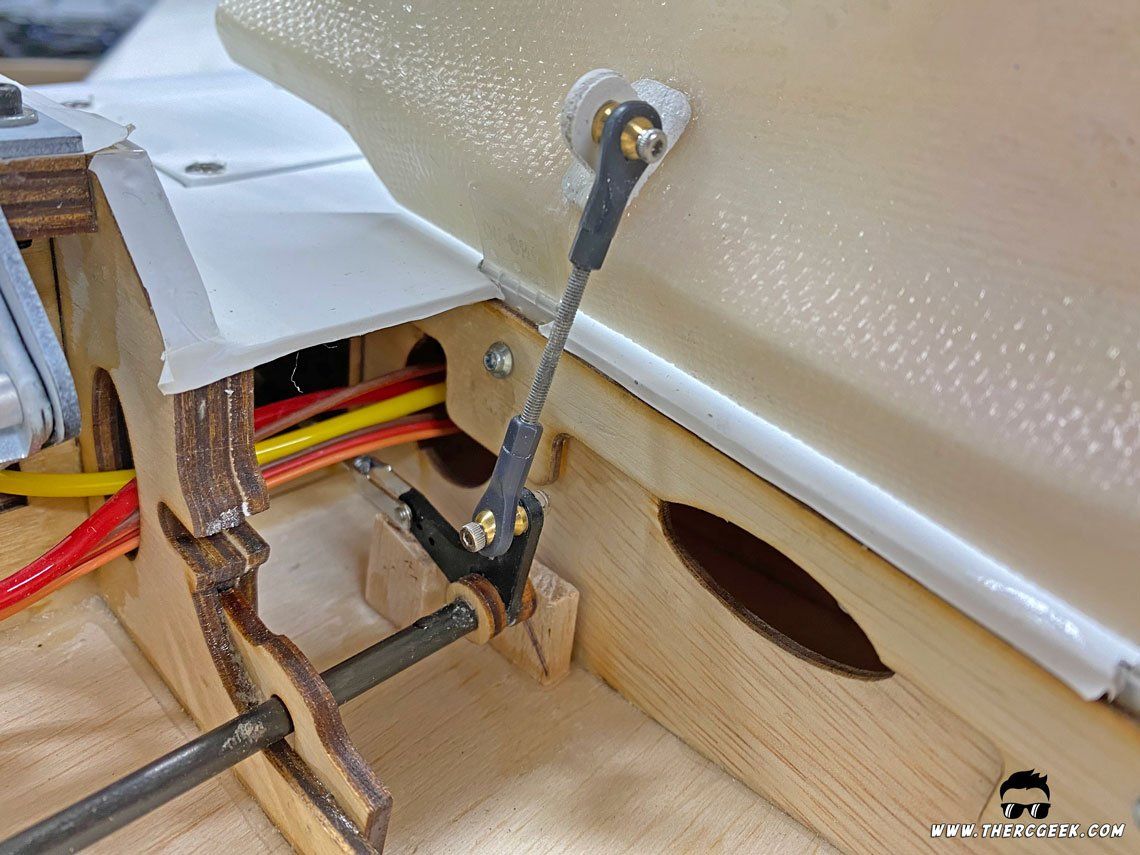
The doors are actuated via a single servo which drives a carbon torque rod that has two bellcranks glued to each end. Ensure when gluing the bellcranks that they are symmetrical left to right. I did modify the placement of the torque rod placing it to the floor of the wheel well compared to the instructions because if you are using the electric retracts, the placement shown results in an interference. The kit supplied wood parts were used to hold the torque rod in place and balsa wood parts were glued at each end to act as stoppers to keep the torque rod from sliding left to right. Lastly, door push rods and control horns were installed. There are ball-links at each end and it is best to ensure that everything is aligned well vertically when installing. It's important to spend time getting the push rod lengths set and work out the geometry for best leverage. Once everything was hooked up and working, a heat gun was used to heat the fiberglass up to be able to form it for a better fit as necessary. Additionally, two small magnets were installed at the leading edge of each door to help hold it closed in flight.

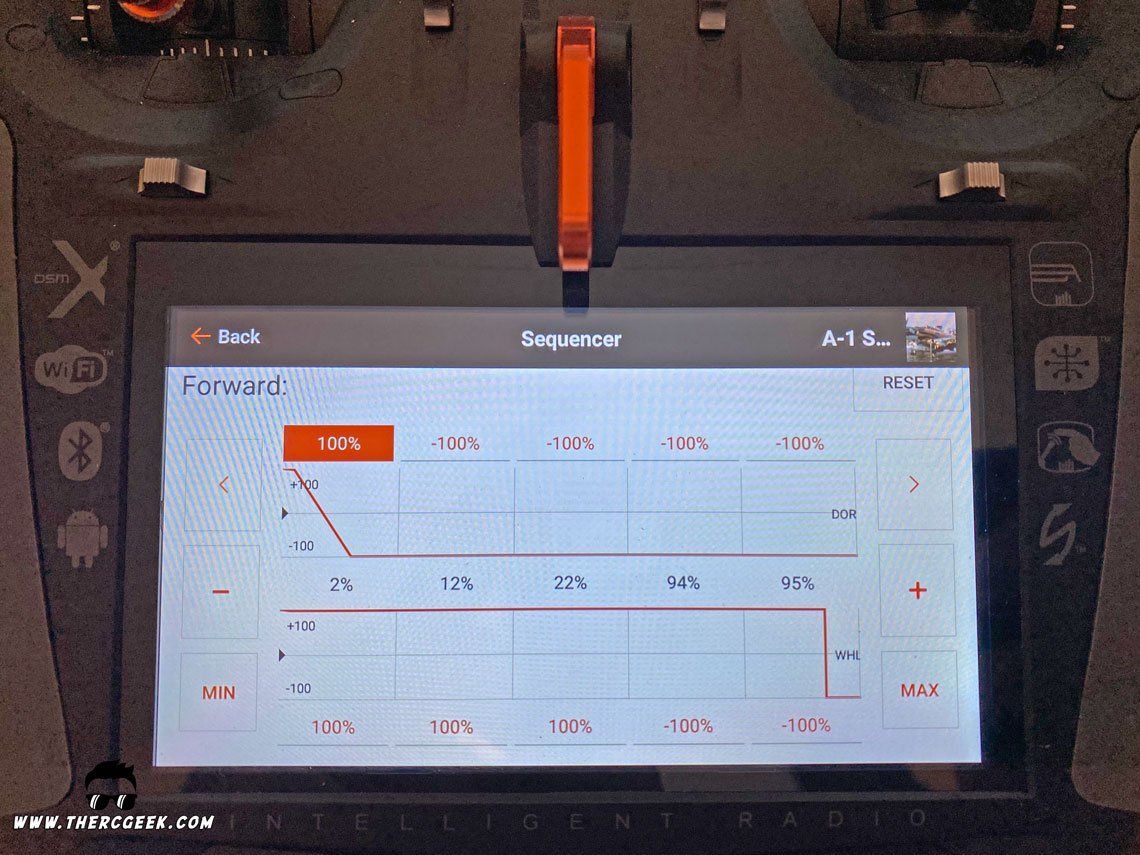
For the gear door sequencing, the built in landing gear sequencer was used in the ix20 radio. This provides full programmability which is extremely nice. Each gear door was plugged into a separate channel in the receiver (mostly so that one side can be reversed) and the timing was adjusted within the radio. Upon retraction the retract valve actuates immediately and the gear doors close after a 7 second delay. Upon extension, the doors open immediately upon with a 2 second delay for when the retract valve actuates.
FINAL RETRACT SETUP
During the fuselage assembly, to finish off the retract installation, the tail wheel was installed along with the air valve and all of the final connections in the fuselage. The tail wheel is a vertical wall mount type of setup and drops right into place being held in place via 4 bolts.
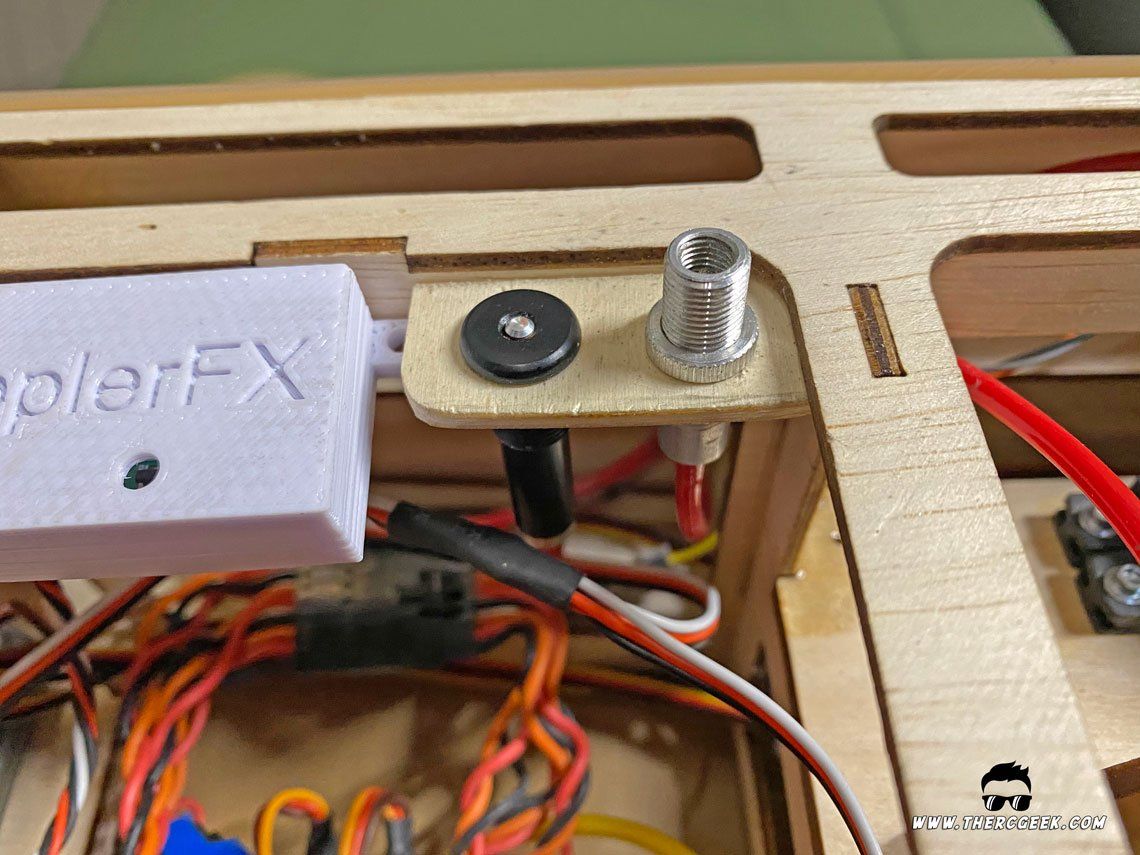
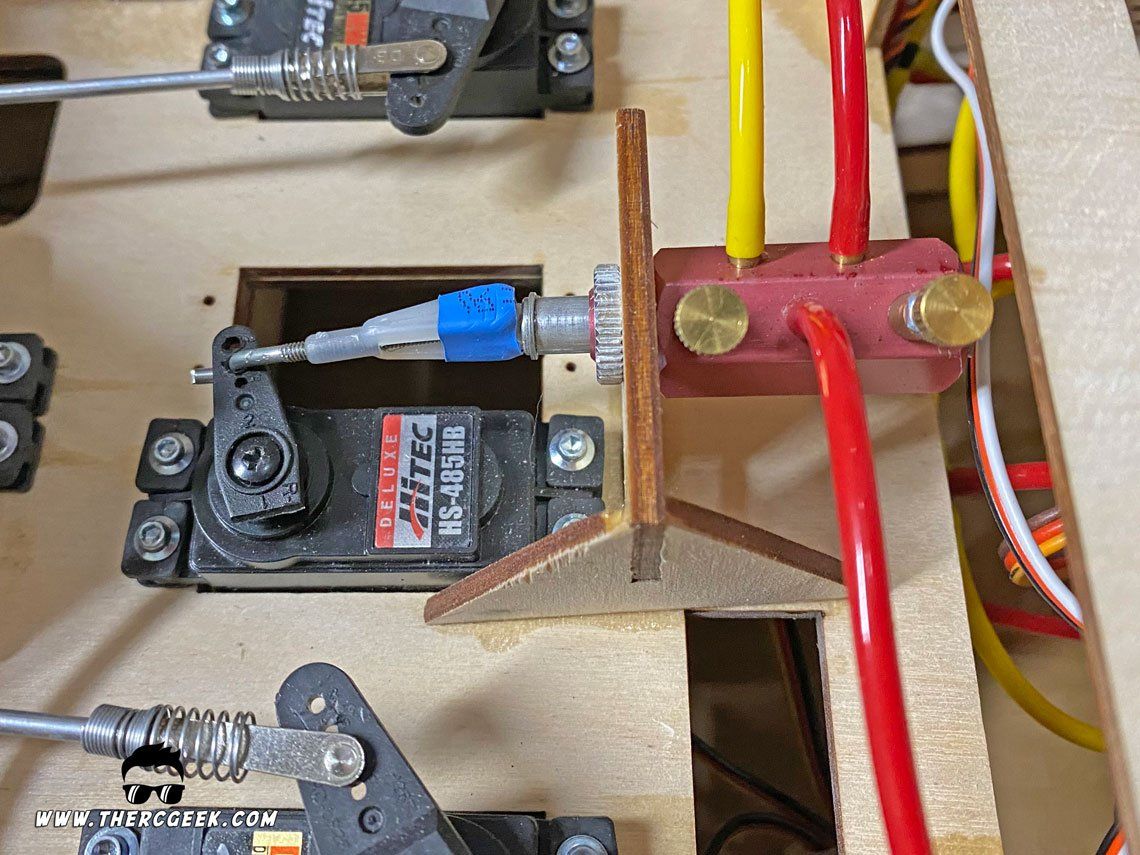
Lastly, the air valve was installed and the final timing of the gear doors was set. A Hitec HS-485HB servo was installed in an open servo slot in the fuselage in the area of the elevator and rudder servos. From there, the kit supplied wood mount was used to mount the valve and was glued in place. The servo requires very little travel to actuate the valve, so keep that in mind when setting it up. Additionally, the air fill valve along with a pressure gauge were installed for ease of access in the hatch area. Note that 3 in 1 oil was used to lubricate and seal every barb connection in the air system. This is extremely important as once the system was complete, it holds air literally for weeks if not longer!

PYLONS & EXTERNAL TANKS
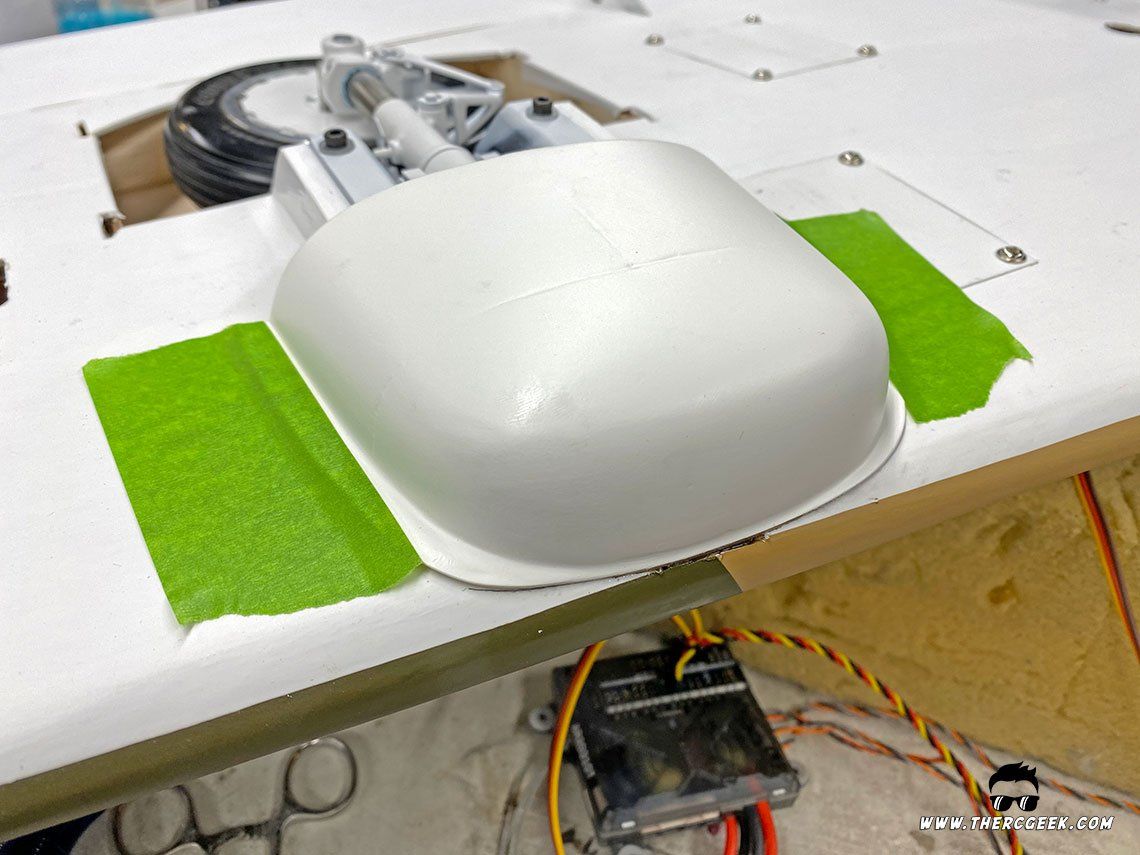
To finish off the wing assembly, the kit provided external pylons and external fuel tanks were installed. The wing center section pylons are glued to the wing and are rigid mounted by a pair of 1/4" dowels which were first glued into the pylons with slow CA. Additionally, E-flite payload releases were installed into each (they're setup for this out of the box). The pylons out of the box didn't completely match the underside wing contour and so that was remedied using some light weight bondo material (USC Icing). The preparation started by placing some green Frog Tape on the wing underside surface at the pylon locations. On top of that, some clear packing tape was applied as bondo doesn't stick to packing tape. The pylons were set in place and aligned as desired and bondo was squished into all of the open gaps between the wing and the pylon intersection. Once the bondo was cured, the pylons were lifted up, the bondo was sanded flush all around with 180 grit sand paper and then the paint was touched up using Tamiya fine surface primer. Once completed, the pylons were glued in place with 5 minute epoxy.


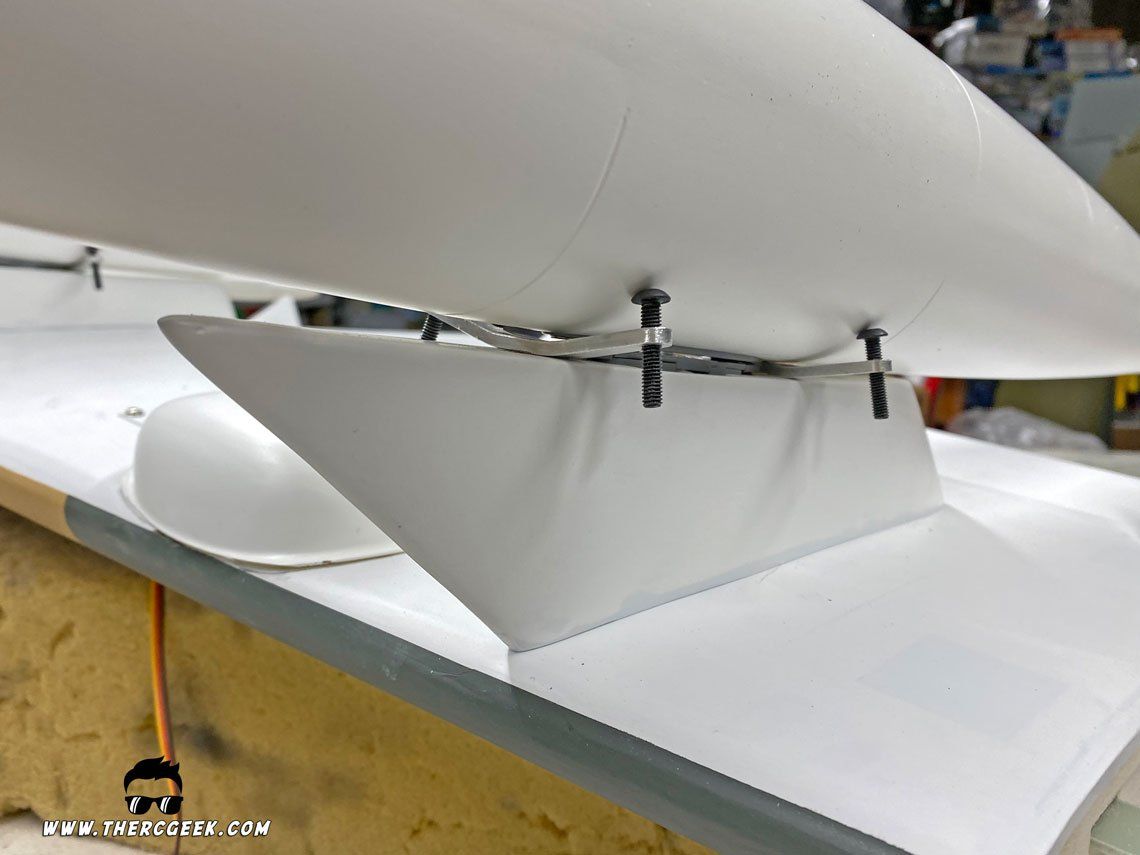
With the wing center section pylons in place, the sway braces were installed per the instructions and then bent to an angle quasi matching the tank contour. The are threaded for 4mm button head bolts which are used to lock the tanks in place to keep them from swaying in flight. A 4mm lock nut is threaded to the back side which keeps the bolt in place and also helps avoid over tightening. It's important not to impart too much force into the payload release to avoid undue stress that could cause it to fail. The preload on the tanks should be just enough to keep the tank secure, but not so much that it interferes with the payload release. So, adjust the lock nuts accordingly to avoid this from happening.


To finish it all up, the outboard wing pylons were installed. The wing was masked off with Frog Tape to protect the finish and the pylons were all glued in with 5 minute epoxy installing them 2-3 at a time. They are setup for rockets which were provided, but I didn't install them with the intention of adding some 3d printed bombs during the repaint process.

FUSELAGE ASSEMBLY
The Skyraider fuselage assembly went quite a bit quicker than the wing as there's generally less tedious work to be completed. The rudder and elevator servos were installed first followed by completion of the air system and retract installation (discussed above) and finished up with the propulsion and final installation of the radio and power system.
ELEVATOR & RUDDER
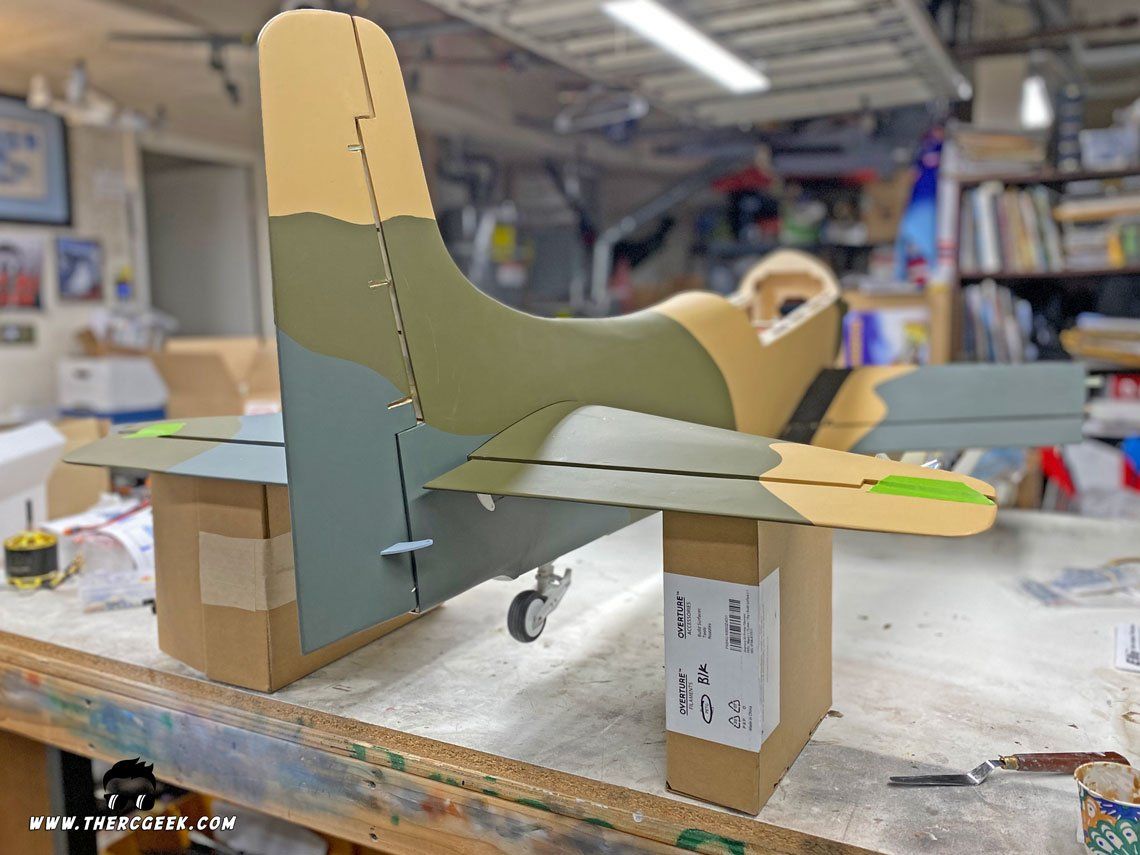
The first item of business here is to glue on the horizontal stabilizers. With the wing center section in place and the airplane on it's gear on the work bench, the tails were glued on with 30 minute epoxy and microballoons to thicken it. As the epoxy cured, boxes were used to prop the tails so that they were square to the wing and vertical tail as it set (recommended to allow this to set overnight).


As mentioned, Hitec D645 servos were used on the primary flight controls of the Skyraider and there are two elevator servos and a single rudder servo that are installed into the airplane. For the elevator, Du-Bro 4-40 pushrods were used with a 4-40 ball link at the elevator and a solder link at the servo (there is sleeving in the fuselage, which makes running the pushrods easy). The rudder and steering were setup using Du-Bro 4-40 pull-pull hardware. A 4-40 ball link was used at the rudder control horn and a 4-40 adjustable quick link at the servo. For the steering, the cable was simply looped around the steering arm and crimped in place. Note that the pull-pull hardware is designed to loop around the connection and then is run through a crimping tube. It's important not to cut through the tubing when crimping the wire. It should be crimped tightly and then thin CA can be wicked into the tube for added assurance.


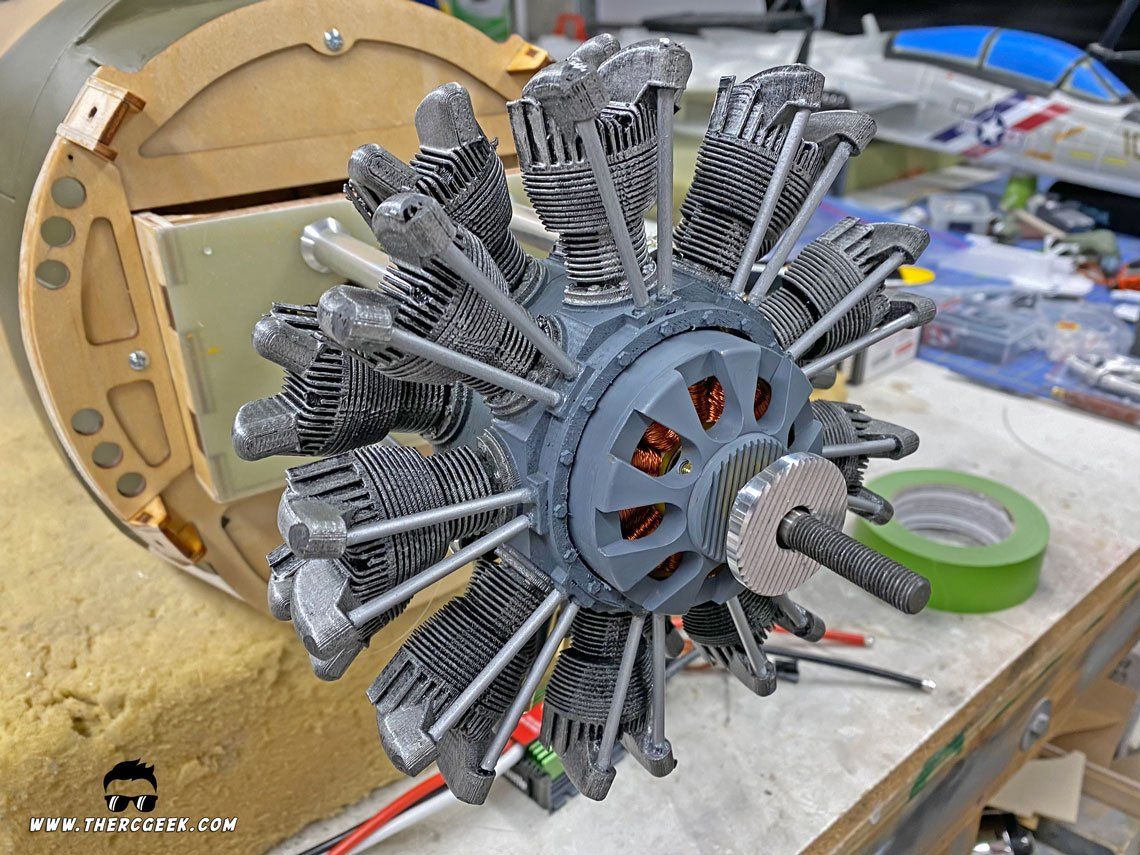
MOTOR & SOUND SYSTEM
To keep the scale integrity of the Skyraider cowl and avoid having to cut into it for an engine cylinder, I decided to go electric on the airplane. To install the scorpion 5535-160kv motor, 90mm standoffs available from Mikado USA were used which provided almost the perfect spacing when using the supplied motor prop plate insert (if placing prop up against the motor itself, the 100mm standoffs may be a better option). A drilling template was drawn (download here), lightly spray glued onto the firewall and the four mounting holes were drilled. The standoffs were fastened to the firewall (only hand tight), the motor was the installed at the end and then all of the fasteners were tightened fully in place. With those standoffs, the installation ended up being extremely quick and simple.


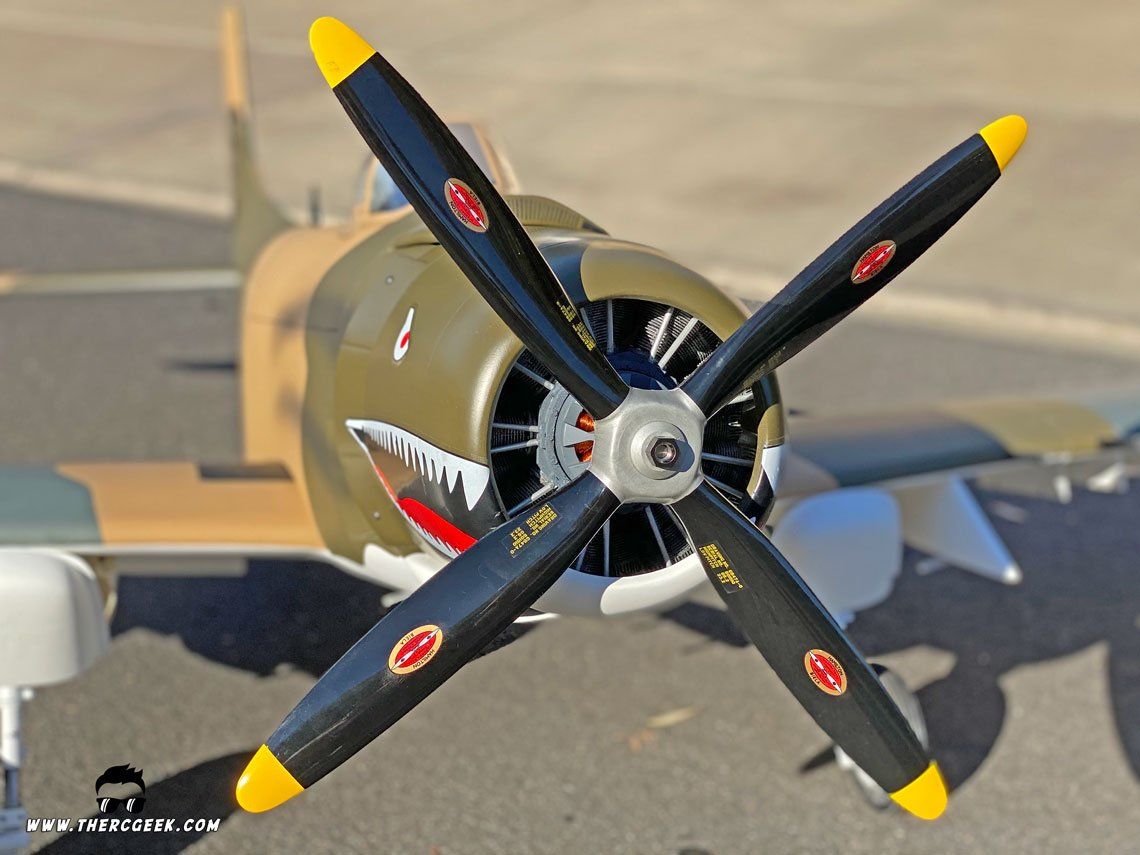
The finish of the look, a double row radial engine was 3d printed (found on thingiverse and scaled to 187mm diameter). The center cover was removed and clearanced so that the motor could fit through. Once the fit was satisfactory, the model was painted (and the motor front painted to match) and was glued to the motor standoffs using hot glue. The radial came out fantastic and when combined with the 20x14 4-blade Biela propeller, really completes the look of the front end of this Skyraider model. A big thank you to Corsair Nut for his help in getting the engine painted and installed.

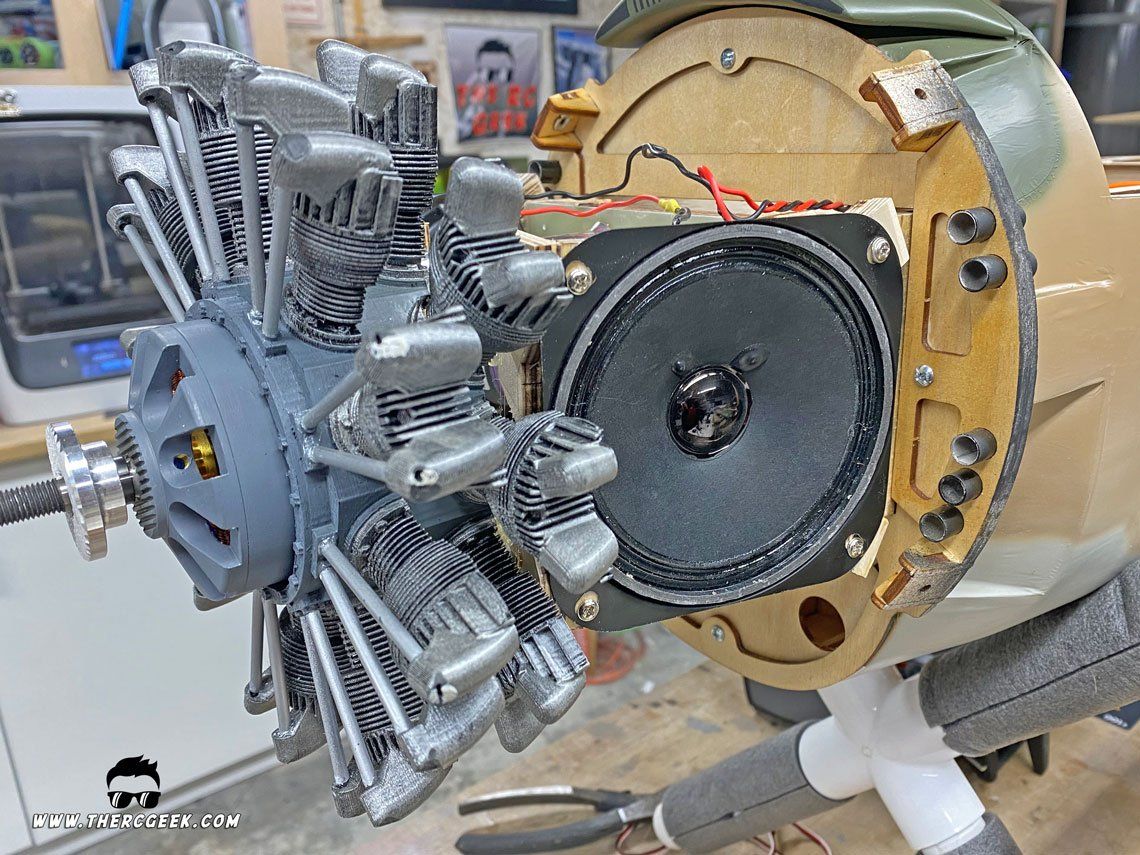
A Model Sounds Inc. sound system was installed into the model to add that extra cool factor. The system was hooked up and the speakers were installed inside the cowl. A couple half bulkheads were made that tied into the motor standoffs which provided mounting tabs for the speakers to be installed onto. The initial configuration had the speakers installed at the top and bottom but were later reconfigured pointing outwards. The system is quite loud, but interestingly once things are closed up, it muffles the sound notably, so there may be some additional work to do here in the future. According to Model Sounds Inc, the best installation is having the speakers installed in the wings pointing downward being hidden only by screen door mesh with no obstructions. This would provide the loudest sound from the speakers.
COCKPIT
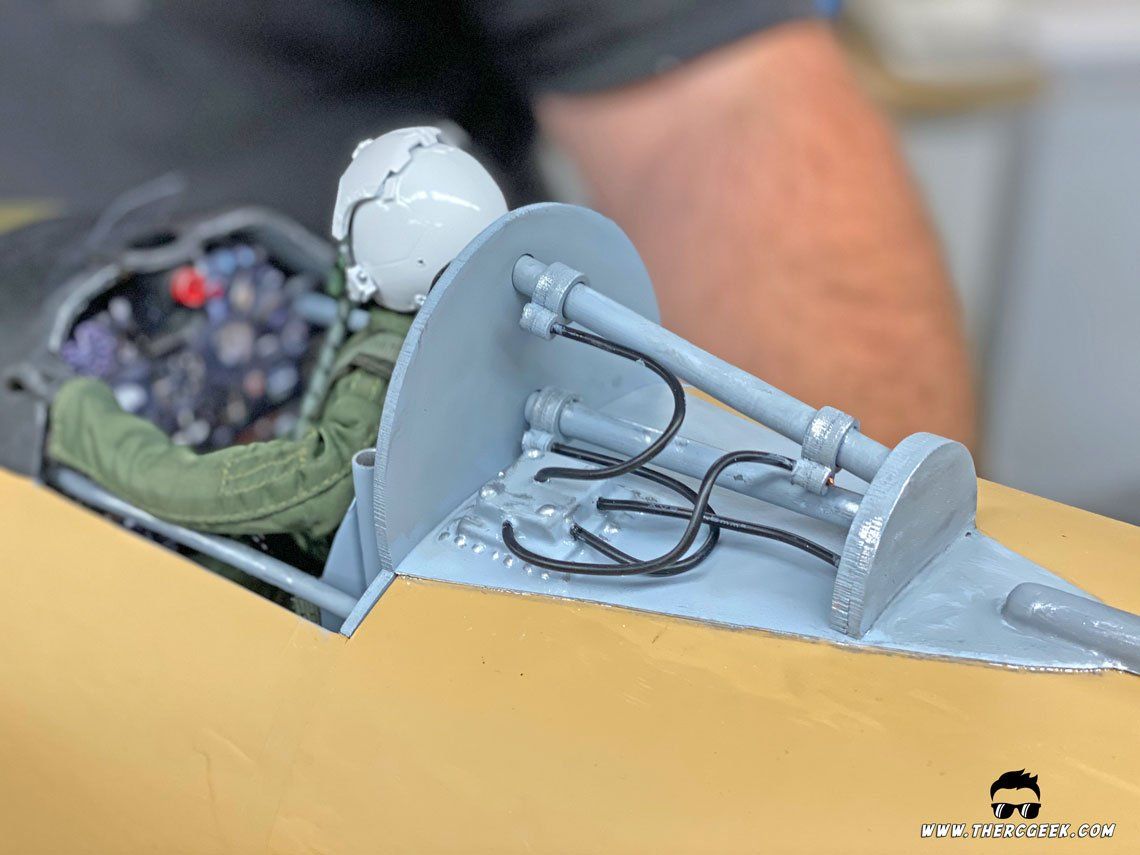
The kit comes with a prepainted and partially assembled cockpit that really looks quite nice when all finished and installed. The parts are vacuum formed and require some trimming, but all of the parts are included and the instructions show the assembly well. Combined with a 1/7 scale pilot from warbirdpilots.com, it really adds so much to the Skyraider model! Note that the pilot used included a servo actuated head which was paired with one of my Random Servo Motion Generators which provides random head movement. Again, a big thank you to Corsair Nut for his help in getting the cockpit built and installed.


PUTTING IT ALL TOGETHER
That completed the assembly of the A-1 Skyraider and on the bench it is big and impressive! The shape is great and there's certainly no mistaking what this airplane is. For the initial flights, the kit supplied markings were applied which are simply peel and sticks and lay down really well onto the model. Note, to get the sharkmouth over the curvature of the cowl, a heat gun was used to heat up the sticker and help stretch and form it around the forward radius.
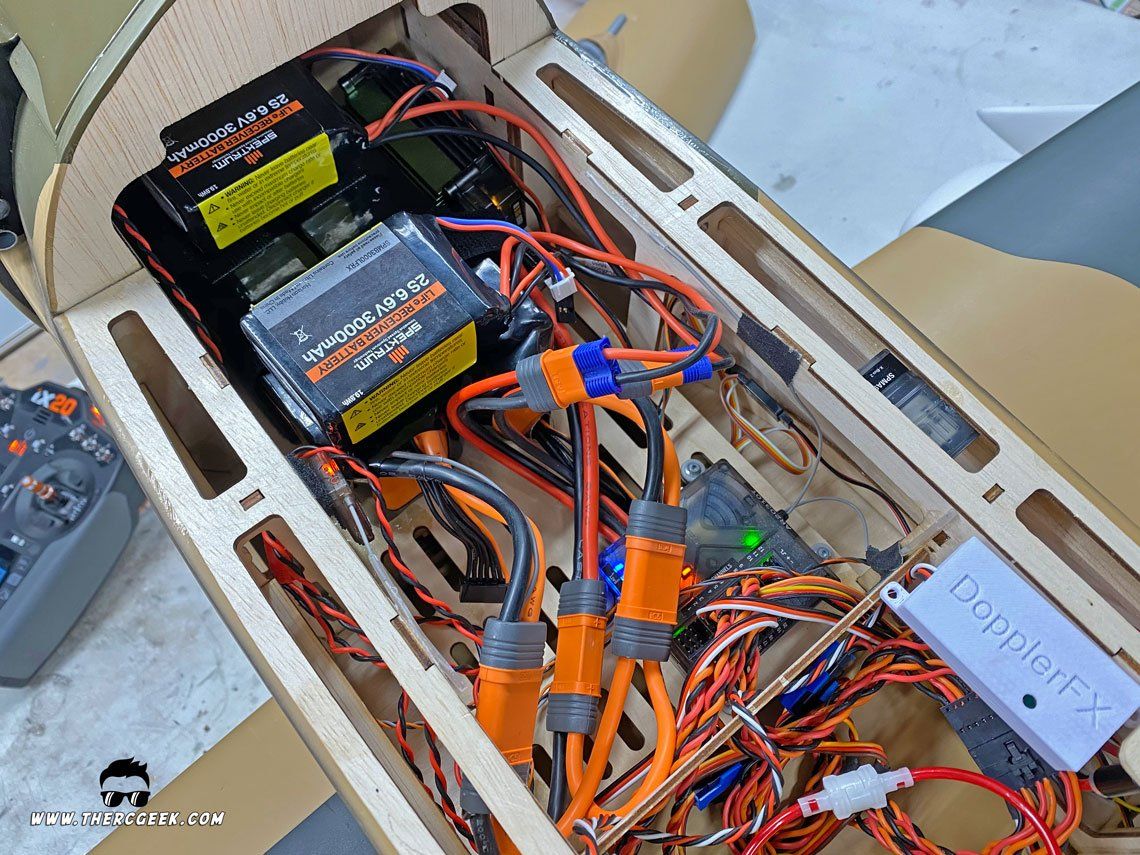
In setting up the airplane, the two Spektrum Smart 6s 7000 mah batteries were placed all the way forward in the hatch area up against the firewall. Additionally, the two Spektrum 2s 3000 mah Life packs were then placed on top of the flight packs forward to back. This put the CG at the forward location which was used for the first flight and felt great. Additionally, there are multiple control rates provided in the instructions. I setup the model with their high rates as my high rates, their low rates as my middle rates and I setup a third lower rate. I ultimately landed on using low rate elevator and mid rate aileron on the first flights.
FINAL THOUGHTS
The Legend Hobby A-1 Skyraider is an extremely impressive airplane that is straight forward to assemble and assembles well in the process. Take your time and you'll be rewarded with a fantastic looking (and flying! See my Skyraider first flights video below) warbird that is sure to turn heads at the field. Also, the Skyraider kit includes some really nice details through a fully detailed cockpit and an assortment of external tanks and rockets. This attention to detail really adds so much to the kit and opens all kinds of detailing opportunities. I see much 3d printing in my future! Next time, we'll talk through an entire repaint of the airframe along with panel lines and weathering. See you at the field!
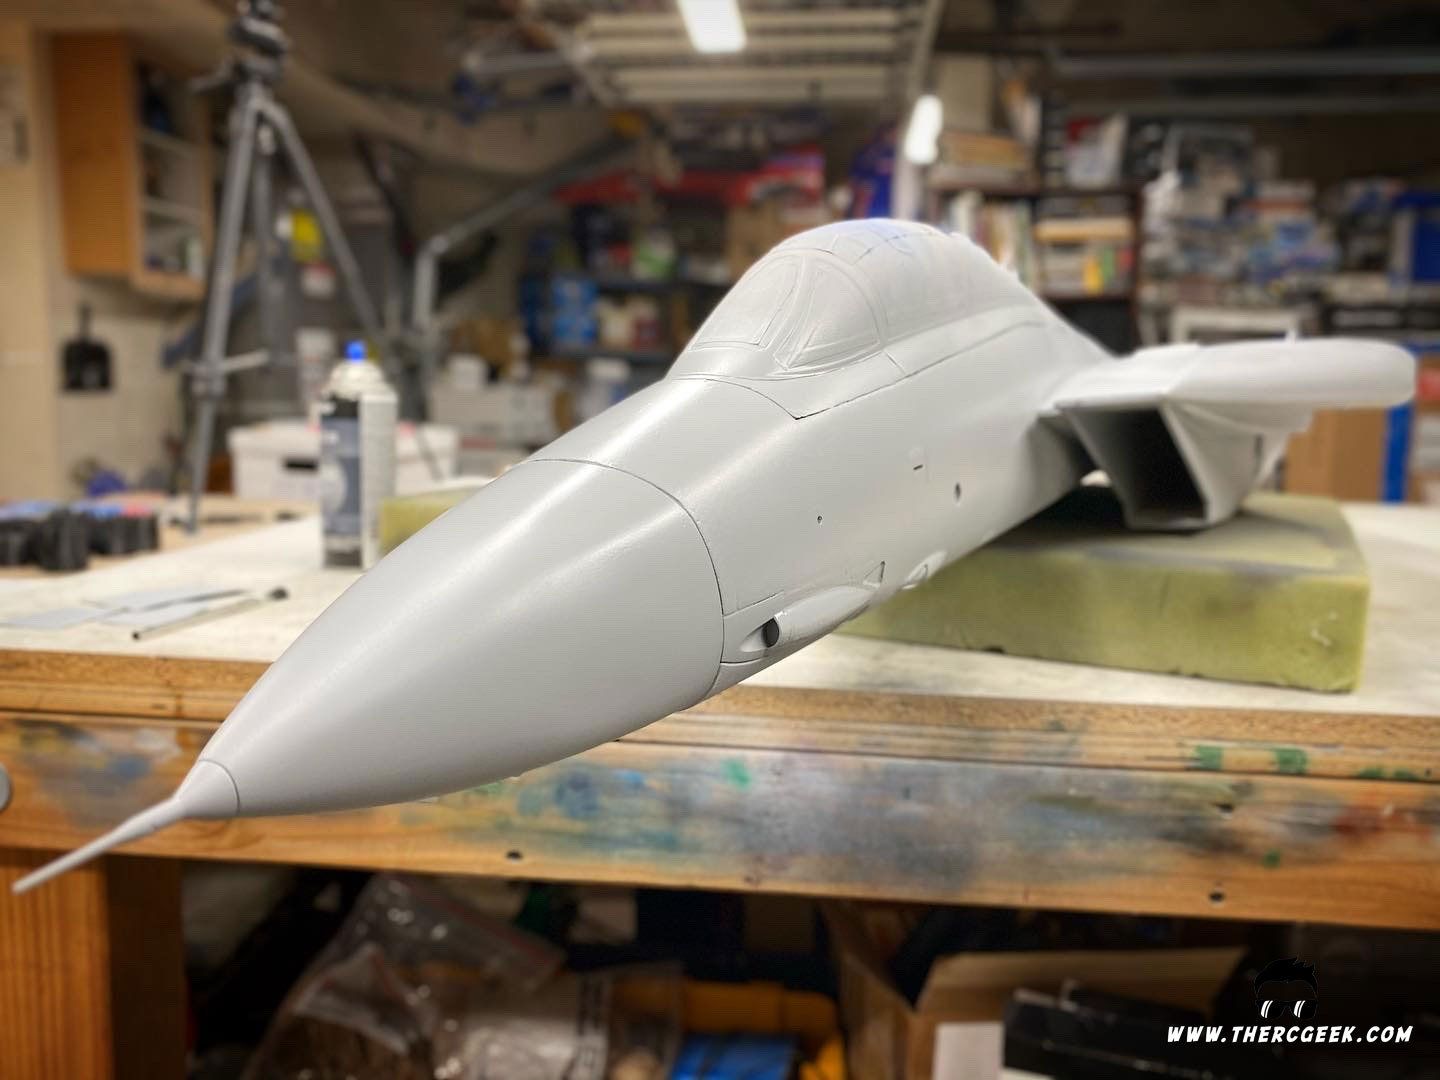
The RC Geek Blog is your place to learn about all aspects of the RC hobby. Learn to build, design, drive or fly that RC project you’ve always wanted to build, but have been intimidated to try. This blog is here to help you on your journey and provide tips and tricks as you go! My hope is to inspire builders both experienced and new! So, welcome, please look around, it’s an exciting beginning! I’m currently documenting my latest competition scale RC jet build, a Mark Frankel F4D Skyray, along with some other fun tips and videos. If you can’t find what you’re looking for on this front page, click on any of the categories to the right and it will show just posts related to those categories. Please feel free to add comments and/or contact me directly if you have questions, I’m here to help! And don’t forget to check out my YouTube Channel, I post new videos every week!
Subscribe To Our Blog Now