The RC Geek Blog
By: Chris Wolfe
How to Paint a Pilot Bust and Add Simple Cockpit Details
Check out the full series of videos and articles at: thercgeek.com/kitbashing
One of the features that always gets inspected on a scale model is the cockpit. There are so many gadgets in the cockpit of a full sized aircraft, it’s fun to see what was modeled. Yet, when it comes to ARFs and foamies, we’re lucky to get a decent pilot let alone a decent looking cockpit! So, in this episode of our Foam Kit Bashing Series, we’re going to talk about some quick and easy ways to dress up an otherwise minimalist cockpit. The whole idea here are simple things that can be done that add big results. We’ll cover full scratch building of a cockpit in a future episode. Oh, and in case you missed it, last time we talked about the whole construction process of converting a Freewing Mirage 2000 into an Isreali Kfir. This airplane has really transformed and looks awesome as a kfir.
Before prepping and painting the airframe (we’ll cover painting in our next episode), we really should work out the cockpit interior first since we need to pull the canopy off the airframe to work on it. It’s better to do this earlier in the process just in case we mess something up it will be an easier fix. The base cockpit provided with the Mirage 2000 is ok, but there are definitely a few issues that we’re going to fix. First off, the pilot is just too small for scale. To solve this, we’re going to replace him with a 1/12 scale Castle 5 bust which comes from my folks at JetHangar.com and show you how to paint him (this is one of the pilots I manufacture for my folks in sizes ranging from 1/18 scale all the way up to 1/6 scale). The second thing we’re going to do is show how to make the cockpit a little more “popcorn” proof and then detail it a little bit to make it a little more Kfir representative. The stock cockpit is black and inside a sealed compartment and had already “popcorned” up…so, now is our time to fix that.
HOW TO PAINT A “CASTLE 5” PILOT BUST
Painting a nice looking pilot is not a difficult thing to do and is something that can actually be done pretty quickly. We first off need a selection of paint brushes. I have a number of paint brushes that I turn to when I’m painting a pilot. I’ll use a wider, kind of square brush for the large areas and then will turn to much smaller brushes for the detail painting. Also, we need a selection of paints. The “Castle 5” instructions show all the paints needed from the Testors Model Masters brands which I usually have on hand. Now, my philosophy in painting these is to paint deep to shallow. What I mean is that I’ll paint the colors in the deeper recesses first which includes the primary flight suit and helmet, and then paint the individual details one by one finishing up with the highest protruding details last. Also, as I’m painting, it’s important to overpaint all of the areas in the corners so that there’s none of the under color showing on the finished product. That allows us to go back and touch up all of the intersecting corners and lines with the other colors wherever we need to. It’s easier to get a clean line while painting a protruding detail than it is to try and go back and clean up a line in a deep recess. Note too that if you accidentally overpaint any of the other colors, you can simply go back and touch it up. I do this a lot because rarely does it come out perfect the first time.
Before any painting was started, it’s worth cleaning the pilot with some water to clean off any mold release. From there, I used a Tamiya plastic model primer
to spray over the bust. The primer is white, so that sufficed for the helmet color as well (I generally like to spray paint the helmets first to avoid any brush marks since that’s the first thing seen). From there, I brush painted the flight suit Dark Green
with a wide brush (it took 2 coats), the pilots undershirt Armor Sand
and then the skin tone around the pilots neck (I used Radome Tan
for this). The oxygen mask and the pilots floatation and survival gear was painted Olive Drab. Lastly, the straps were painted Euro I Grey
and then the buckles painted with Steel
along with the oxygen mask clip details. The clips for the oxygen mask that are on the helmet were painted Flat Black. Notice to this point, we have yet to paint the visor. That was intentional, keep reading…
Once all of the primary painting is done some dry brushing was done on the pilot suit and details which really helped add a some extra dimension and realism to the pilot. If you’re not familiar with dry brushing as a technique, it is the act of taking a brush that has had most of the paint wiped off of it with a paper towel and then brushing it over a model. What it does is leave a small amount of residual paint over highlighted areas and gives the illusion of added depth to details. For pilot painting, I like to use a little bit of the base color that was used for painting onto the back of a paper cup, mix in a little white, and then use that lightened color to dry brush over that base color that I used on the pilot. That lightens all of the highlights on the pilot and really makes it look notably better. For example, I used some lightened Dark Green and dry brushed that over the flight suit, I used lightened Euro 1 Grey to dry brush over the straps, and lightened Olive Drab (you can even use the Armor Sand) to dry brush over the flotation and survival gear, etc. Experiment with different colors to get the desired look. Dry brushing is a very handy technique to have in your arsenal and is something you can use quite a bit. There are additional things you can do to add even more realism to pilots like oil paint washes and such, but that’s not something I’ve played with much. There are some good tutorials on that over at Aces of Iron.
With the dry brushing done, the last thing done was to hand paint the squadron insignia on the patch on the right shoulder (there’s a small molded detail on the pilot for this). Well, I should say that it was attempted anyways…
Before painting the visor (this is the very last thing painted), I sprayed the whole pilot with a flat clear coat ( Testors Dullcote works). This helps even everything out and give a uniform sheen. Also, by doing this all of the dry brushing and detail painting really pops. The very last thing done is painting the visor. I use a high gloss graphite metallic paint here as that gives it a nice high gloss and translucent appearance. Note that if the finish of the visor isn’t as high gloss as you’d like, you can paint Pledge Floor Care Finish (used to be Future Floor Acrylic) over it. I’ve also heard of guys applying epoxy too, just try to avoid getting air in the epoxy as you mix it.
“POPCORN” PROOFING AND COCKPIT DETAILING
Now that the pilot is painted, all he needs now is a fresh new office to work in. The stock Mirage 2000 cockpit is a decent base to start with and with a few extra goodies can be made into a nice enough looking cockpit. Unfortunately, it is painted black and so all those lovely EPO foam beads had already swelled up like balloons… That, of course, HAD to be fixed and in a way that would keep it from returning in the future.
To hide the texture, I simply covered all of the exposed areas with thin cardstock. This included all of the framing around the cockpit tub, the sides of the seat and head rest, the instrument panel hood, and the canopy rear bulkhead. I used the cockpit tub to trace and measure the areas needing to be covered and then used 3M 77 spray glue was used to tack down all of the cardstock covers. The cardstock used is about the thickness of an index card as anything thicker would be difficult to work with and form. Ultimately, what adding the cardstock does is hide all of the unsightly texture and keep it from reappearing in the future; it essentially makes the cockpit “popcorn proof.” Then, with the primary cardstock elements in place (except for those to be painted black), the tub was painted Aircraft Grey. From there, all of the black elements were painted and added separately.
To make the instrument panel, I found an image of a Kfir C7 panel and scaled that to fit the Freewing instrument panel ( download the file ). It was printed out and cut out to be spray glued on. Before placing in into the cockpit however, the center section of the panel was cut out and glued to a piece of 1/8″ balsa that was painted black. This was to give it a little dimension simulate the raised center section of the full size cockpit.
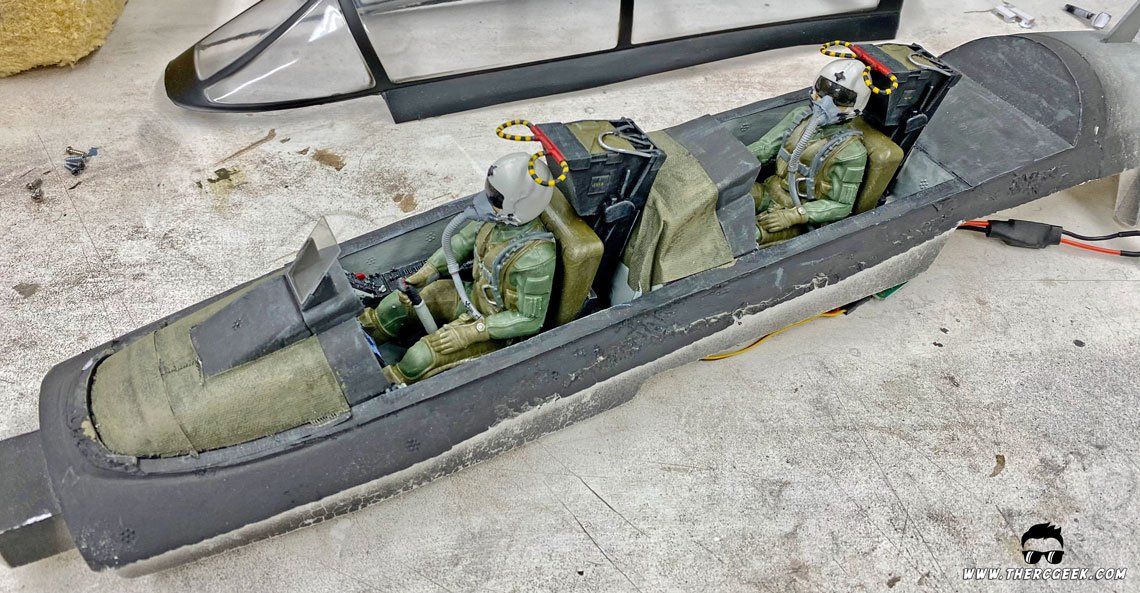
With everything in place, I finalized all of the painting of the interior painting which was primarily finishing out the ejection seat colors. The seat is a Martin Baker Mk10, so found a picture online and used that for reference as well as took some artistic license as needed. The head rest was painted Euro I Gray and the seat back painted Olive Drab. Now, to finish it all out, I did some dry brushing all around like we did with the pilot and then applied a clear coat. Lastly, a HUD glass detail was installed using some parts I had available from my A-7 cockpit kit. You can use some triangular cut pieces of sheet styrene to accomplish the sides and then of course a clear piece of styrene for the HUD glass. The pics below show the fully finished cockpit.
With the cockpit tub completed, the Castle 5 pilot was installed by gluing a balsa wood platform between the sidewalls of the cockpit tub and then gluing the pilot to it. Lastly, the canopy was glued back on to the airframe with some Formula 560 canopy glue.
Just to reiterate as we close, the whole intent here was to cover some simple things that can be done that make big differences in the looks of a model. Cockpit scratch building is one of my pleasures, so we will go into much more detail in the future when we get to that point on our competition Skyray build. For this Kfir, this cockpit is good enough and is a huge improvement to the stock setup. Next time we’ll cover painting the airplane. A kfir has to have Isreali camouflage and so we’ll show how best paint the airplane. See you next time!
The post Foam Kit Bashing 101 Ep3 — Pilot Painting and Cockpit Details appeared first on The RC Geek.
The RC Geek Blog is your place to learn about all aspects of the RC hobby. Learn to build, design, drive or fly that RC project you’ve always wanted to build, but have been intimidated to try. This blog is here to help you on your journey and provide tips and tricks as you go! My hope is to inspire builders both experienced and new! So, welcome, please look around, it’s an exciting beginning! I’m currently documenting my latest competition scale RC jet build, a Mark Frankel F4D Skyray, along with some other fun tips and videos. If you can’t find what you’re looking for on this front page, click on any of the categories to the right and it will show just posts related to those categories. Please feel free to add comments and/or contact me directly if you have questions, I’m here to help! And don’t forget to check out my YouTube Channel, I post new videos every week!
Subscribe To Our Blog Now
