The RC Geek Blog
By: Chris Wolfe
I DESTROYED My Brand-New RC F9F Panther… On Purpose!
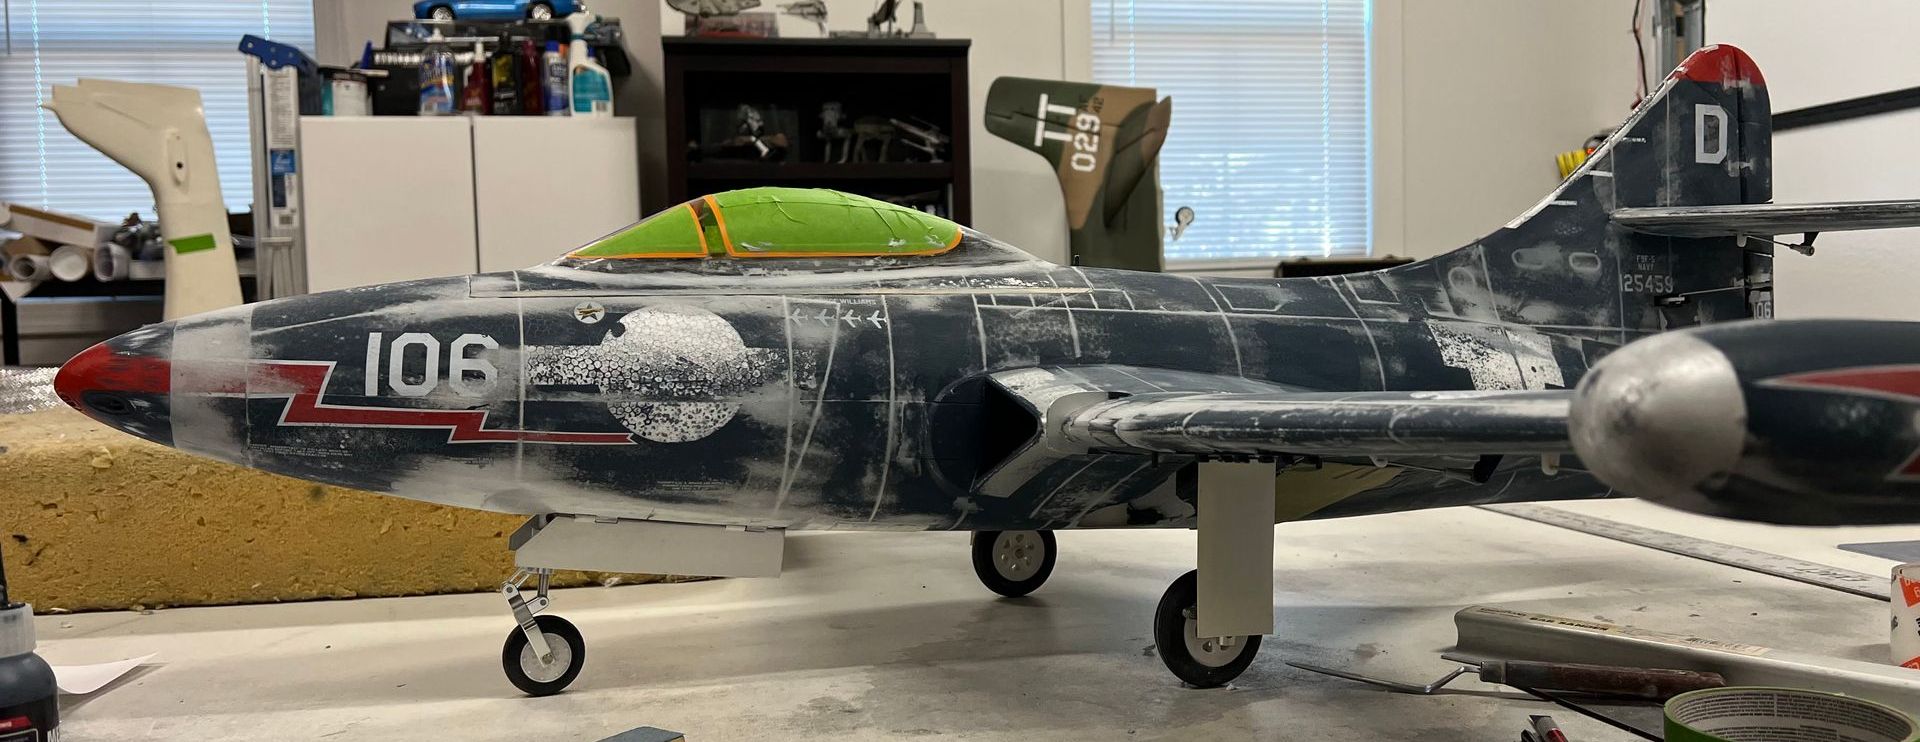
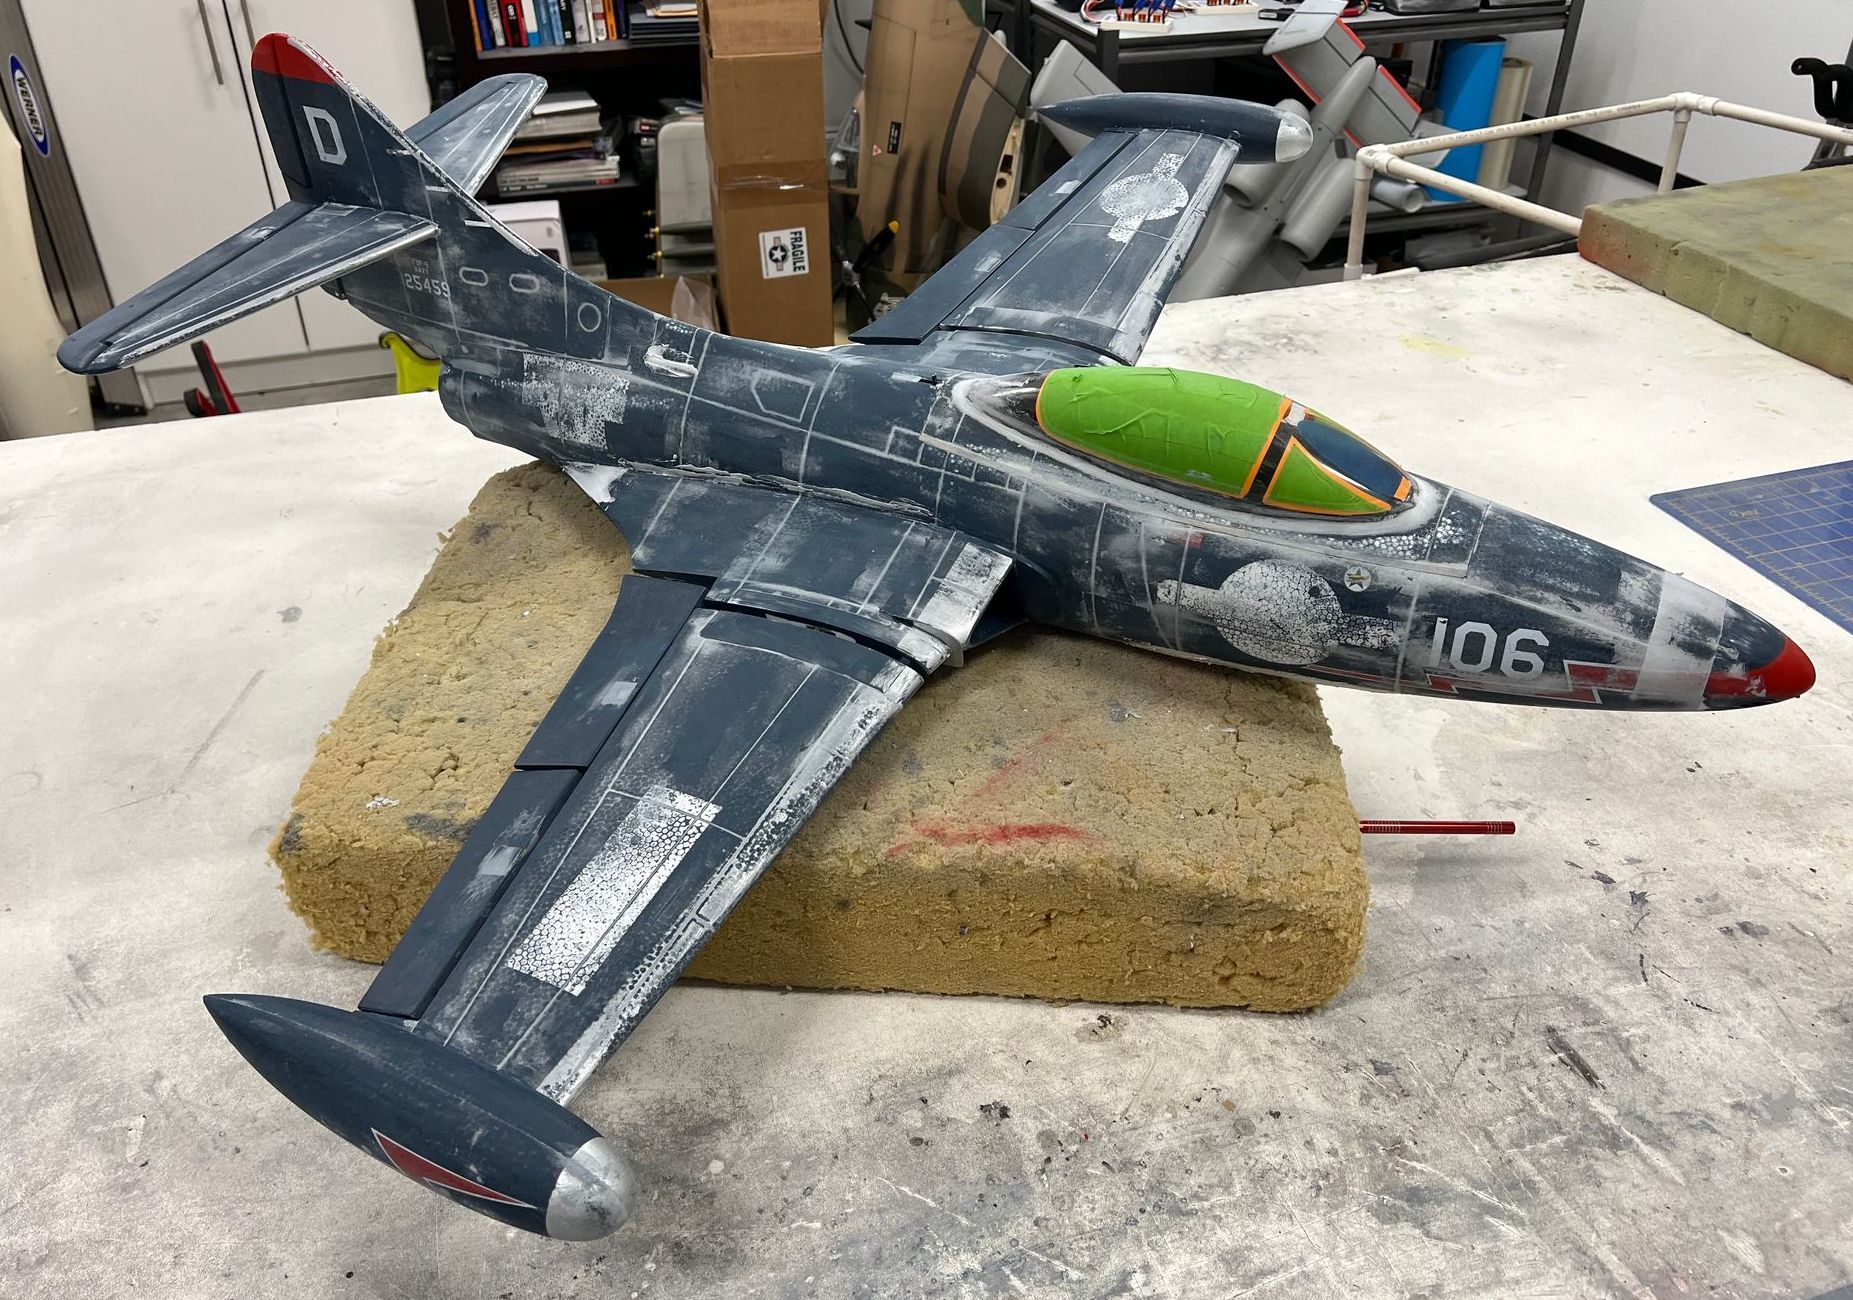
Every so often, a model crosses your bench that asks for more. Not because it’s lacking, but because it has so much untapped potential. That was the case with the Freewing RC F9F Panther. Right out of the box, it’s a solid, great-flying EDF jet with clean lines and a strong silhouette—but as a scale builder, I saw it as a canvas. One that deserved to be pushed beyond stock into something that could truly stand out on the tarmac. I envisioned gear doors that hinted at internal complexity, body flaps and speed brakes poised for that ever so scale approach, and a full cockpit makeover. This wouldn’t be a quick refinish, but it would be a satisfying one.
In this first chapter of the build series, I’m taking you through the airframe transformation: from surface prep to custom modifications, and all the steps to lay the foundation for a crazy cool 70mm EDF jet.
Cockpit and Canopy Refinement
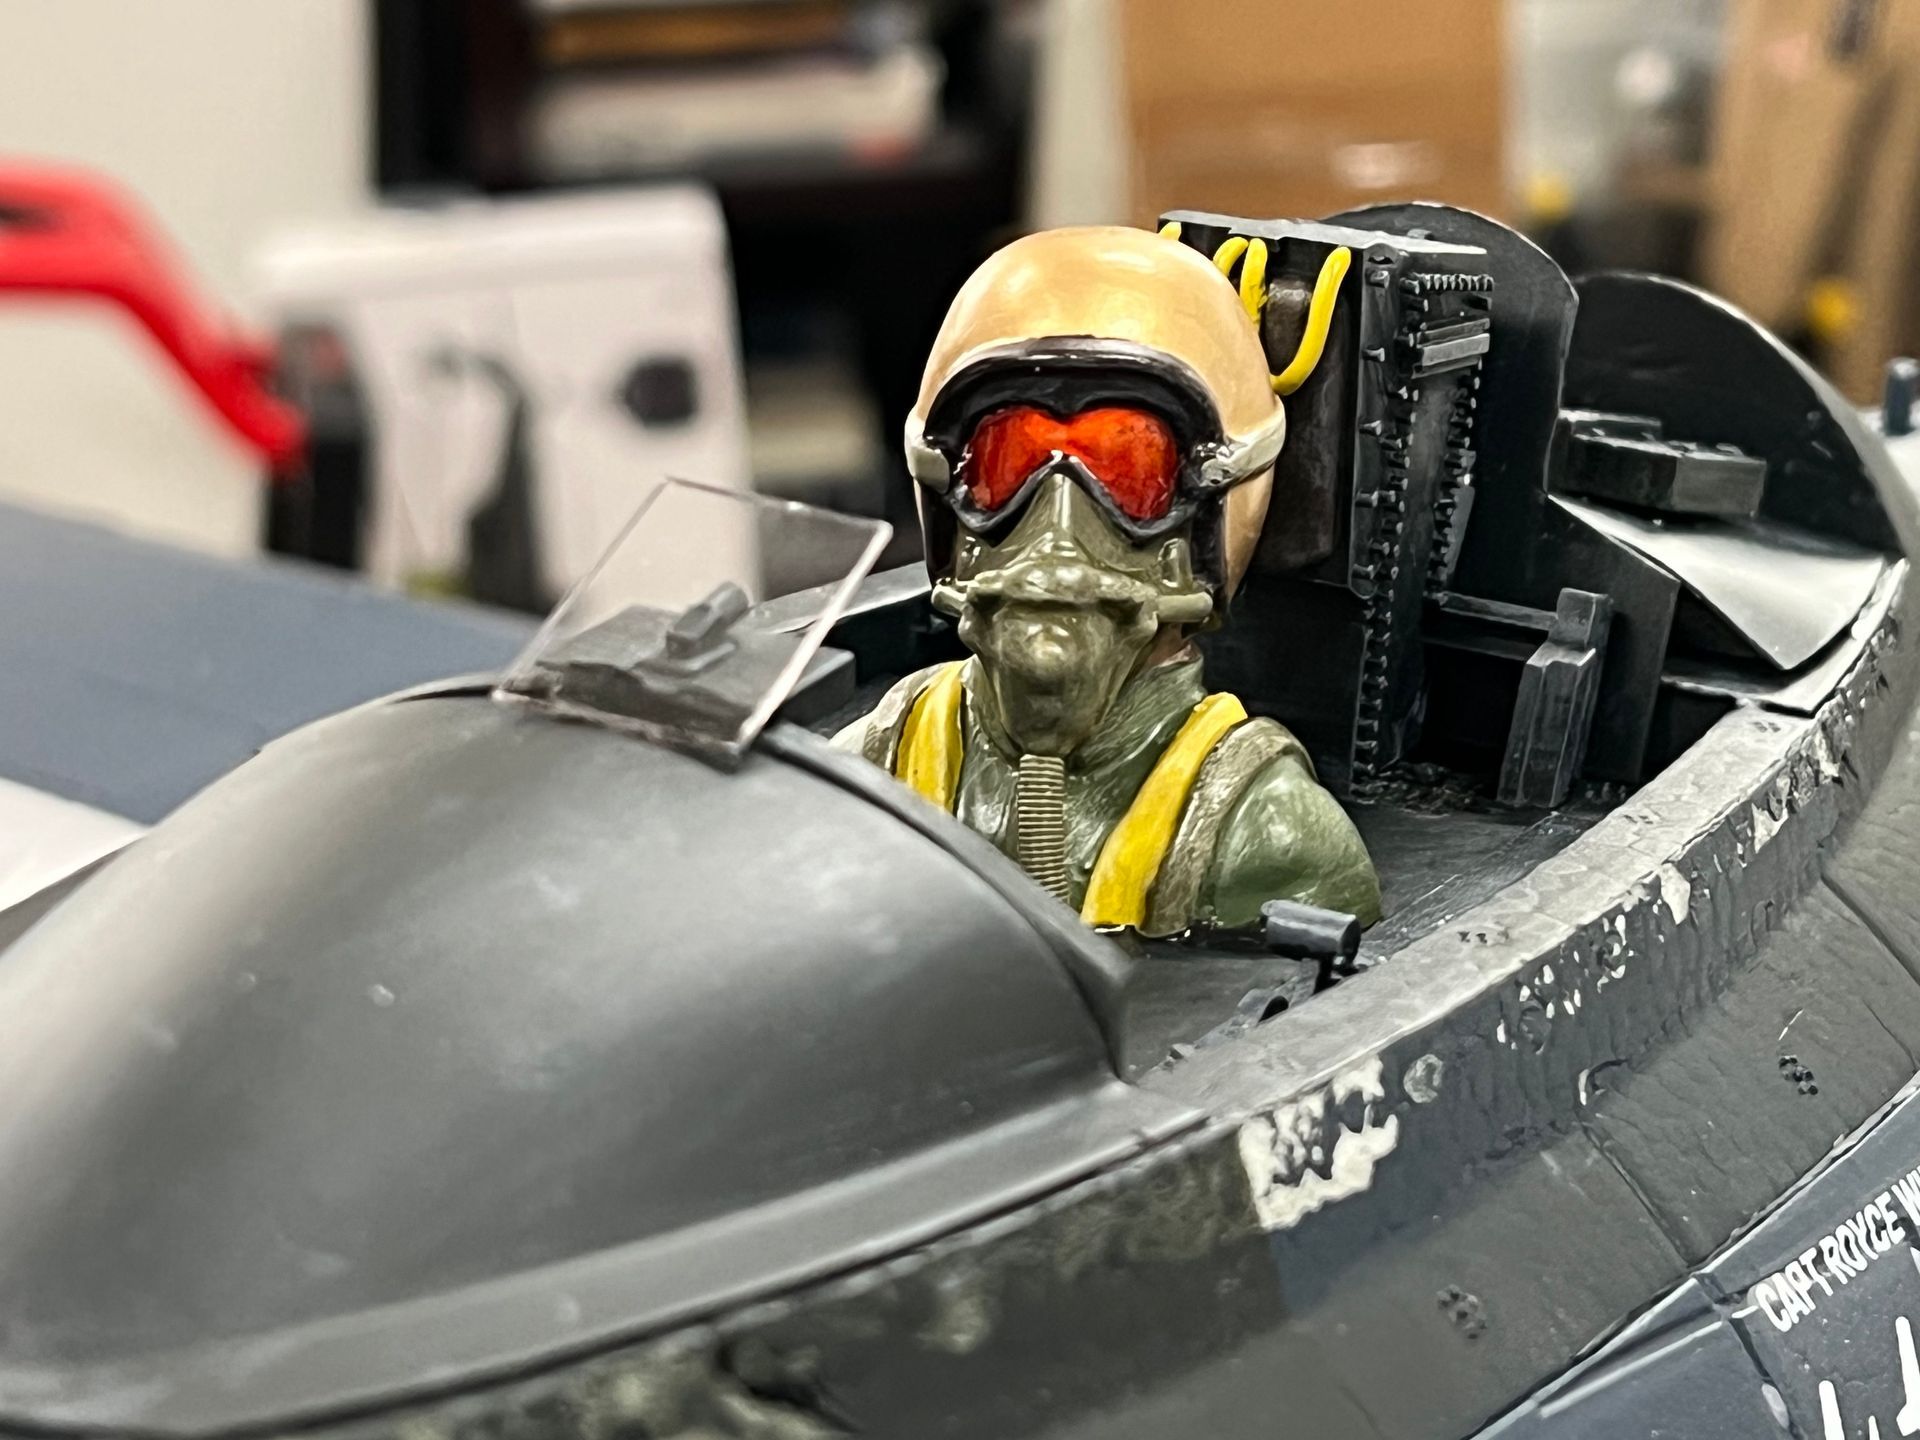
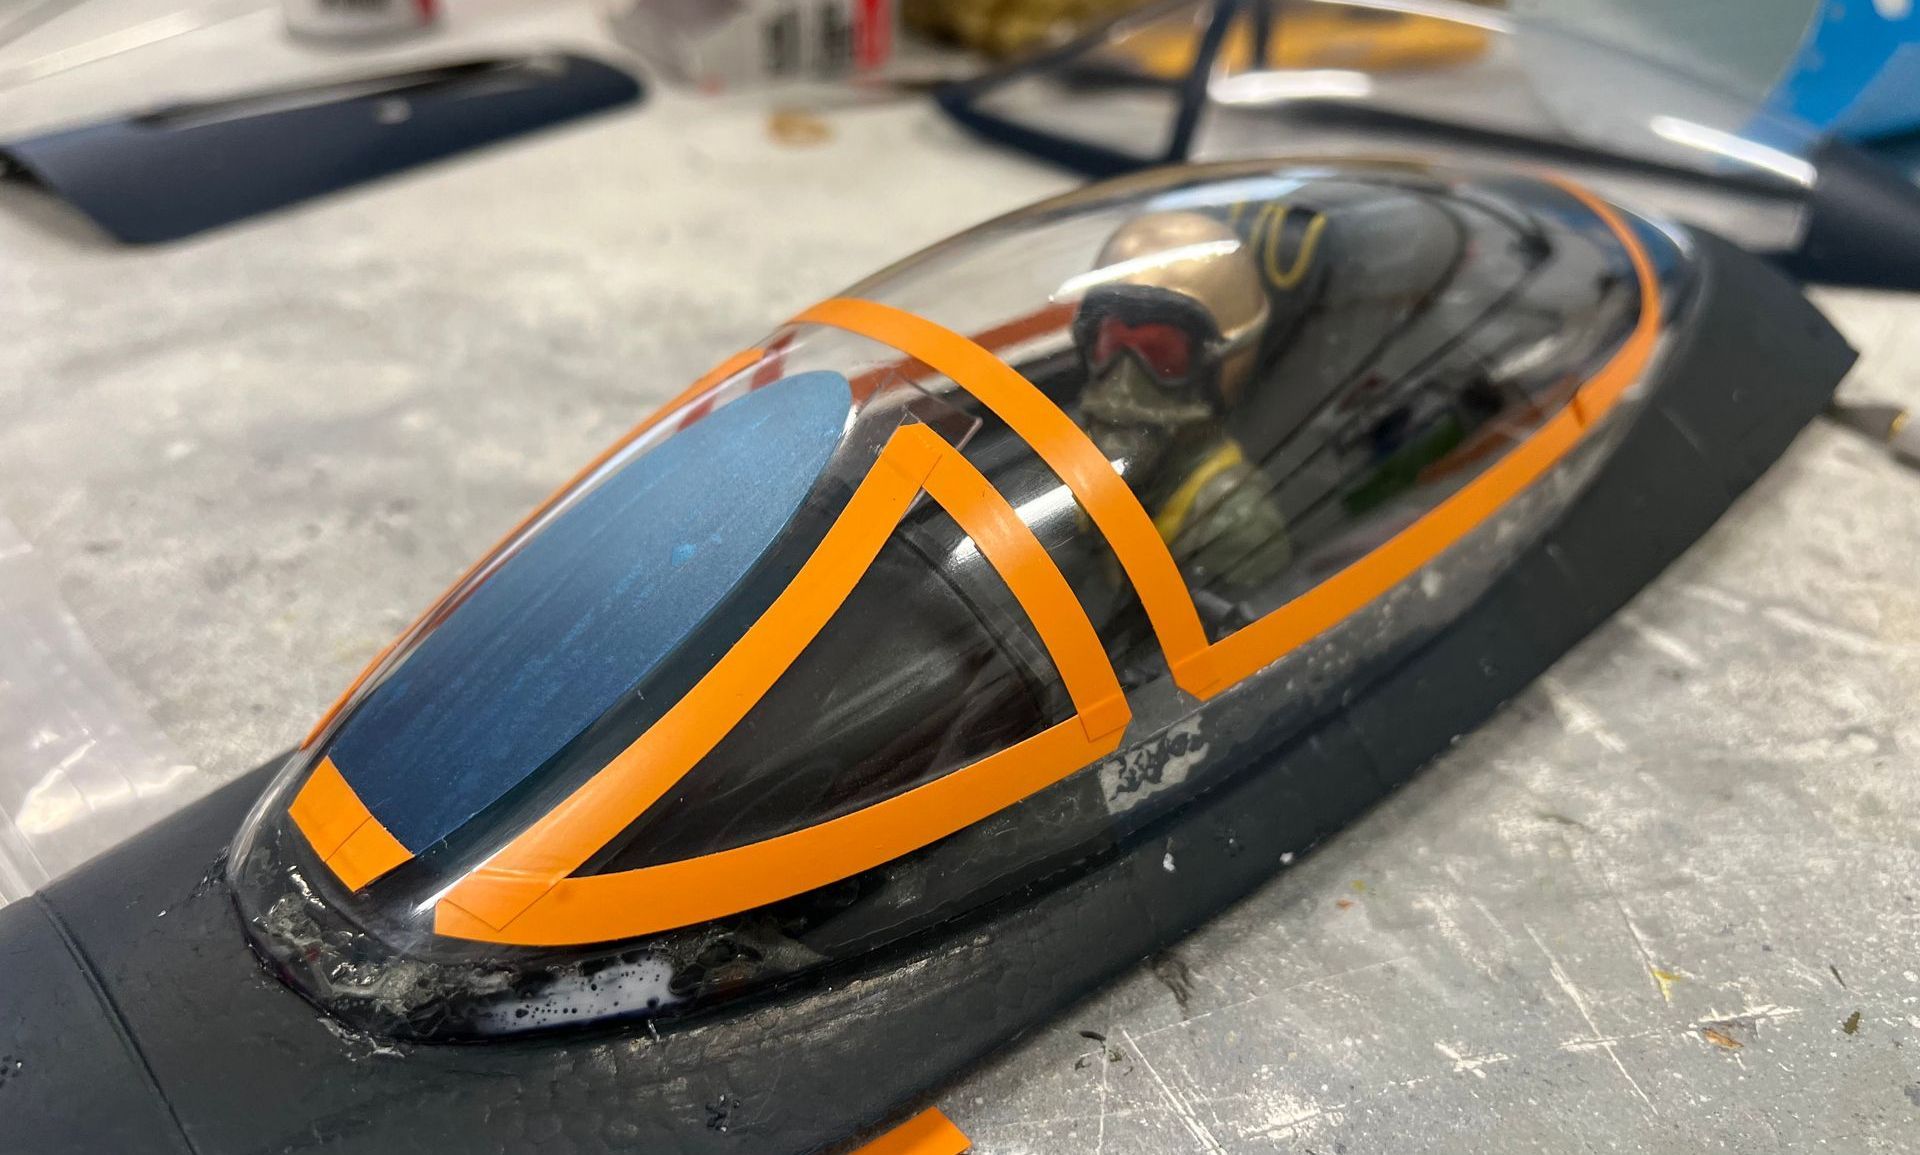
The canopy on the stock Panther is decent, but its shape and interior were simplified for production. Thankfully, a friend of mine wanted to create a more scale-accurate canopy, and in exchange for some 3D-printed goodies for his own Panther, he sent me a newly shaped canopy to use on this kit bash. With that in hand, I completely reworked the cockpit. The stock tub was built up primarily from 3D printed parts, supplemented with hand-cut components where necessary. I pulled in details like the instrument coaming and side consoles from a set of T-33 cockpit files I had on hand. To give it a more authentic presence, I added an era-appropriate pilot bust—the 1/11 scale 'Sabre Jock' bust—to tie it all together.
The ejection seat was another fun detail. I started with a 1/72 scale Panther seat file I found online, then scaled it up to roughly 1/11 scale. Rear cockpit framing was also added to create visual depth through the canopy, making it feel more like a real aircraft when viewed from above or the side.
All of the printed parts were created using a resin printer, which produces parts with plastic-model-level detail—ideal for this kind of application. I used Tamiya spray paints for the base colors and brushed in detail work with Testors enamel paints.
Once everything was painted and secured in place, I trimmed the custom canopy to fit, glued it on using Formula 560 canopy glue, and masked the framing with vinyl fine line tape to finish it off. I personally love building and painting cockpits, and this was easily one of the most satisfying parts of the kit bash. The new interior gives the model a far more realistic silhouette and brings it to life even when it's just sitting on the bench.


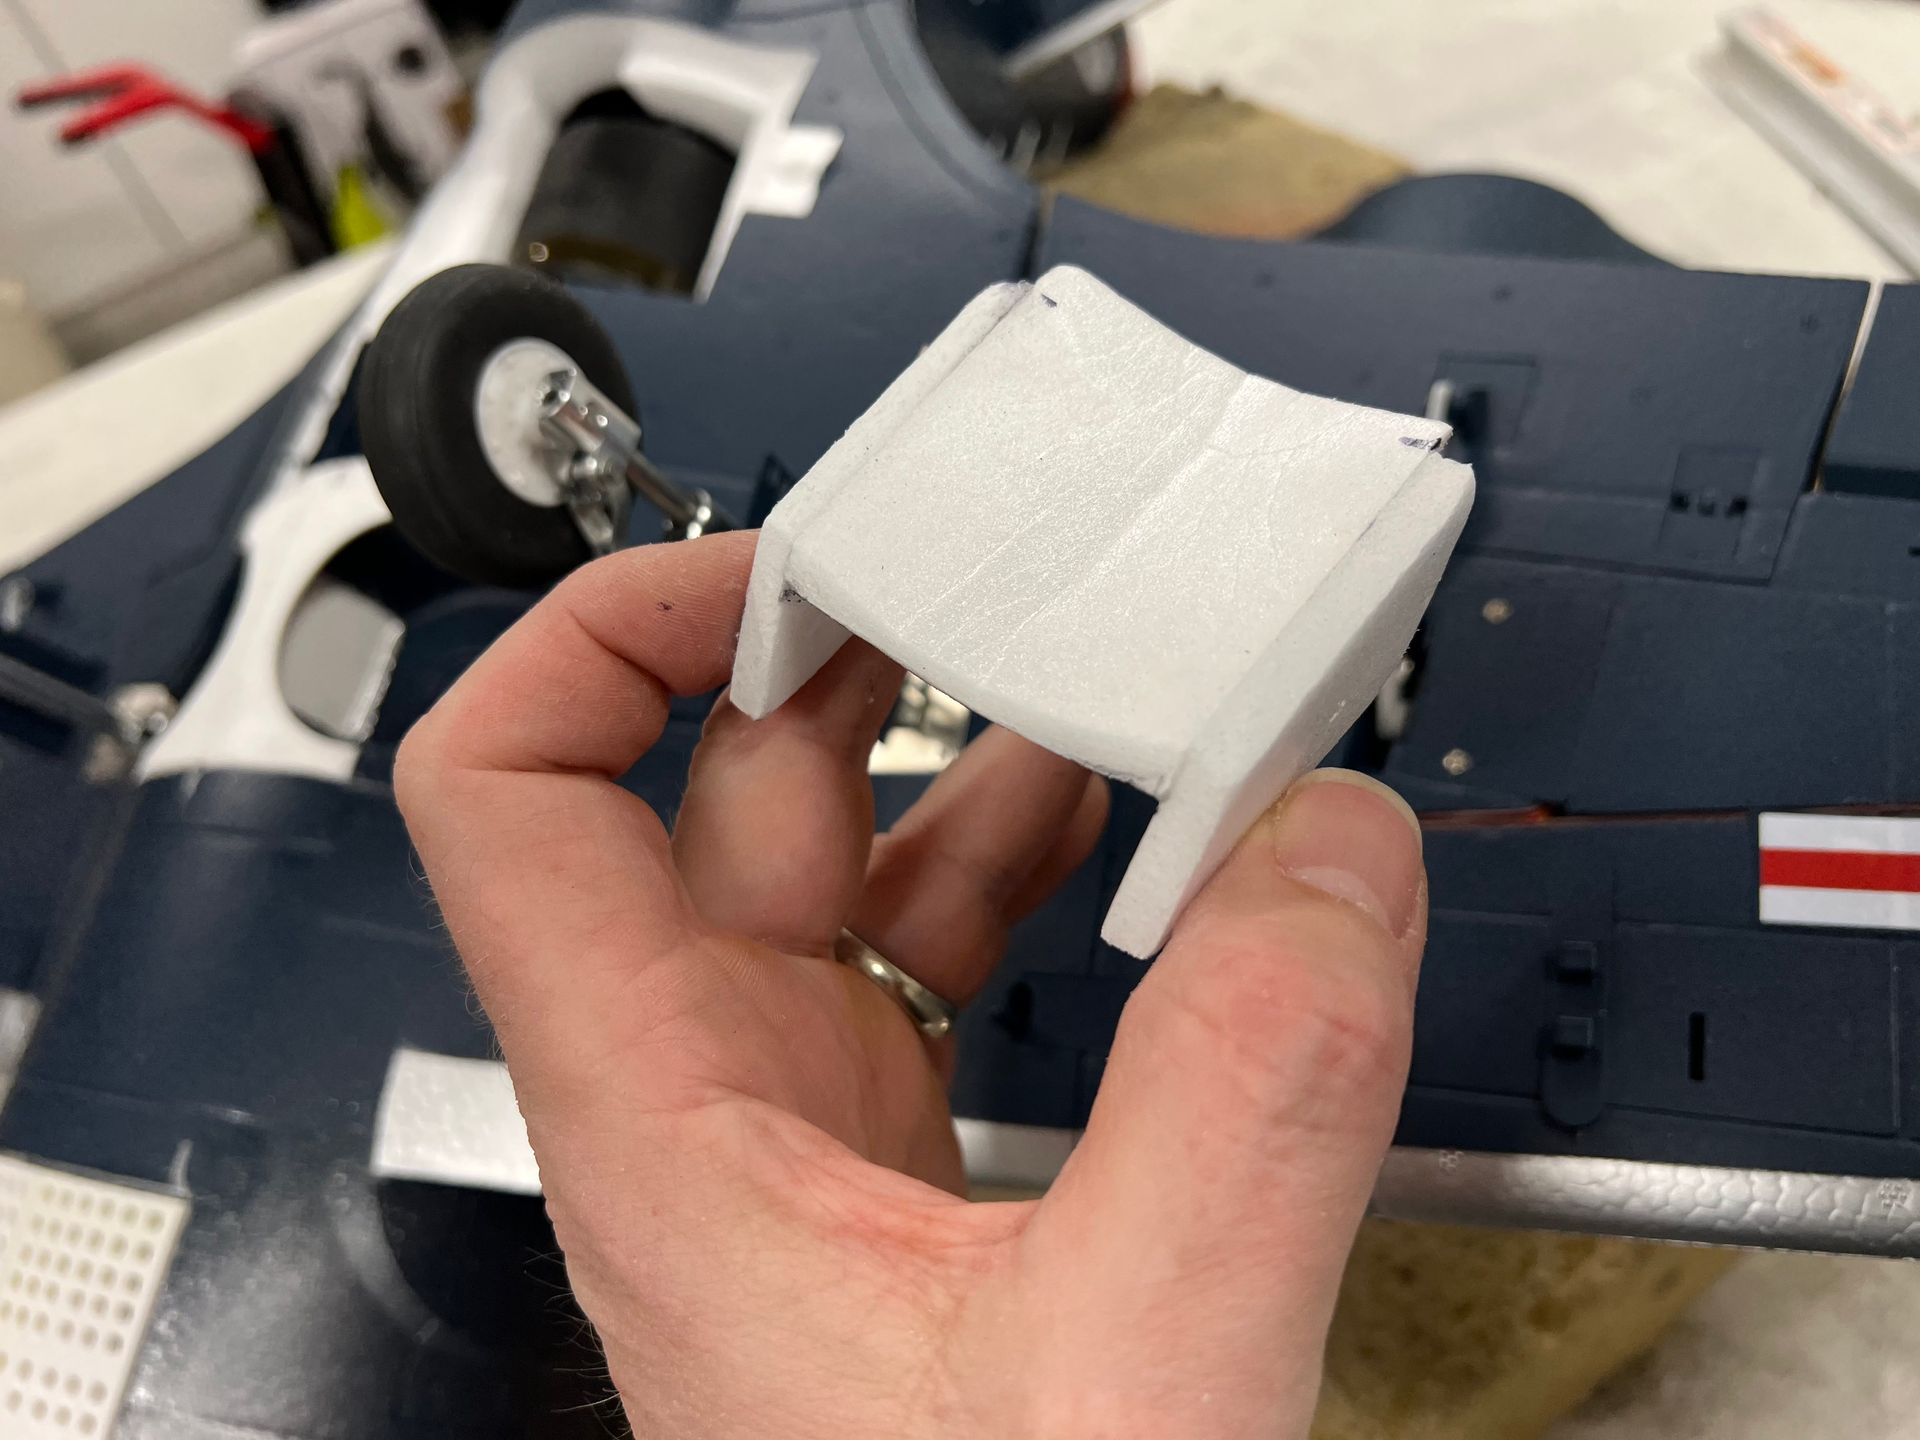
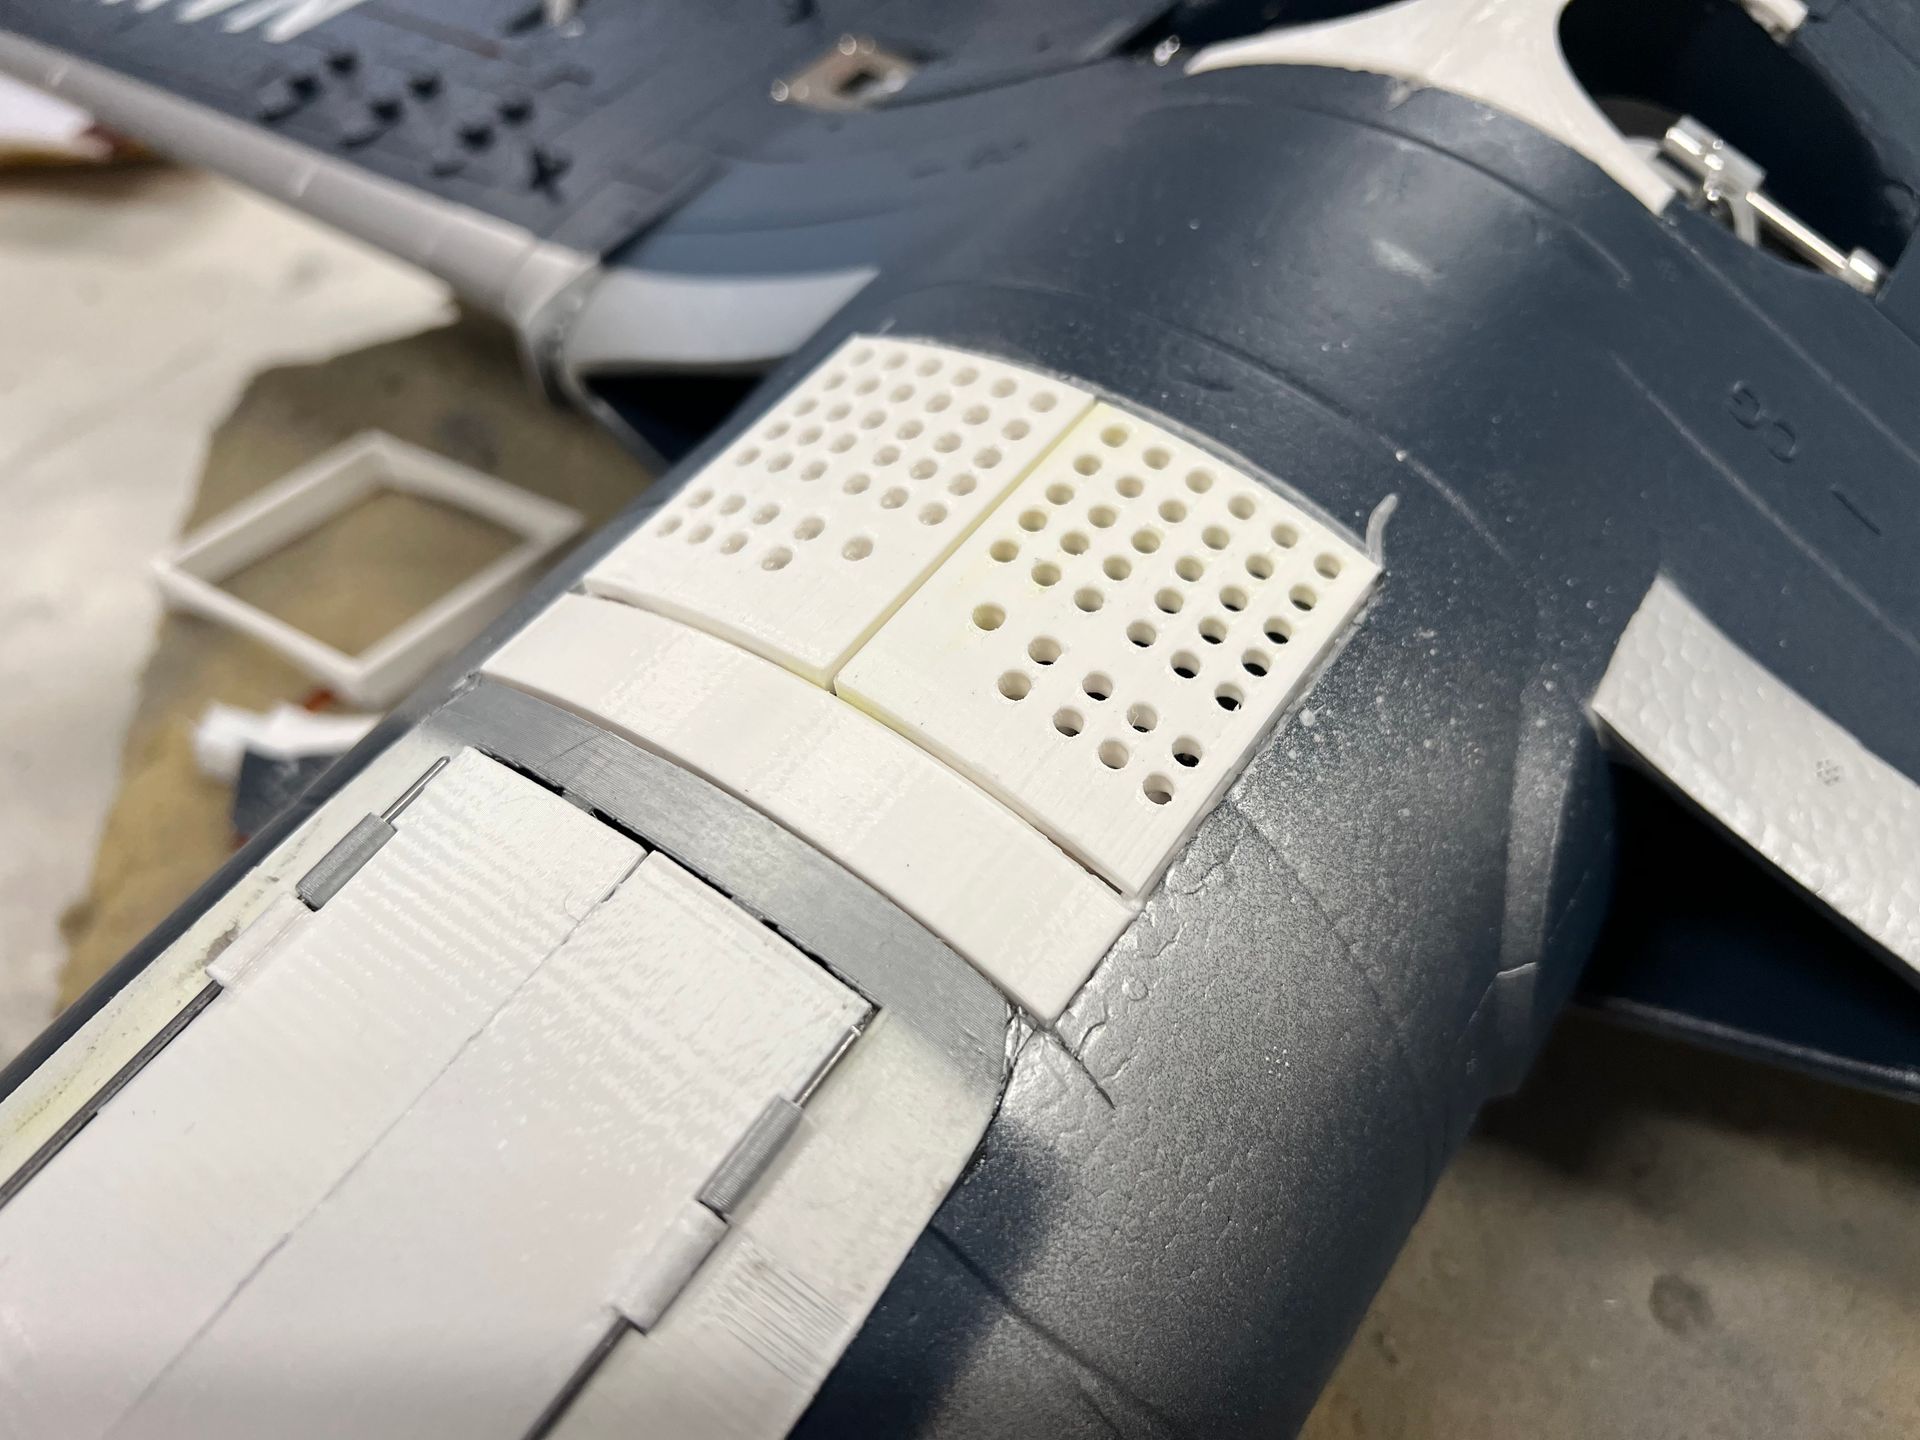
Auxiliary Intake Plug
One area of the stock Panther that’s bothered me is the auxiliary air intake on the underside of the fuselage. It’s molded open, presumably to suggest functionality or aid airflow, but in reality, it’s not aerodynamic nor even necessary the feed the 70mm fan (the inlets themselves provide sufficient area).
To clean it up, I built a custom intake plug using Depron foam. It was shaped to fit snugly into the opening, following the contours of the fuselage while sitting just slightly proud of the surface to be able to sand it flush to blend in more naturally with the surrounding profile. After rough-cutting the plug to size, I built an internal structure to help match the internal inlet shape for a smooth transition to the fan and then glued the enture assembly into the openeing (after removing the plastic grate of course).
The result is subtle, but effective. With the plug in place, the underside of the jet looks far more refined and cohesive, and the entire airframe reads more like a purpose-built aircraft than a molded foam model. It’s a small change, but one that really improves looks and should help clean up the entire inlet system as a whole.

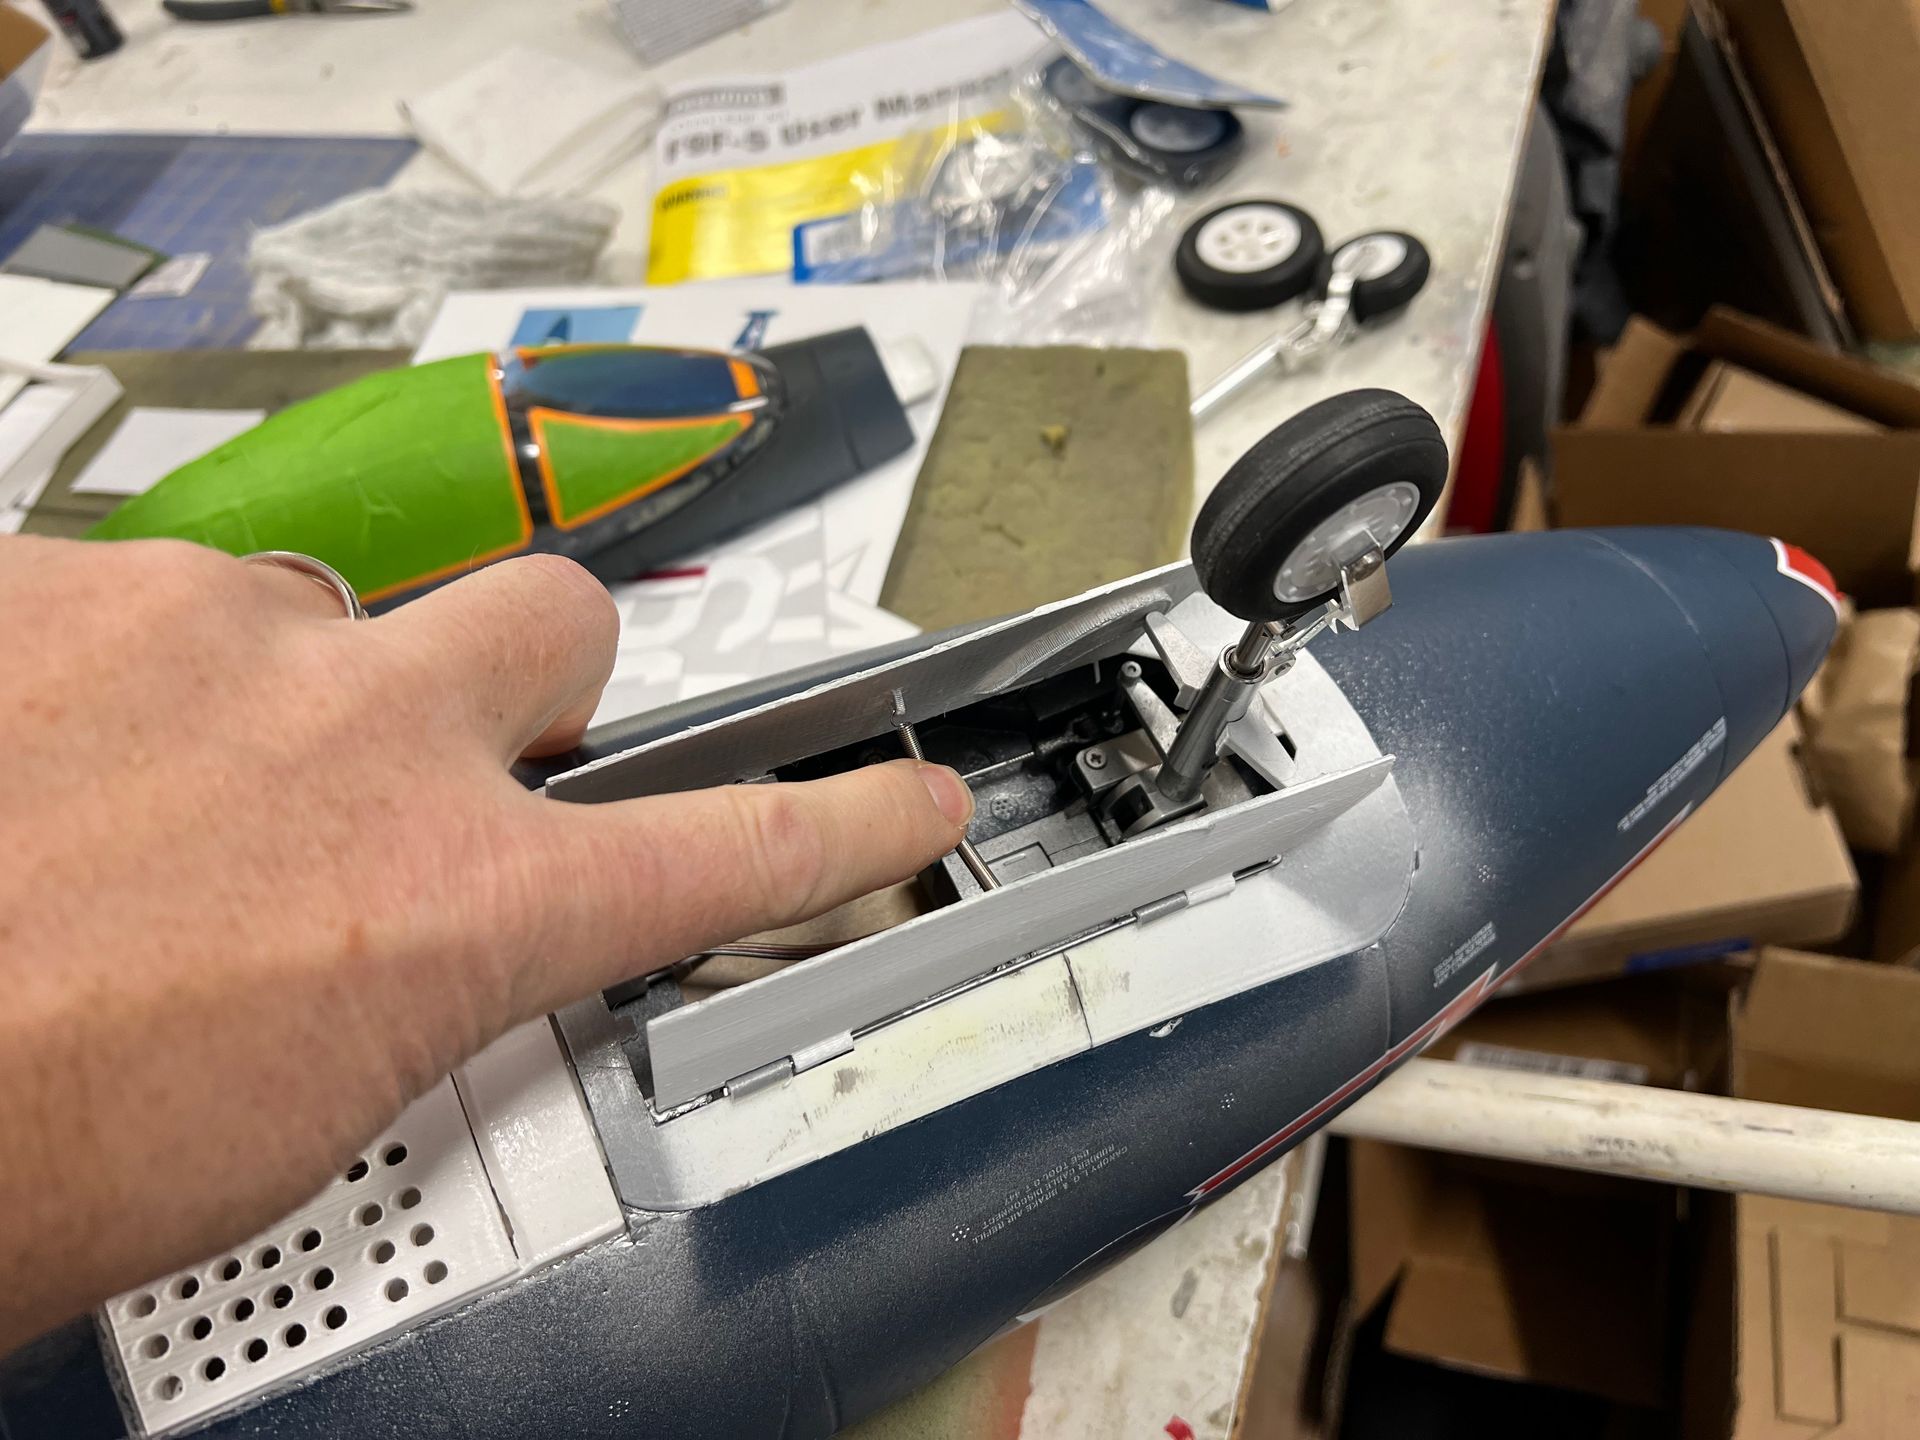
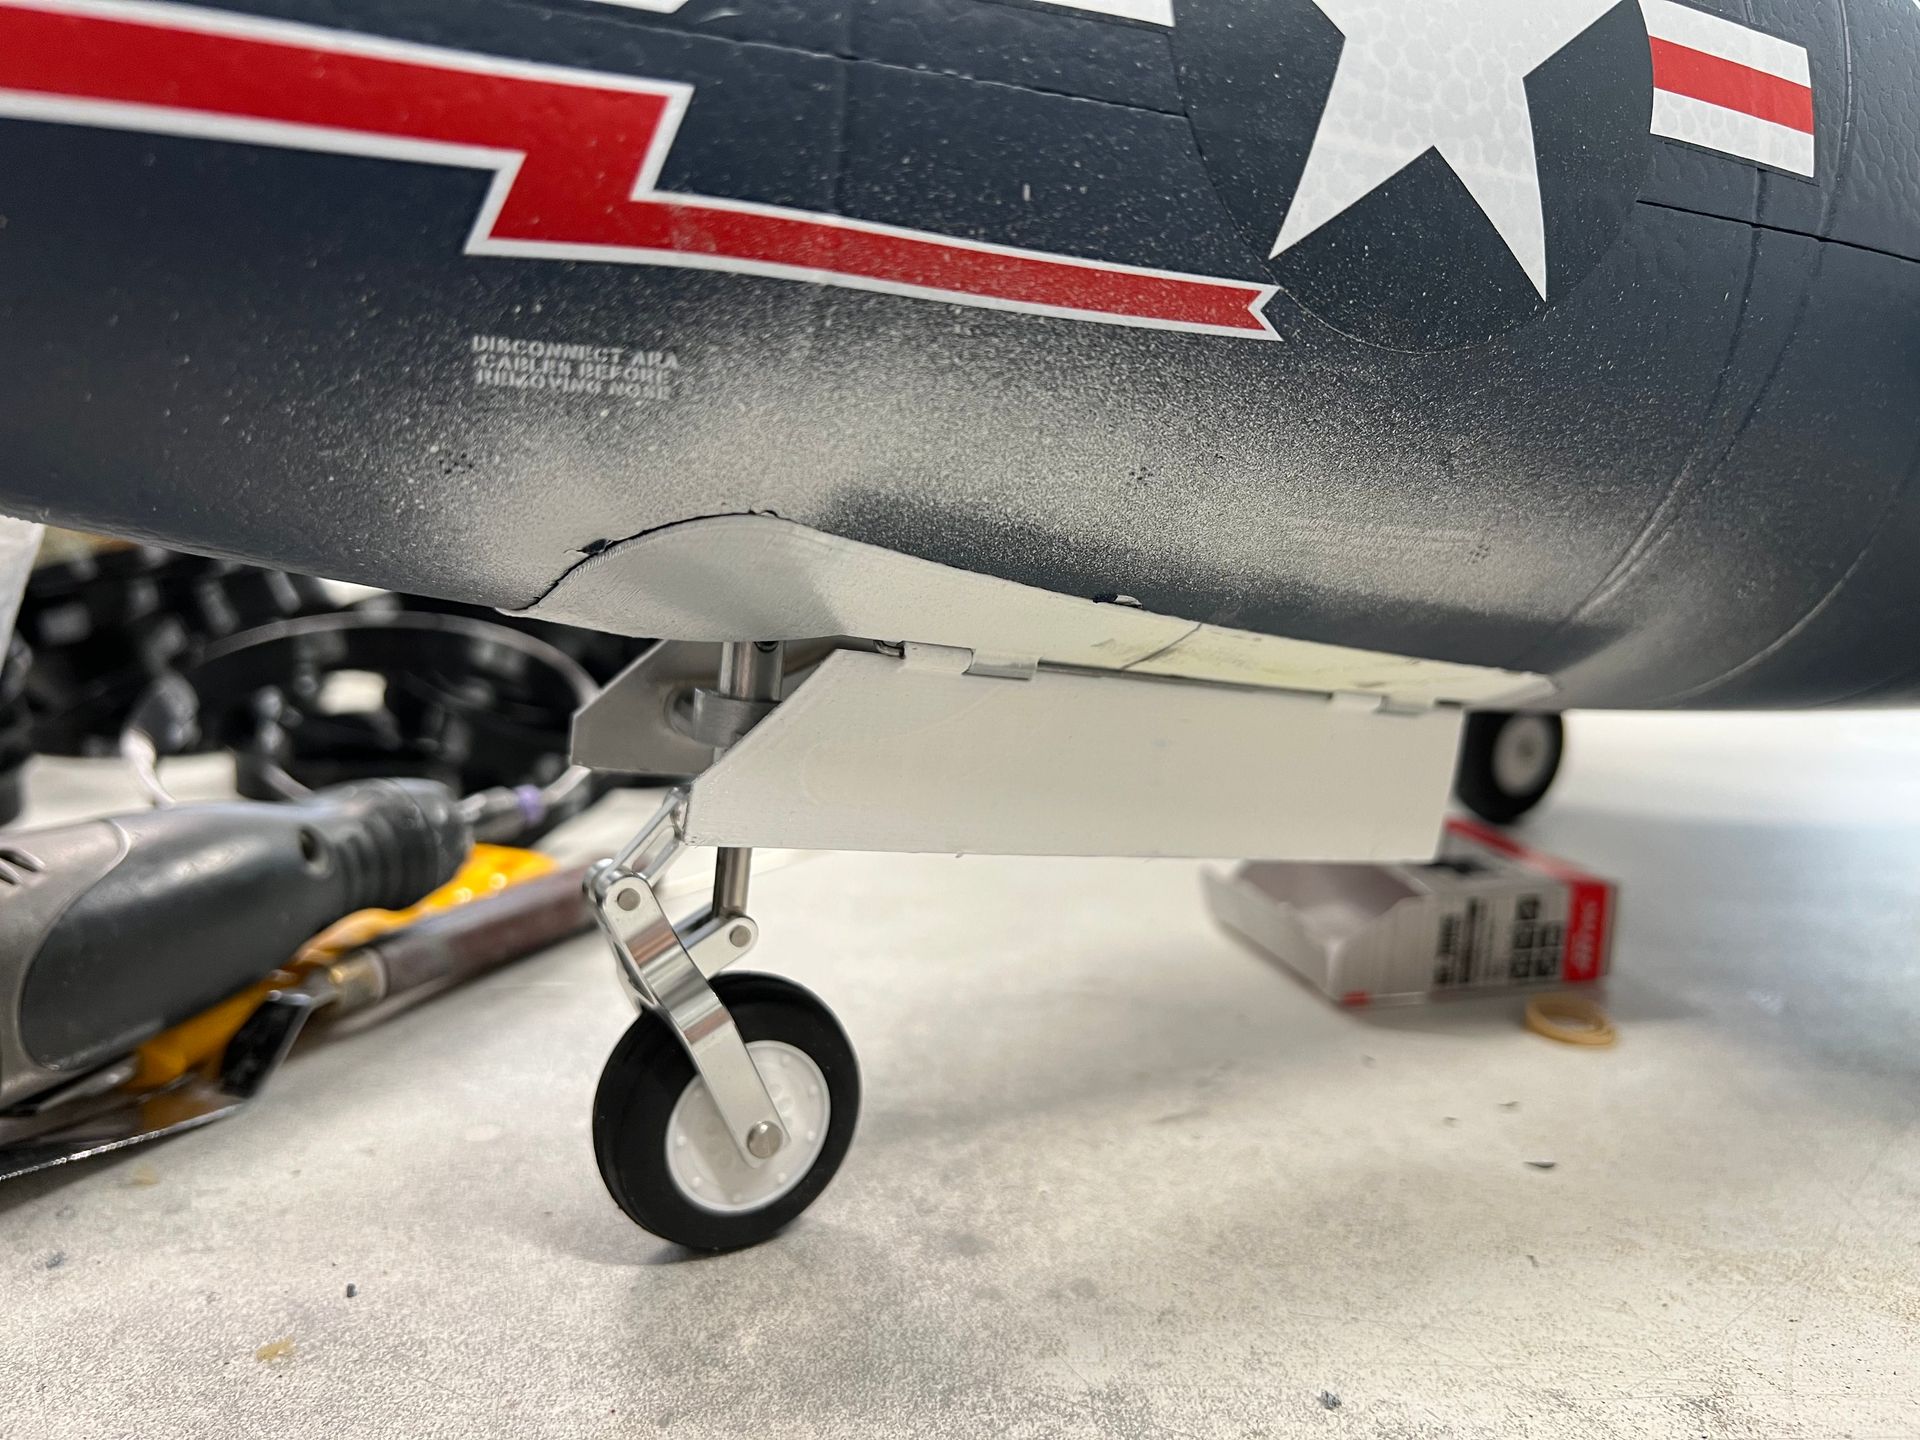
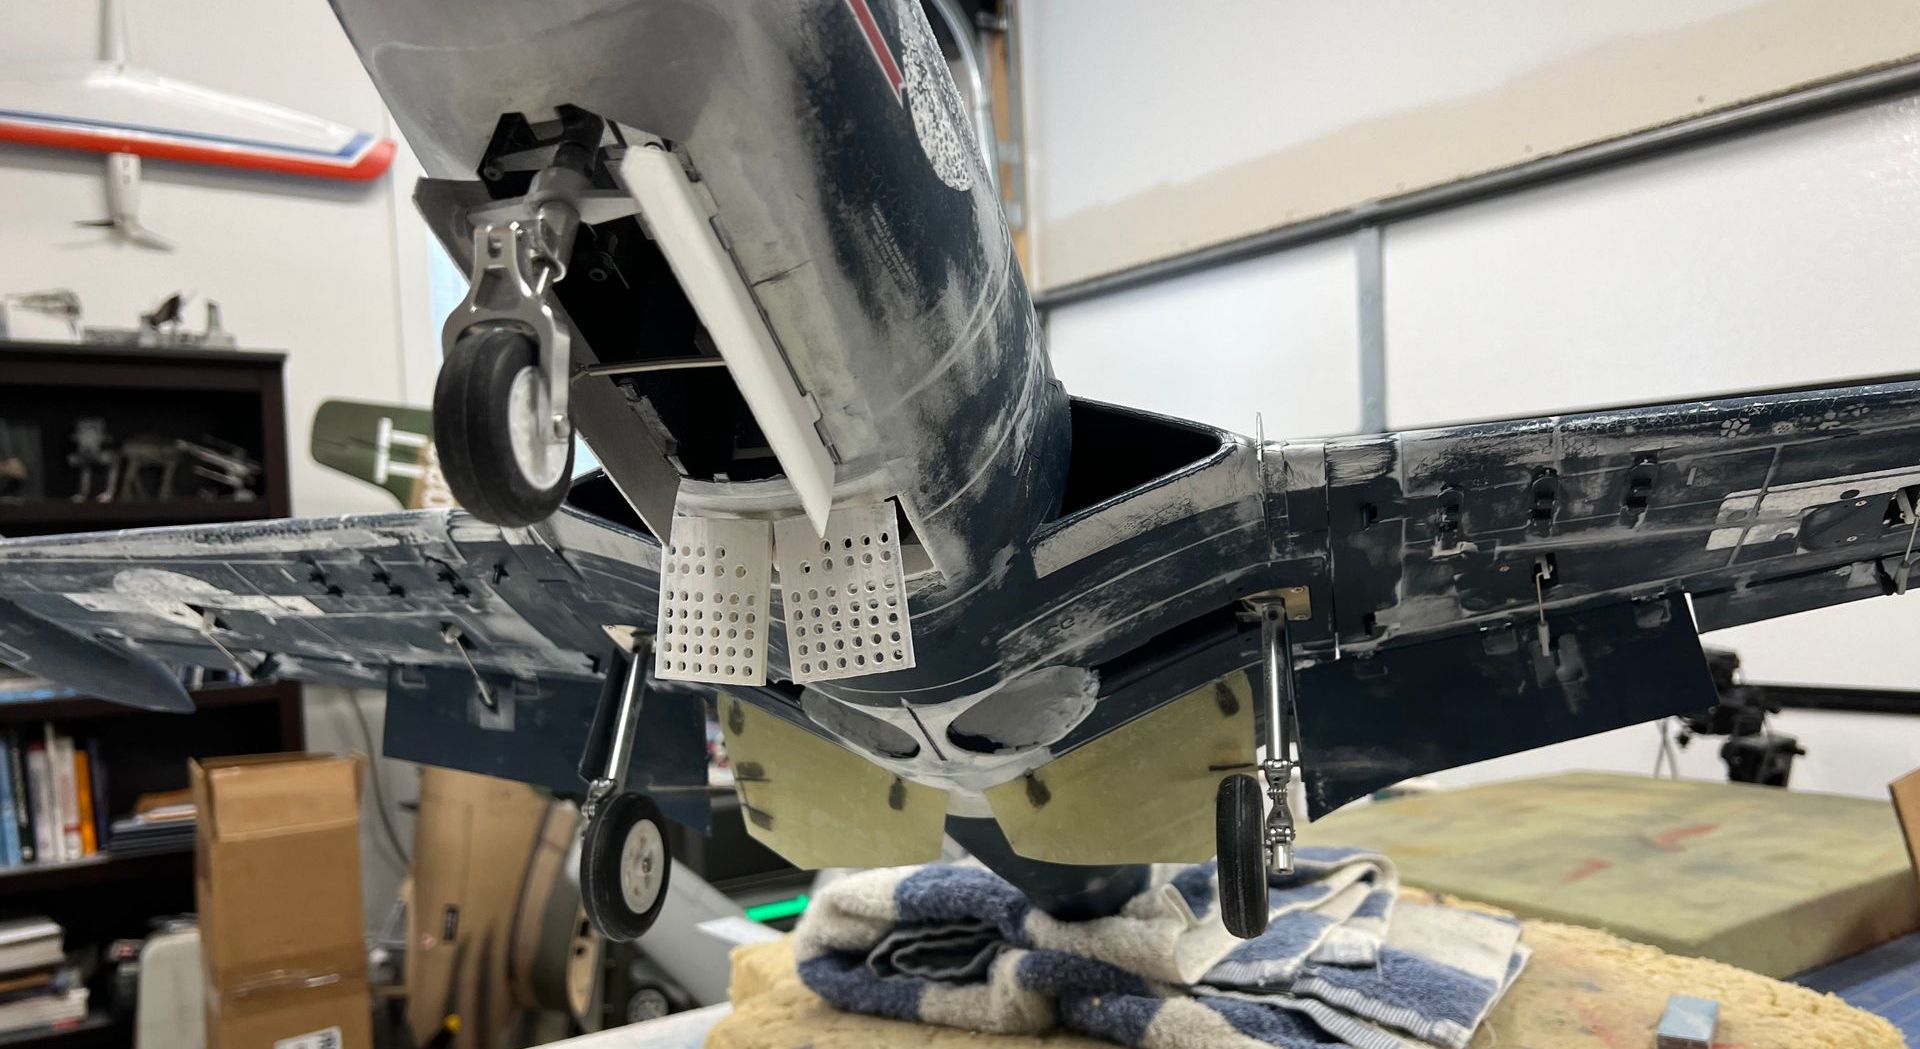
Main and Nose Gear Doors
The stock Panther doesn’t include functional gear doors, which is typical for this size of model. On the full-scale aircraft, they’re a prominent and defining feature. So from the start, I knew I had to bring them back.
For the mains, I started by fabricating full-size strut doors from sheet styrene, cutting them to match the correct shape and proportions. Rather than rebuild the stock doors entirely, I glued these new scale-sized panels directly onto the existing, undersized ones. It was a simple solution that delivered a big visual payoff. To support the overall look, I also replaced the stock tires with properly scaled 50mm wheels and swapped out the stiff stock springs in the struts with softer ones so the landing gear would fully compress under the model’s weight—much more like the real thing.
This combo made a surprising difference. It transformed the Panther’s posture on the ground, giving it that nose-up, ready-to-launch attitude that matches the full-scale jet.

The nose gear required a bit more engineering. I found a free set of 3D printable files specifically designed for the Freewing Panther that matched the door shapes and hinge lines almost perfectly. After printing and cleanup, I glued the cover panel in place permanently and rigged the two doors together using a spring linkage as intended by the designer. This setup allows the doors to be pulled closed automatically as the nose gear retracts—no servos required, just simple mechanical action. In the process, I also shimmed the nose gear down and angled it further forward as much as feasible using some washers all in the hopes of getting the angles to appear more visually correct. It was a small tweak, but one that really helped with the looks greatly.
Landing gear might not be the flashiest part of a build, but they can absolutely make or break the realism of a model. In this case, the combined changes to tires, stance, and gear doors made a huge impact. The Panther just looks right now—whether it’s sitting on the tarmac or rolling out after touchdown.

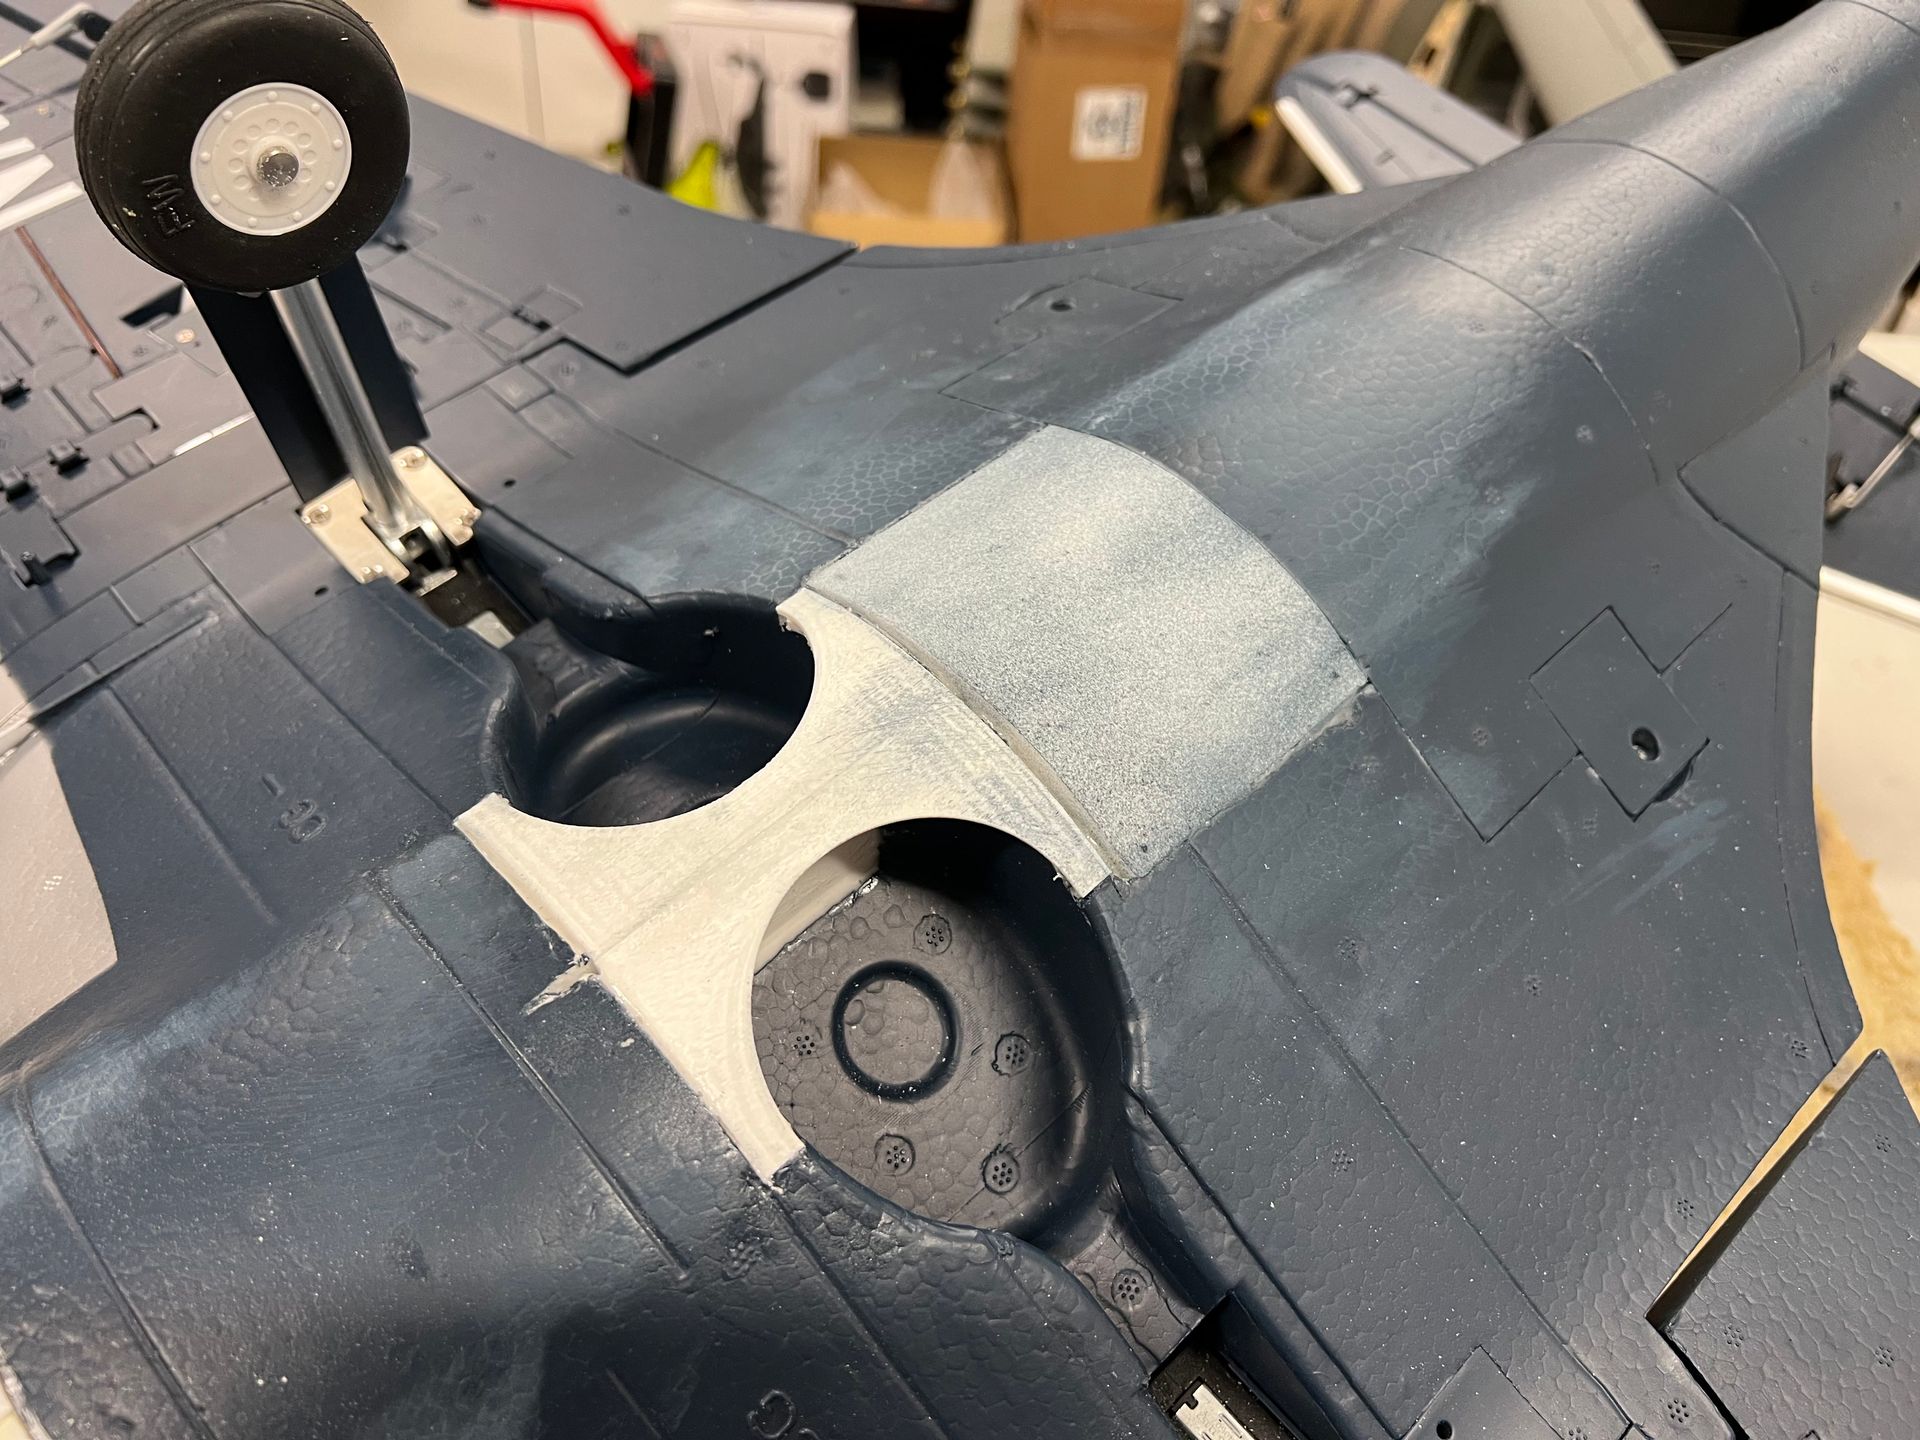
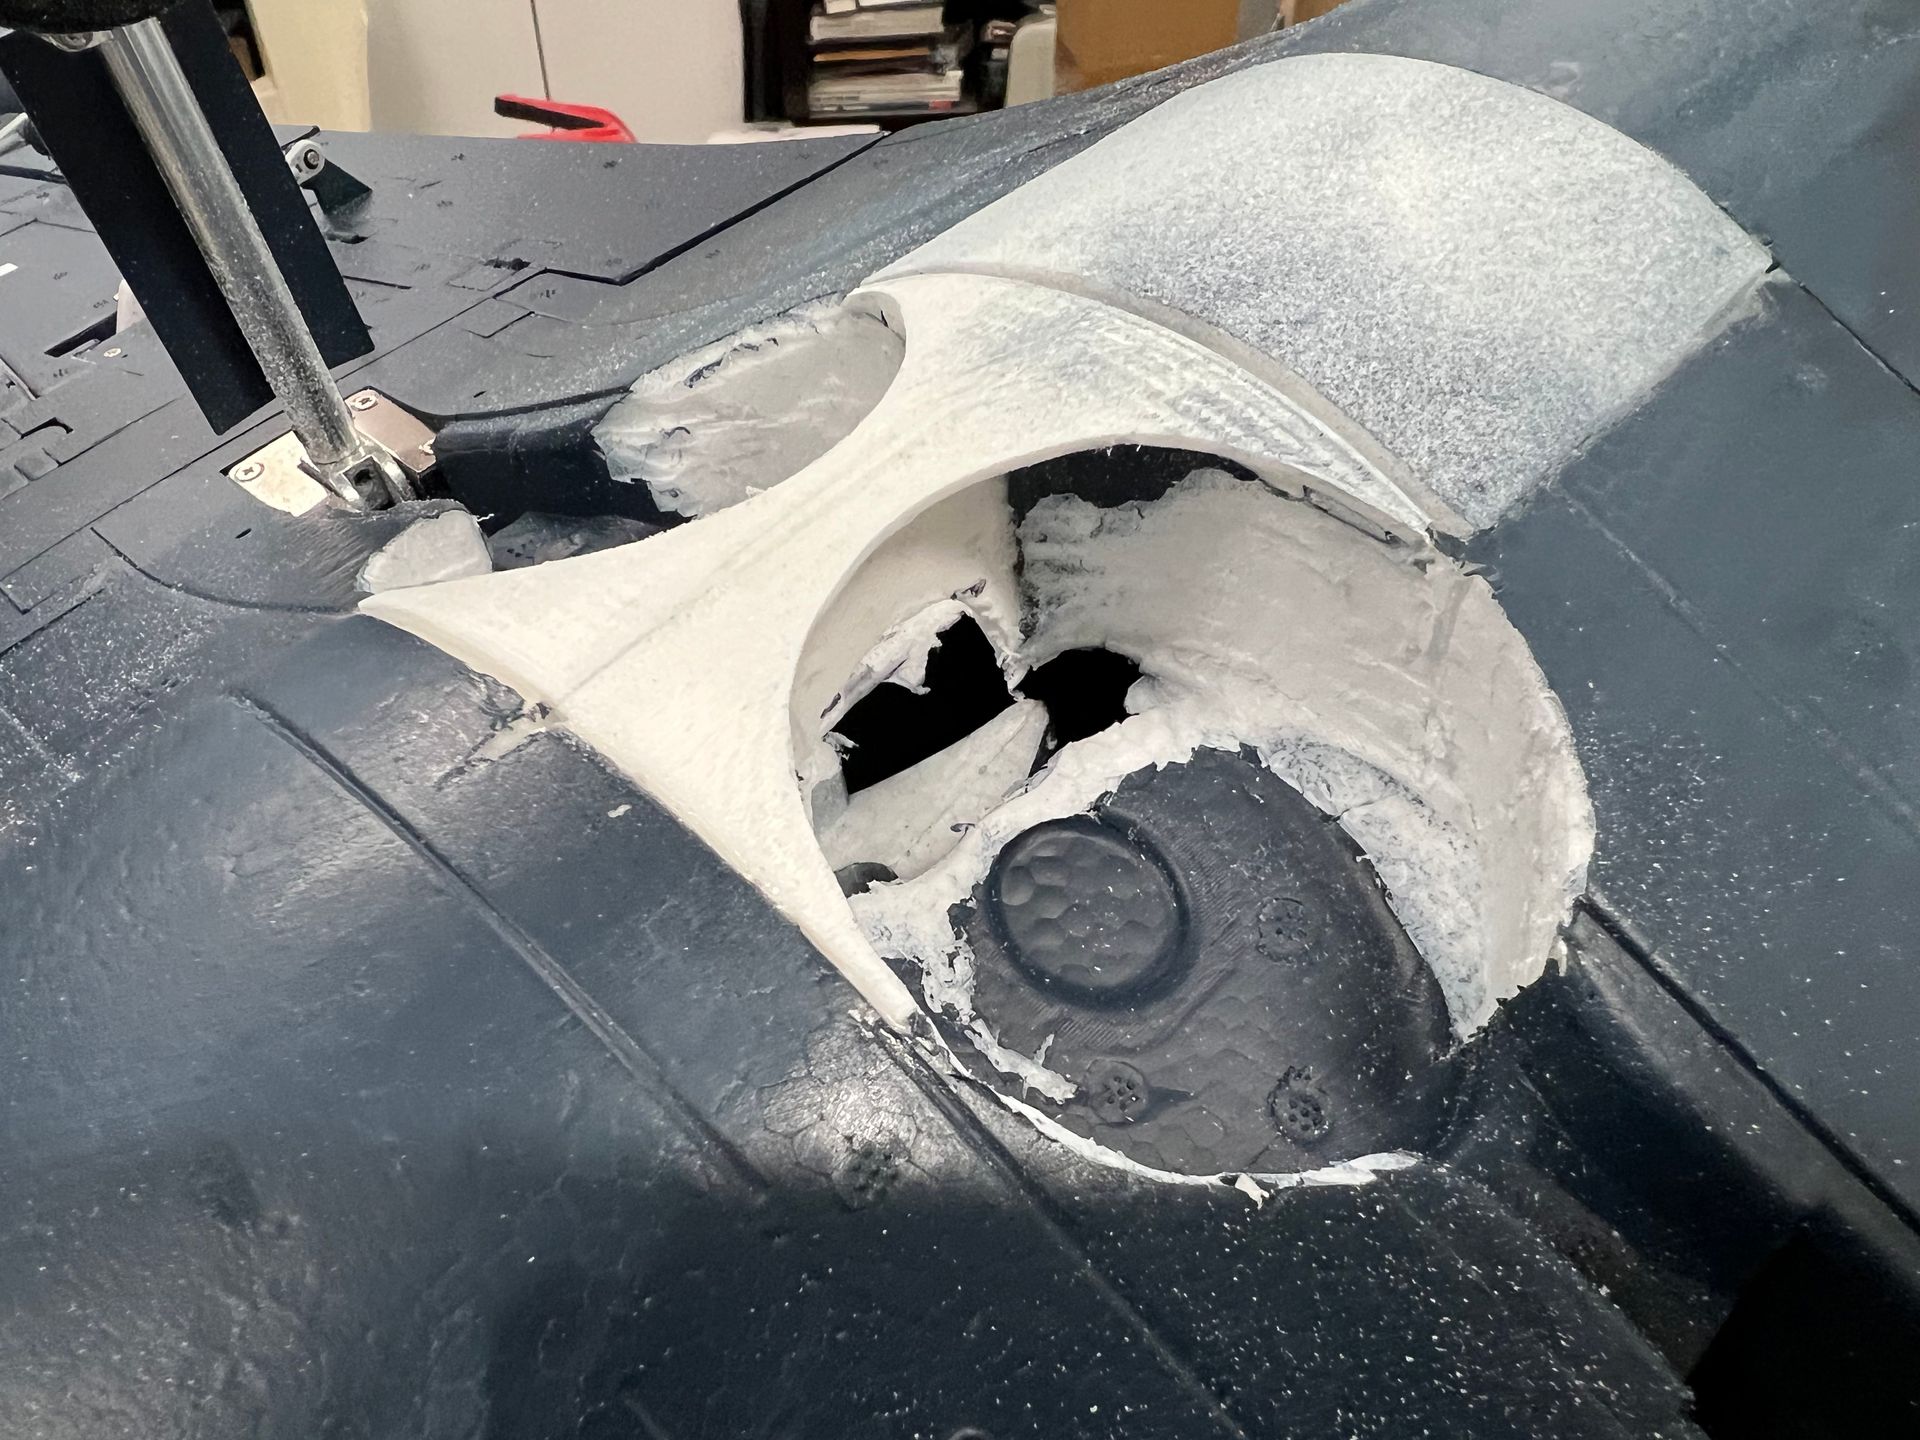
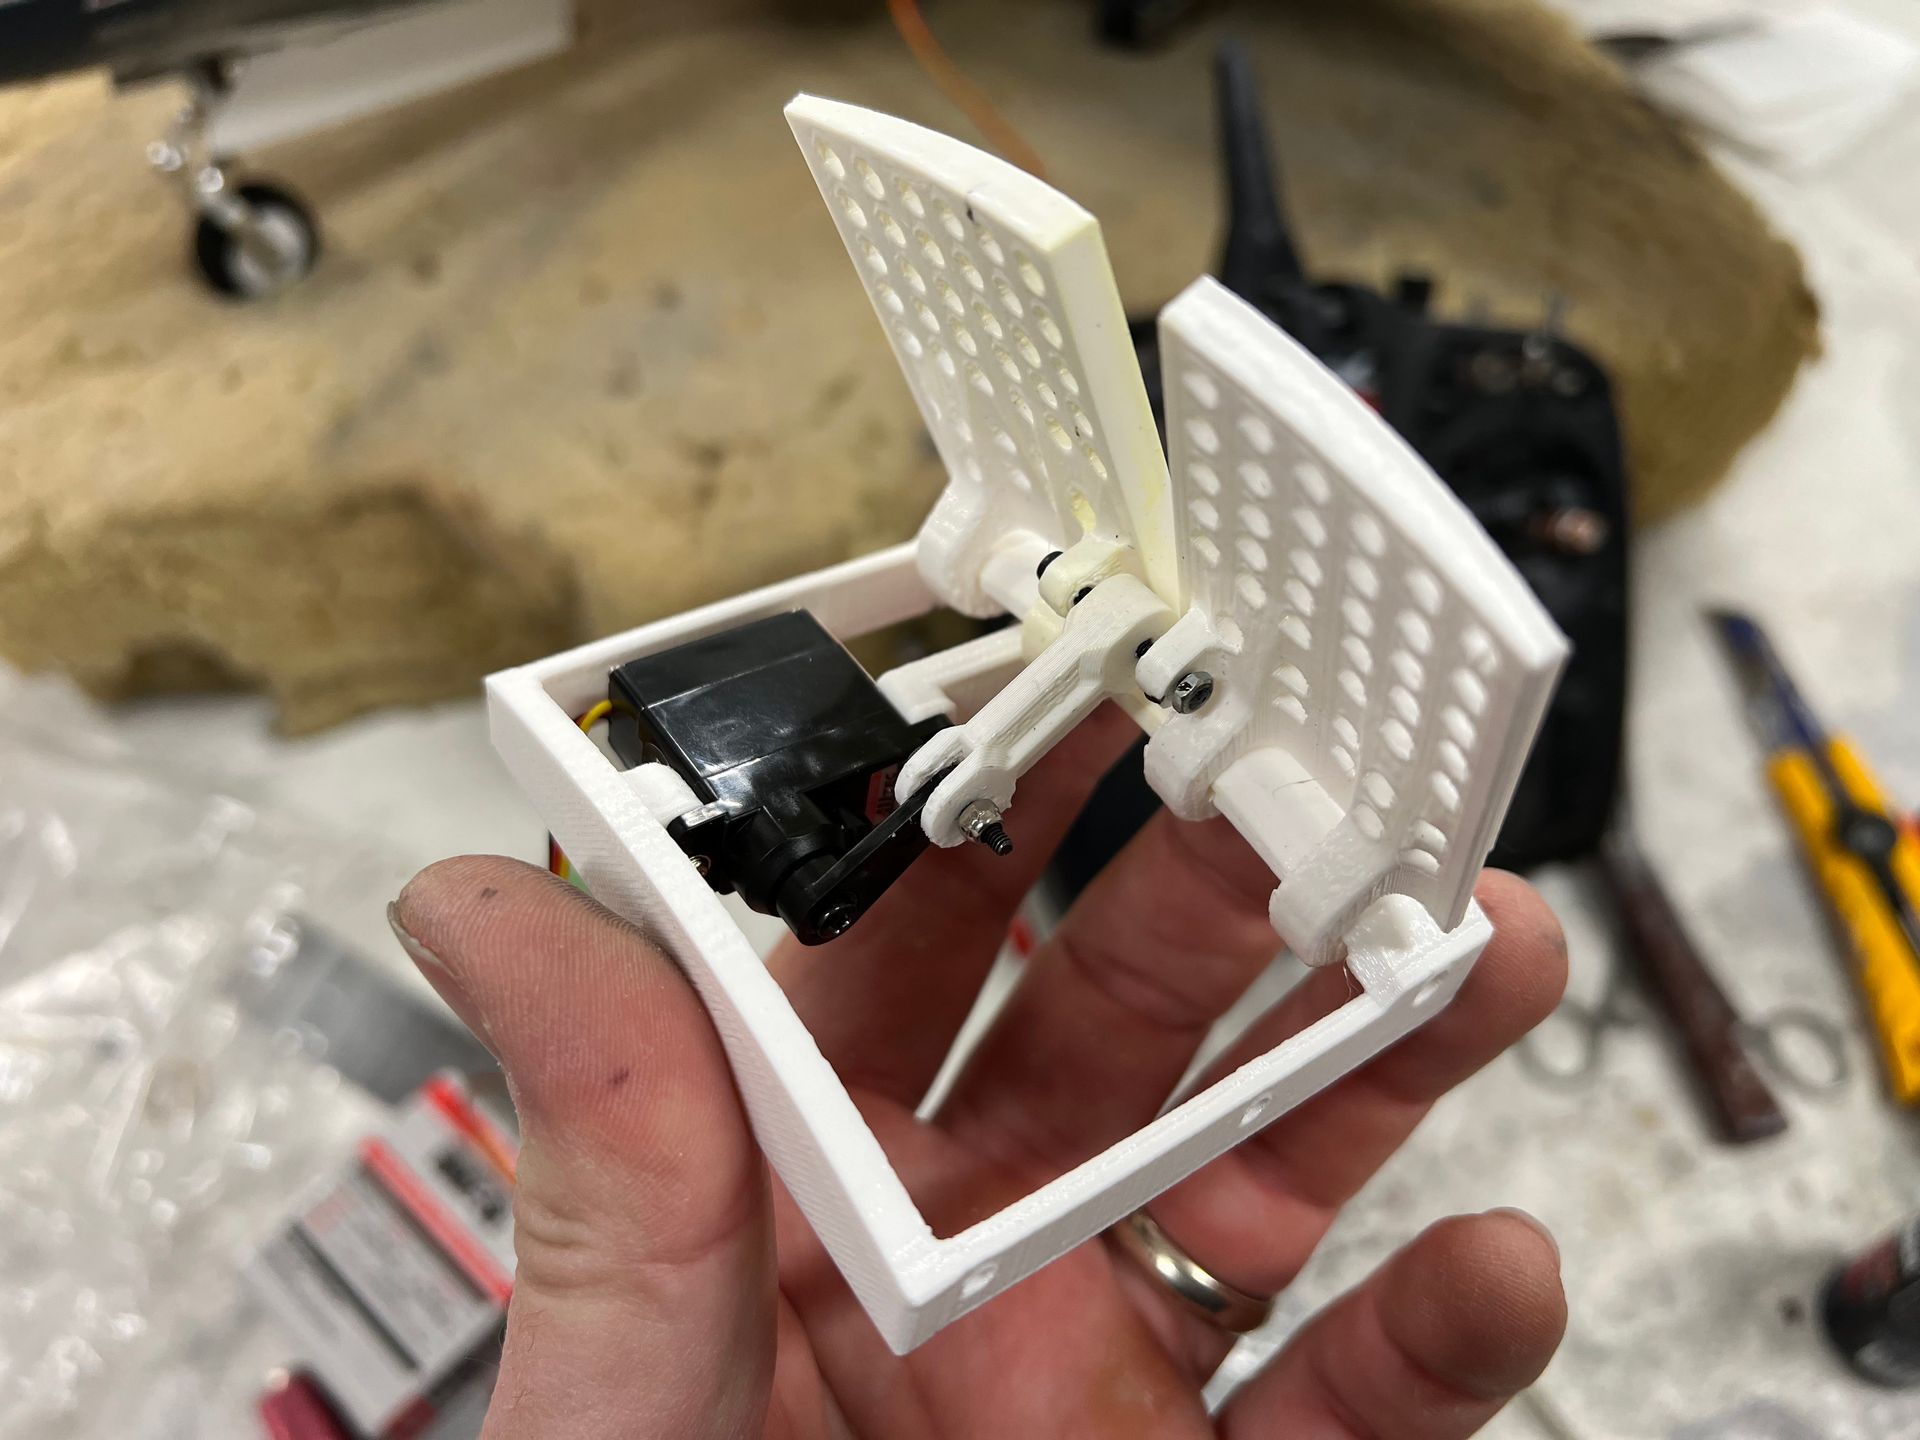
Speed Brake Detailing
One of the more interesting design features of the full-scale F9F Panther was its reliance on deployable speed brakes to help manage throttle lag on final approach. The early jet engines had noticeable spool-up time, so Navy pilots needed to fly their approaches with higher throttle settings to ensure they had the necessary response if a go-around—or bolter—was required. To allow this without over-speeding, the aircraft used large belly-mounted speed brakes just behind the nose gear with the sole purpose to generate drag and keep the approach speed under control.
For this kit bash, I wanted to replicate not just the look, but also the function of those speed brakes. I found a set of existing 3D printable speed brake files originally intended for the Freewing 80mm EDF Cougar. While they are actually too small for the Cougar, they captured the full geometry for this 70mm EDF Panther just about right and were even a very close match to the contour. The parts were printed in PETG for heat resilience and lightweight strength, and mounted into the fuselage by simply cutting out the existing fuselage and dropping in the build speed brake assembly in its place. Each brake is operated by a single servo and are deployed via a separate channel as desired for landing or slow dirty passes for that big dose of scale realism.
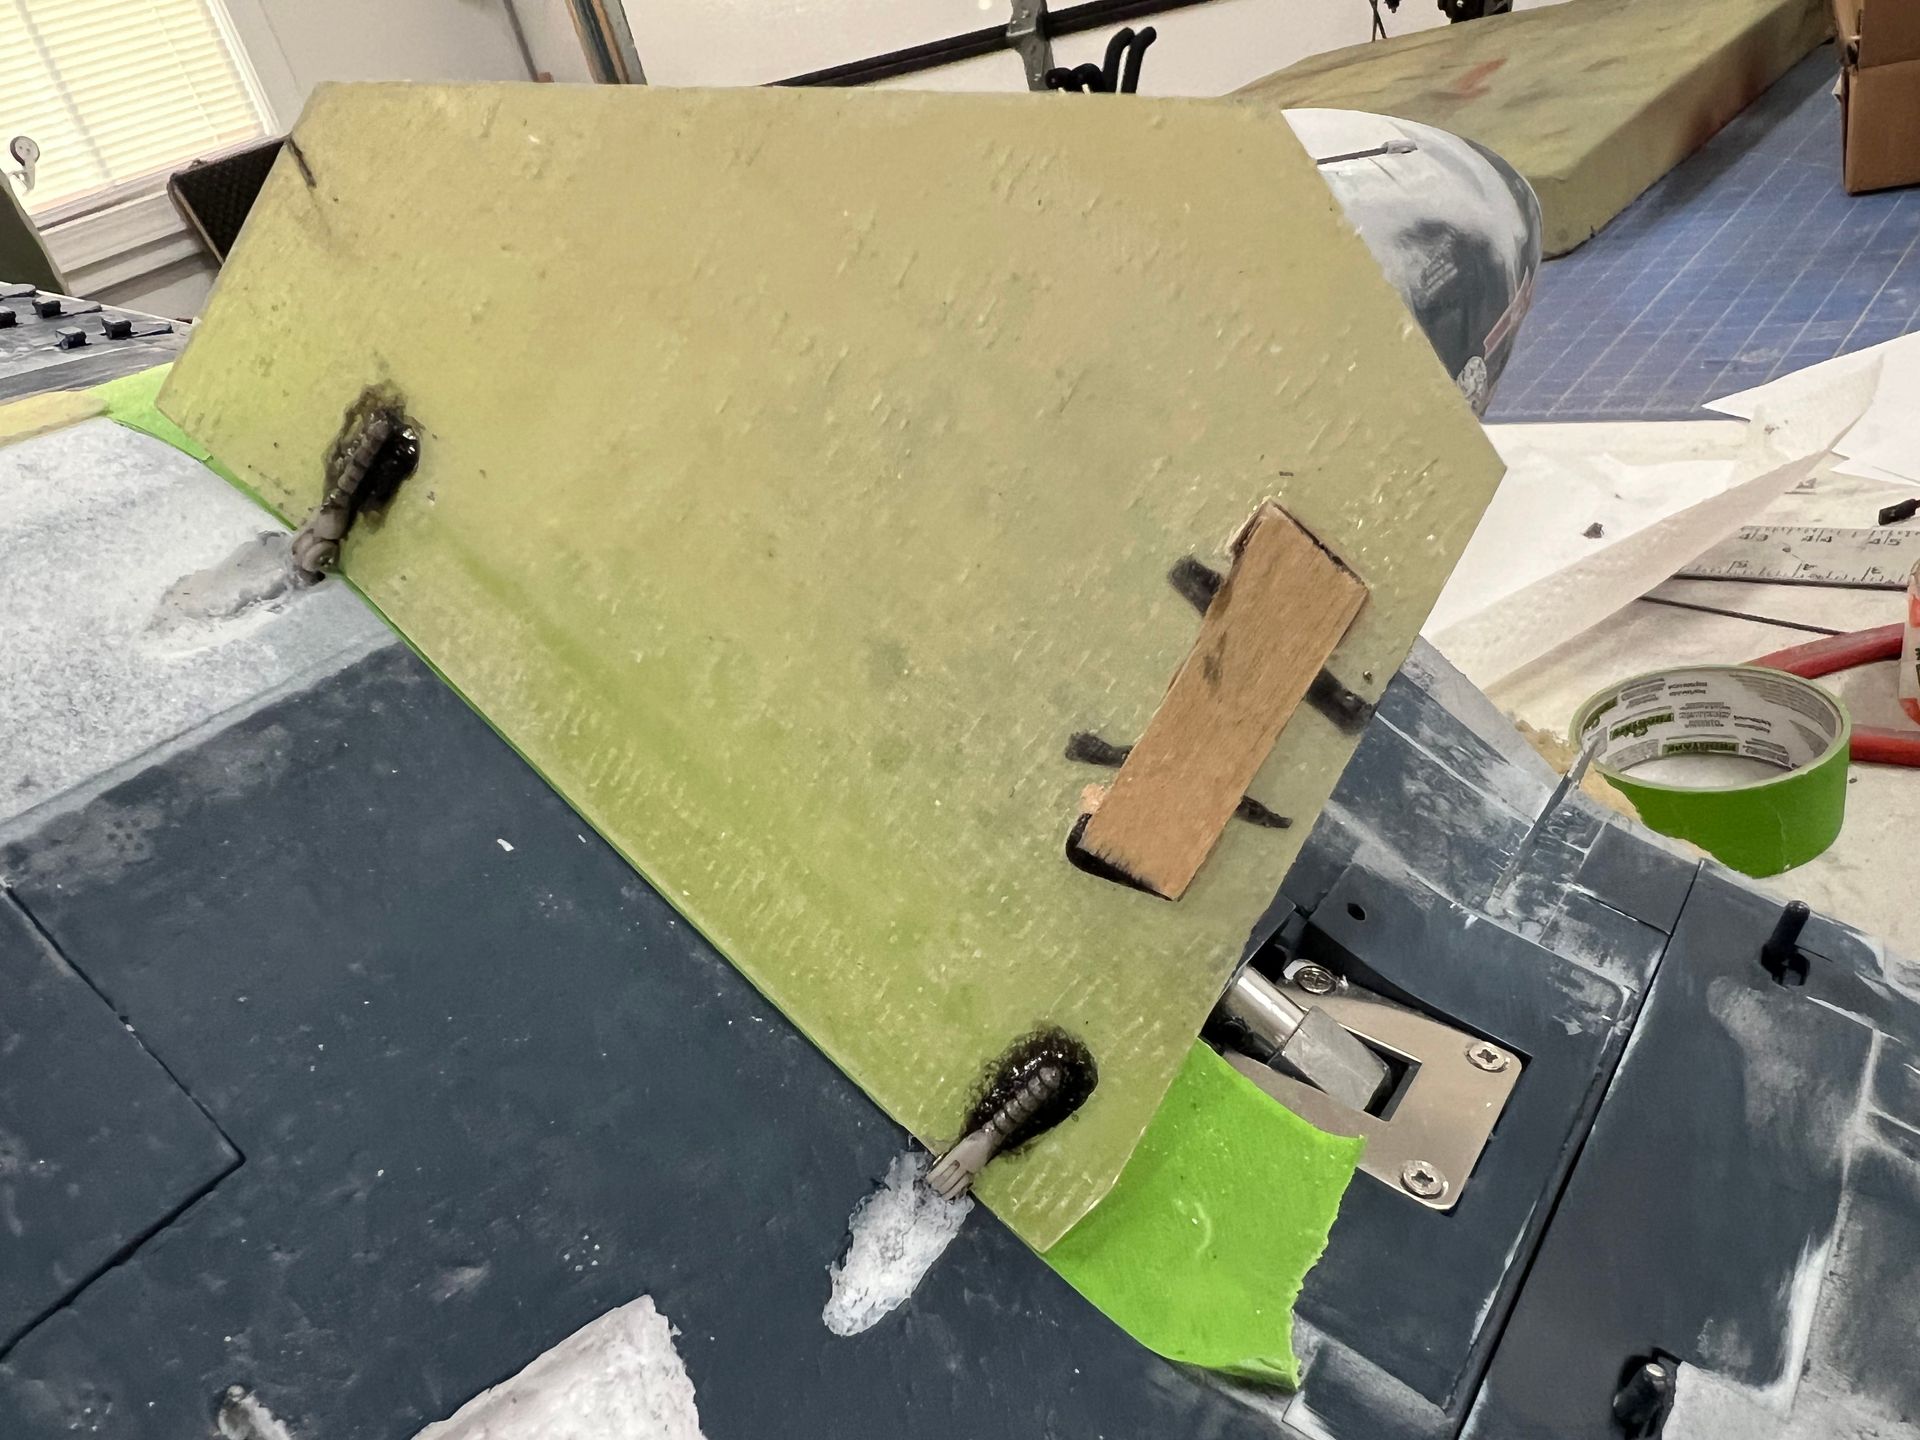
Scratch-Built Body Flaps
Body flaps are one of the signature features of the F9F Panther—they're positioned across the fuselage, roughly in line with the wing flaps, and give the jet a distinctive, unmistakable look when deployed. On the full-scale aircraft, they served as aerodynamic control surfaces to enhance low-speed handling during carrier landings. For this model, they were the perfect opportunity to bring in functional realism.
Unlike most of the other modifications on this build, the body flaps were scratch-built from fiberglass. To create them, I first laid packing tape over the fuselage where the flaps would be, applied mold release, and then laminated a couple of layers of fiberglass directly over the surface. Before the layup, I placed vinyl templates to define the final flap shapes. Once cured, the fiberglass came off cleanly and was easy to cut to shape using the predefined outlines.
Each flap was hinged using two small hinge points with steel pins for durability and smooth motion. To avoid the need for additional servos, I devised a simple mechanical solution. A 1/16" plywood spar was embedded into the root of each wing flap and extended inward through the fuselage. Behind the body flaps, a plywood capture bracket guided the spar and allowed it to slide as the wing flaps moved. This setup meant the body flaps would open automatically with the wing flaps and return cleanly when retracted.
The design ended up working even better than expected. It’s a simple, effective, and lightweight way to incorporate functional body flaps without adding complexity—and it adds a ton of visual impact, especially on approach with everything deployed.


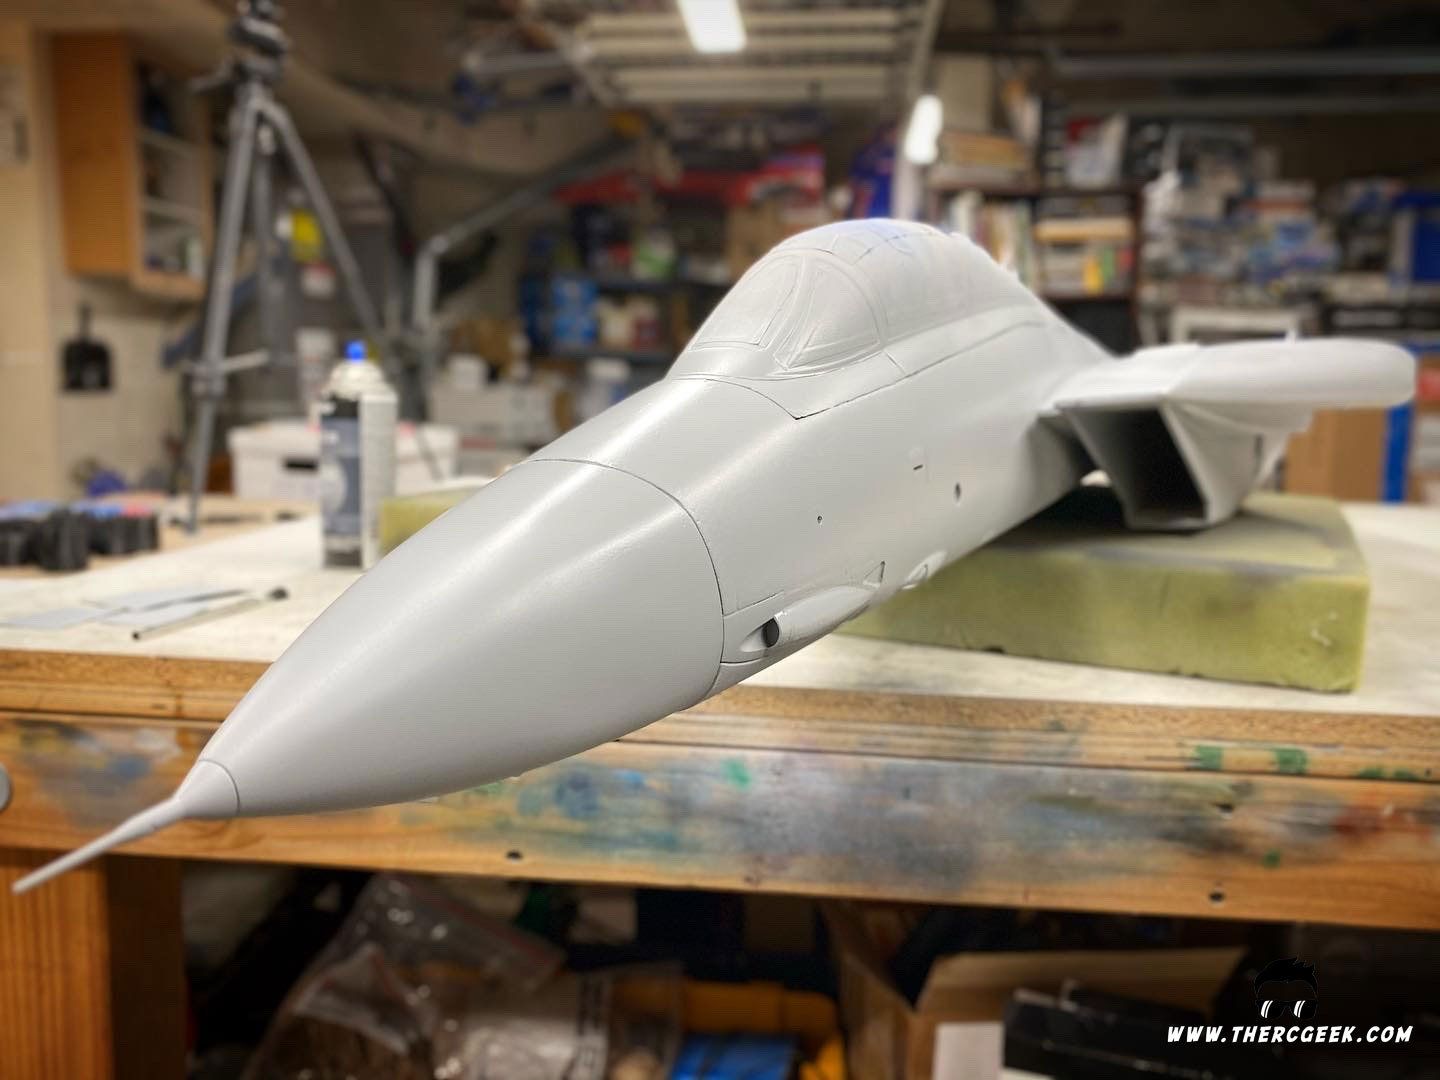
Surface Prep: Smoothing the Canvas
The airframe comes molded with soft, but oversized panel lines which are fine for most flyers—but for a scale finish, they had to go. I started by filling every panel line and molded surface detail using lightweight spackle. The spackle was applied with a putty knife and placed to ensure no gap was left behind. Once fully cured, I block sanded the entire airframe by hand to achieve a smooth, even surface and eliminate the telltale texture that often gives away a foam model. Cleaning and sealing the foam ensured a clean base for the later sealing and primer process. This process turned the stock foam surface into a blank canvas, allowing me to later apply my own custom panel lines and other detail in a more controlled and realistic way.
In Part 2 of the series, I’ll walk through the process of sealing, priming, painting, and weathering the model using SMS acrylic lacquers and custom vinyl graphics. Stay tuned!
The RC Geek Blog is your place to learn about all aspects of the RC hobby. Learn to build, design, drive or fly that RC project you’ve always wanted to build, but have been intimidated to try. This blog is here to help you on your journey and provide tips and tricks as you go! My hope is to inspire builders both experienced and new! So, welcome, please look around, it’s an exciting beginning! I’m currently documenting my latest competition scale RC jet build, a Mark Frankel F4D Skyray, along with some other fun tips and videos. If you can’t find what you’re looking for on this front page, click on any of the categories to the right and it will show just posts related to those categories. Please feel free to add comments and/or contact me directly if you have questions, I’m here to help! And don’t forget to check out my YouTube Channel, I post new videos every week!
Subscribe To Our Blog Now