The RC Geek Blog
By: Chris Wolfe
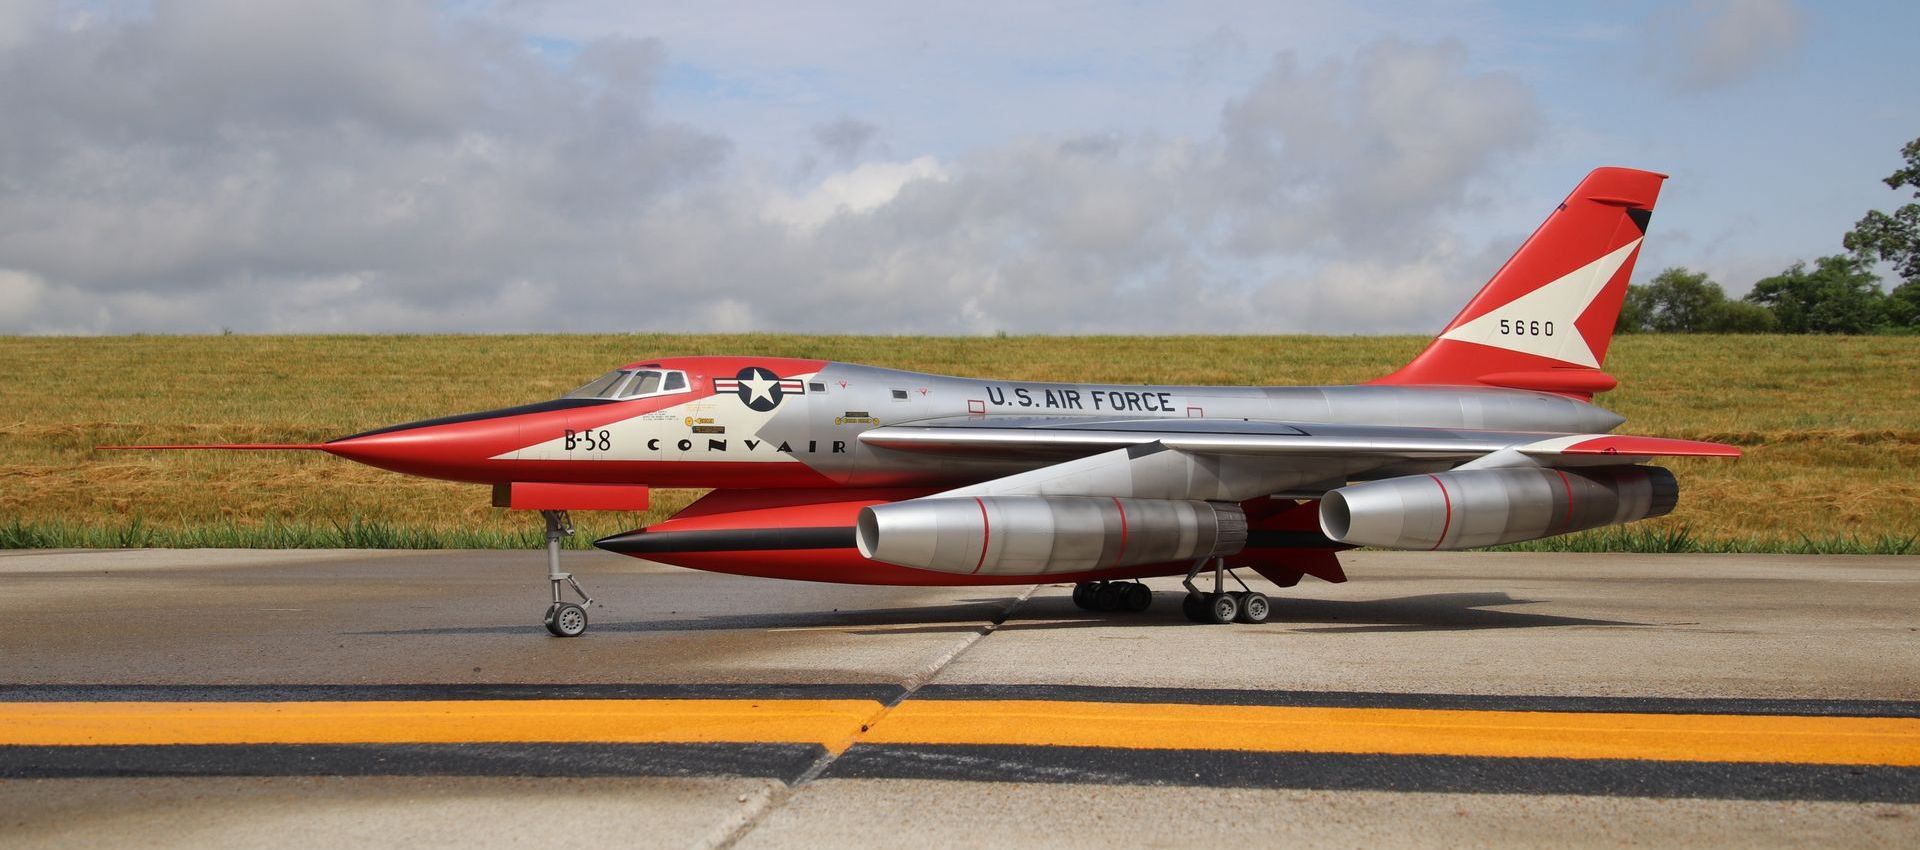
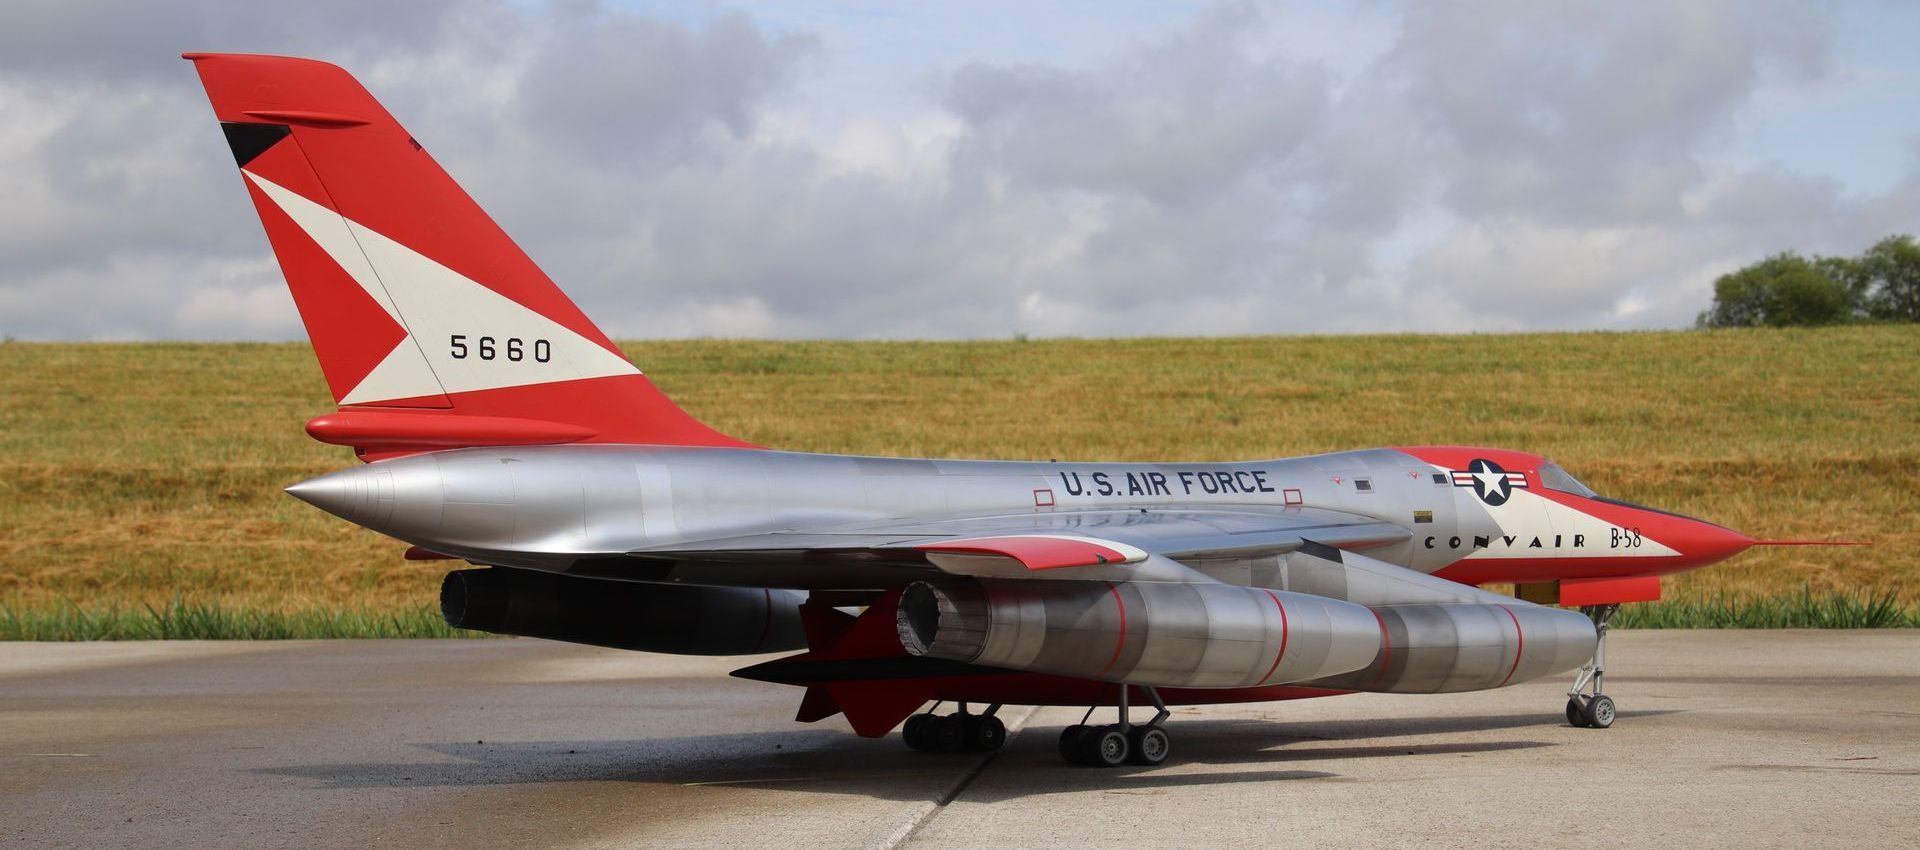
The B-58 Hustler Saga - From Triumph to Tragedy
In the RC world there are projects, and then there are projects that push you to your limits of creativity, engineering, and perseverance. My RC B-58 Hustler project was undoubtedly one of the latter...especially in the realm of perseverance. This was going to be my next competition scale model and well, let's just say that didn't quite work out because of a mistake I made. Join me in a story of meticulous construction resulting in a single and unfortunate flight...with many lessons learned.
Building the RC B-58 Hustler
Truth be told, this project started about 8 years ago. A good friend of mine Dorian Anderson from Jet Hangar Hobbies had developed and tooled an all composite B-58 Hustler for 4x EDFs. He had built and flown a couple prototypes through the last number of years and about 2 years ago, the opportunity came up to be able to build one of his limited edition kits with the newly developed RC Crafters scale landing gear for myself. And with that, the wheels began turning and the research began for the project. The B-58, with its sleek lines and futuristic design, was a marvel of its time, capable of reaching Mach 2 and serving as a strategic bomber during the Cold War and I was excited to recreate this beast in RC form.
Shortly before our move to Tennessee, I took possession of the airframe and after getting settled from our move, it was time to start the build. Which went as follows (fully documented on my YouTube Channel):
Setting up Flight Controls and a Building Drag Chute System
The build began with setting up some of the simpler items. The elevons were pre-hinged by Dorian and so the elevon servos were installed and from there the rudder surface was hinged and the servo installed and setup. There were no external control horns anywhere on the model, so care was taken to ensure that everything was tight and strong. To finish up this step, drag chute doors were built and a spring loaded pin mechanism built and tested with the RC Jet Chutes drag chute.
EQUIPMENT USED
Elevons ► Hitec DB961WP
Rudder ► Hitec D89MW
Drag Chute ► RC Jet Chutes (26" diameter)
REPLICATING the B-58 Hustler's INSANELY COMPLEX Retract System
Through the build, the landing gear and gear doors were probably about the biggest challenge in the process. Being a critical part of the build the whole system needed to function smoothly and reliably. Each landing gear door was meticulously hinged and setup to resemble the full-scale version while also remain reliably actuated in the process. The main gear doors were actuated by a single servo each while the nose gear doors were able to be actuated by the nose landing gear itself. Without a doubt, the RC Crafters landing gear were absolutely incredible!
EQUIPMENT USED
Landing Gear ► RCCrafters.com
Gear Doors ► https://bit.ly/HTHS70
Springs ► https://amzn.to/3z8Ilx9
Braided Fishing Line ► https://amzn.to/3FOWzqE (amazon)
StarBond CA Glue ► https://bit.ly/StarBondCA (Use Code "Geek10" to get 10% OFF)
POWER UNLEASHED! B-58 Hustler Propulsion Install and Taxi Testing
The final steps in at least getting the model to a flyable state was the propulsion installation. 4x Schubeler ds-30 EDF units were installed along with castle creations speed controllers. In addition, I had installed four of my MiniBurner simulated afterburners since it won't go Mach 2 without afterburner after all! With everything in the model, it was time for a bit of taxi testing to check all of the systems and see how it would ultimately track on the runway. The mistake made here was that I didn't spend additional time testing the propulsion systems installed in the model. While I did check the amp draw of the fans statically many times which showed sufficient headroom. In retrospect, performing a simulated flight on the ground and checking the data loggers on the ESC's would likely have shown that the speed controllers were too small for the amp draw of the fans based on the heat build up.
EQUIPMENT USED
Simulated Afterburners ► 28mm inrunner MiniBurner
ESC's ► Castle Creations
Batteries ► Spektrum 7000mah
EDFs ► Schubeler DS-30
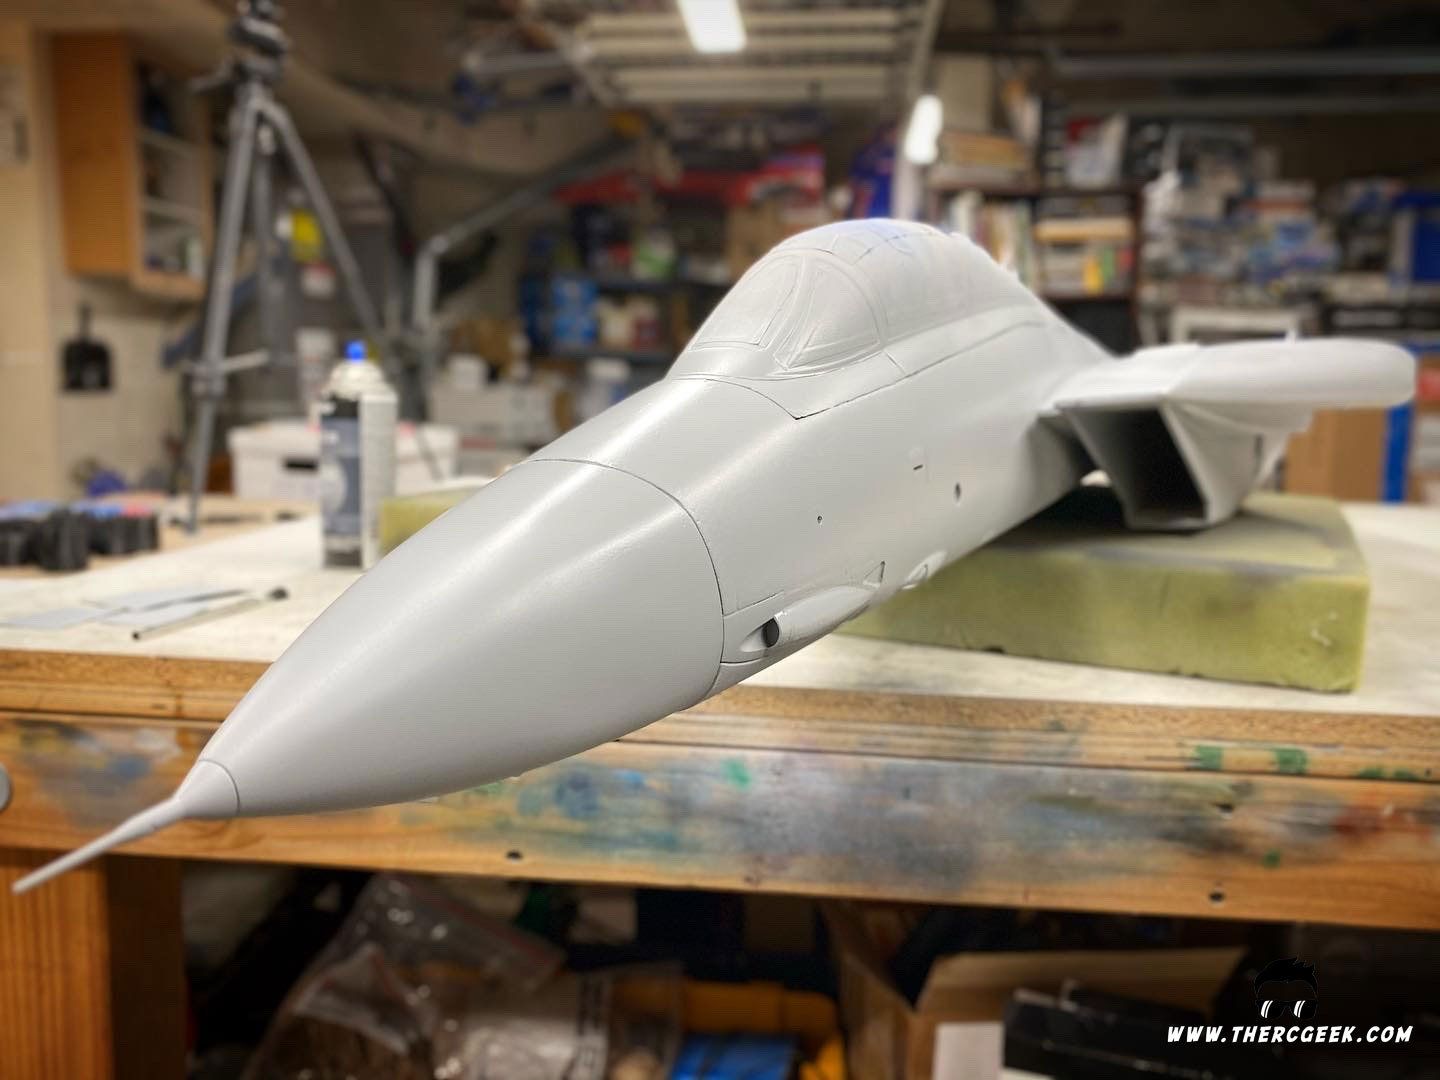
Aircraft Alchemy: Creating the Ultimate RC B-58 Hustler Metallic Finish
In the research I did on the aircraft, I fell in love with the prototype paint scheme with its red nose and tail and white chevrons. To achieve the iconic polished aluminum finish of the B-58, multiple shades of ALCLAD2 paints were used to paint the airframe. The challenge here was not just in painting but in creating the subtle variations in color to mimic the real aircraft's appearance. The whole airframe was airbrushed in this manner using a fan tip on the airbrush to help cover a larger area. From there, all of the markings were painted using various types of paint and masks from Callie-Graphics and the finish was wrapped up with a full weathering wash.
EQUIPMENT USED
Nav Lights► https://amzn.to/44uUzOt (amazon)
Grex Airbrush► https://amzn.to/3NXReR1 (amazon)
Airbrush Fan Tip► https://amzn.to/3QbFtsS (amazon)
ALCLAD2 Paint► https://bit.ly/AlcladAL ("regular" finishes used, airbrush only)
LVP Paint (trim markings)► https://bit.ly/LVPpnt (beware, doesn't dry super hard, so sprayed rustoleum 2x matte clear over it as a barrier)
Mr Paint► https://bit.ly/MRPpnt (Airbrush Only)
Frog Tape► https://amzn.to/3rBXruJ (amazon)
3M Fineline Tape► https://amzn.to/3XV65Ax (amazon)
Paint Masks► https://callie-graphics.com/
Folk Art Raw Umber► https://amzn.to/3O2PJku (amazon, acrylic used for weathering wash)
Tamiya Acrylic Thinner►
https://bit.ly/TamiyaThinner (cleans up acrylic wash)
The Maiden Flight: Triumph and Tragedy
While we did skim a bit through the build details above, every video shows in detail the full process mentioned. It represented about 8 months worth of work in the end bringing the model to completion. In the middle of this too was a failed first flight attempt where, similar to the full scale airplane, the model was having difficulty keeping tires in place and causing all sorts of rolling friction. The end result on that day was that the model wouldn't rotate. With lessons learned and a new wheel and tire design, the model was seemingly ready to go again a few weeks later.
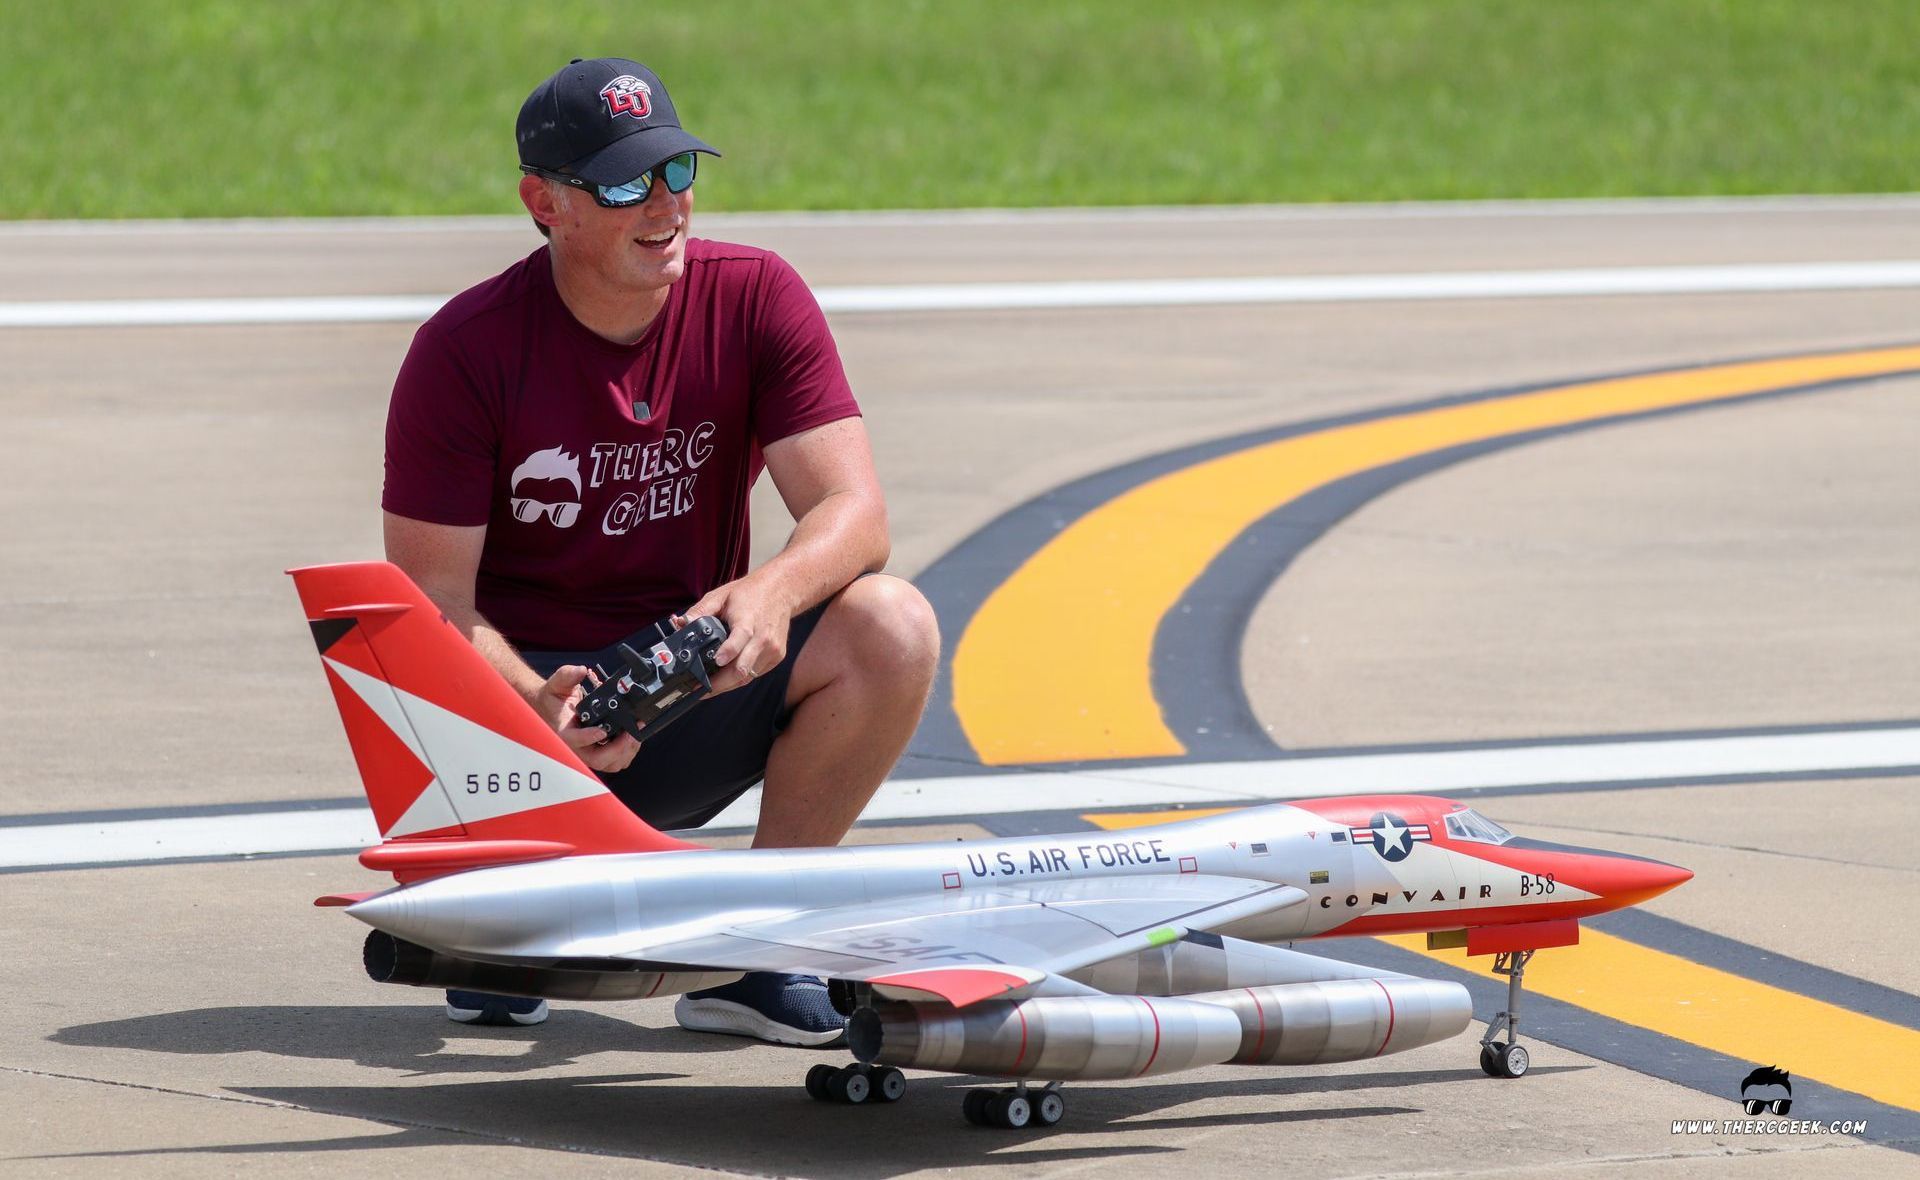
With the maiden flight day here at last, the B-58 was ready to take to the skies (and really looking good if I dare say so). There was much anticipation and with the model gleaming on the runway, it was a moment of triumph and a testament to the dedication that went into the project. In the process, I had also upgraded to high voltage lipo batteries (a second mistake) to help with the low end acceleration for takeoff. They charge to 4.35v/cell and provided a noticable increase in RPM...but at the expense of additional current draw.
Advancing the throttles after taxiing onto the runway, the model accelerated quickly, and the model rotated beautifully (though throwing one of the main tires off the axle). At last, the B-58 was airborne and she was quickly accelerating in the climb out as the gear were retracted. After multiple passes and trimming the model, it was time to bring her in for landing. However, as they say, the best-laid plans often go awry as you'll see in the video...I began to battle asymmetric thrust, and then...
A Journey Worth Embarking on
At the end of the day, the airplane was lost due to a mistake I made. I had been so concerned with the weight of the model that I ended up choosing smaller ESCs than I normally would. While I thought I had sufficient headroom...I did not. The ESC's got too hot in the flight and started shutting down one by one resulting in asymmetric thrust making the model almost impossible to maneuver the direction I needed.
Needless to say, this was a disappointing and discouraging result to say the least and it was completely avoidable had I opted for larger ESCs. However, sometimes, it's those tough lessons that are what push us to rediscover our passion for the hobby through perseverance. I've always believed that it’s not just about the flights, but the entire journey that makes a project special and this was quite the journey. Regardless the conclusion, it was a journey worth embarking on, for it's in those challenges that we find the most valuable lessons and the true spirit of perseverance. Plus, it gave a chance to share so many different building techniques and there's so much more to come! So, no matter where you are on your RC journey, just keep going. Mistakes happen to all of us, the important part is that we learn from them and apply it in the next build/flight/outing.
Until next time, I'll see you at the field!
The RC Geek Blog is your place to learn about all aspects of the RC hobby. Learn to build, design, drive or fly that RC project you’ve always wanted to build, but have been intimidated to try. This blog is here to help you on your journey and provide tips and tricks as you go! My hope is to inspire builders both experienced and new! So, welcome, please look around, it’s an exciting beginning! I’m currently documenting my latest competition scale RC jet build, a Mark Frankel F4D Skyray, along with some other fun tips and videos. If you can’t find what you’re looking for on this front page, click on any of the categories to the right and it will show just posts related to those categories. Please feel free to add comments and/or contact me directly if you have questions, I’m here to help! And don’t forget to check out my YouTube Channel, I post new videos every week!
Subscribe To Our Blog Now