The RC Geek Blog
By: Chris Wolfe
Flight of the Flir Cat…The Sequel!!
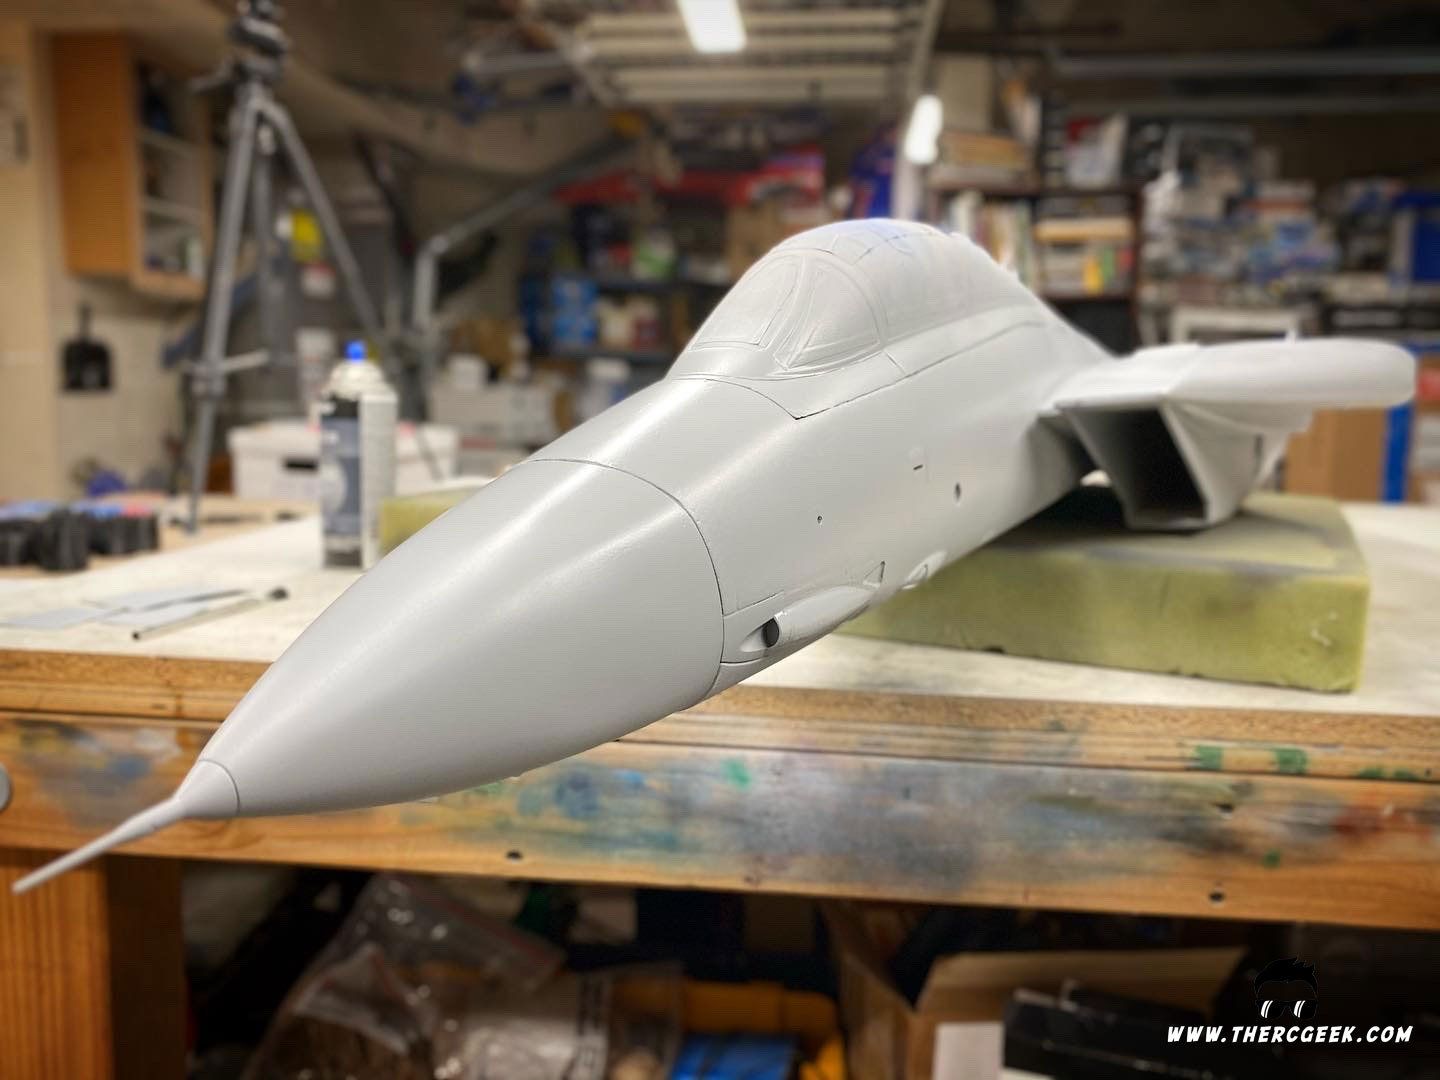
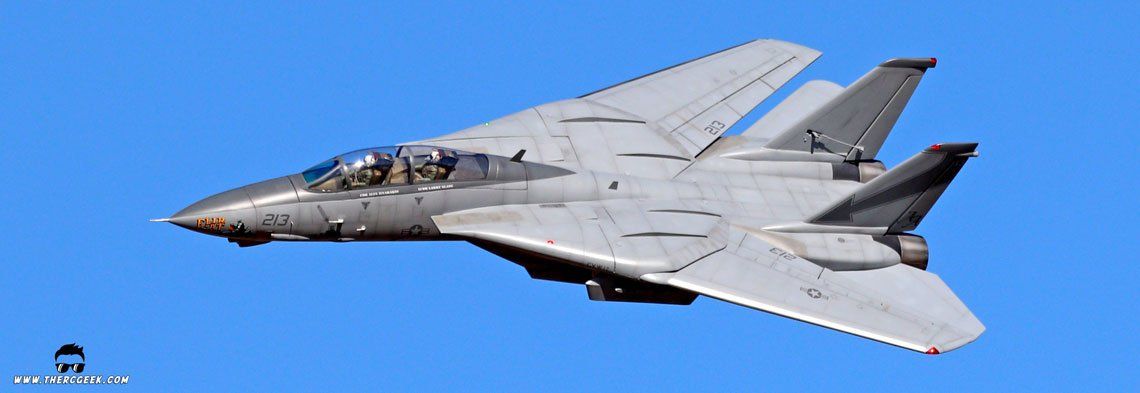
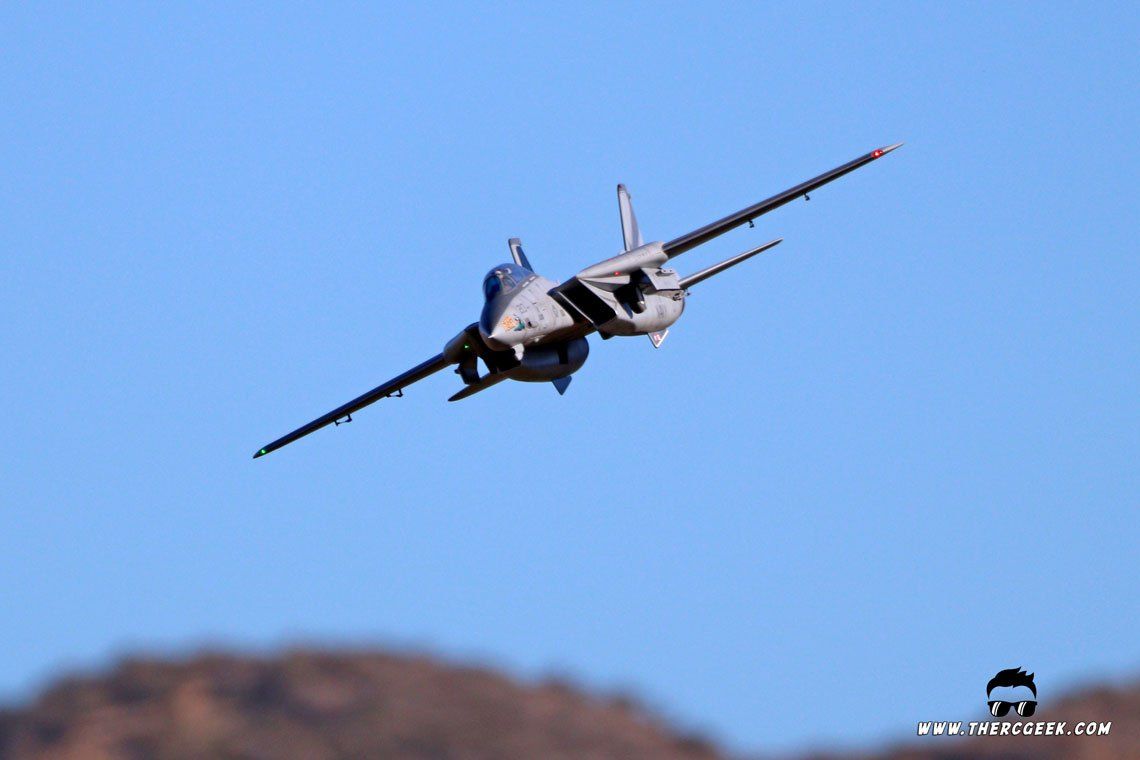
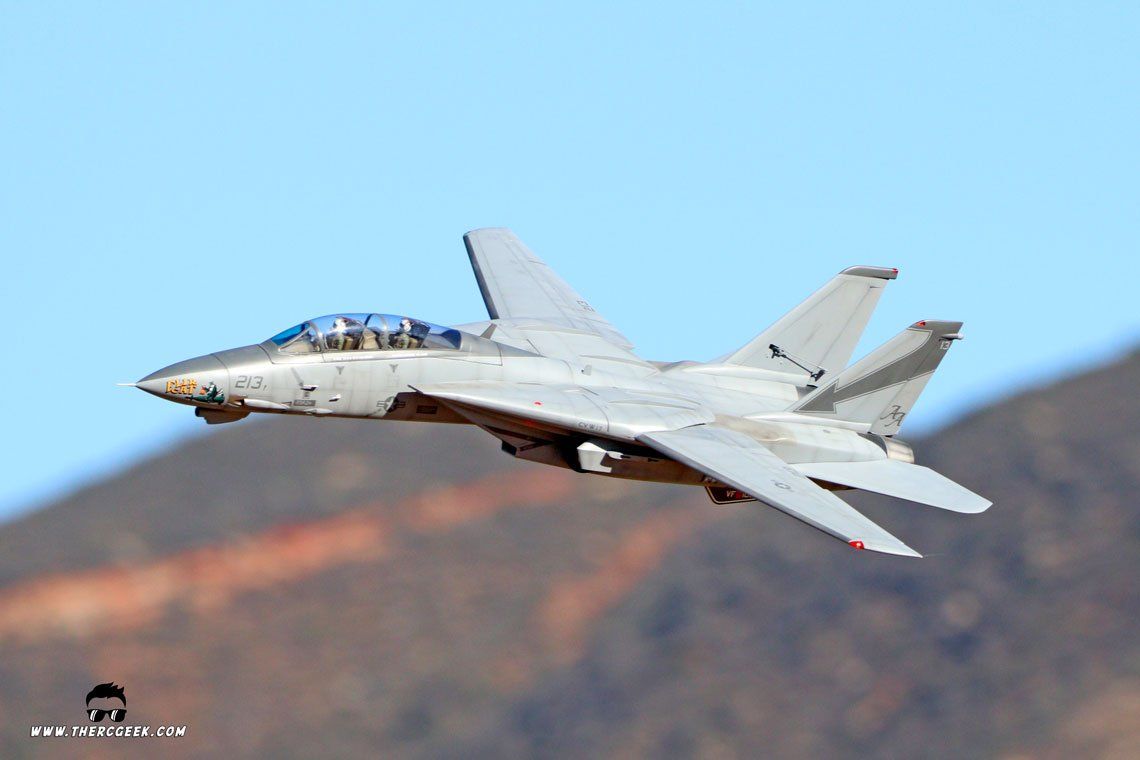
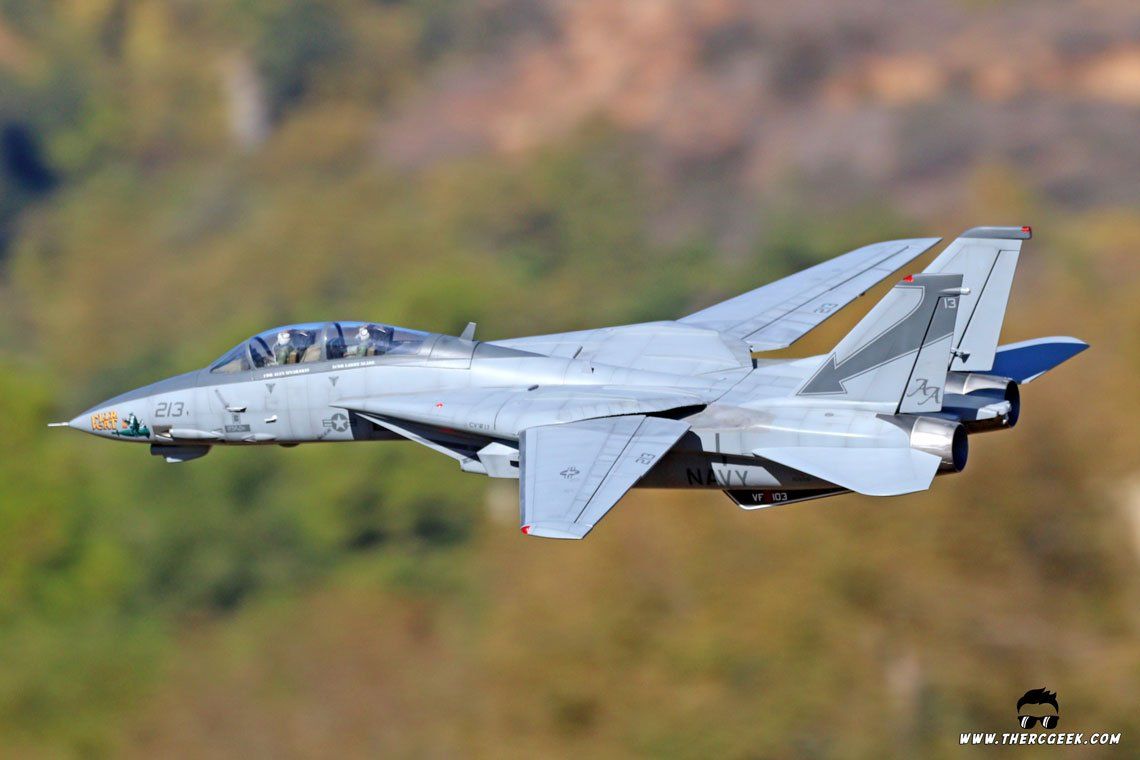
I tell you what, it has been quite the journey getting here! As a project, this Freewing F-14 Tomcat refinish took much longer than I had originally planned based on all of the other distractions that have come through the shop, but I'm so happy with how this model turned out in the end. It did take a few flights to get tuned and I have made a few small modifications in the process since our last installment, but otherwise I'm happy to report that the Tomcat is flying quite well. The F-14 Tomcat has such a great look and presence in the air, you just can't beat it!
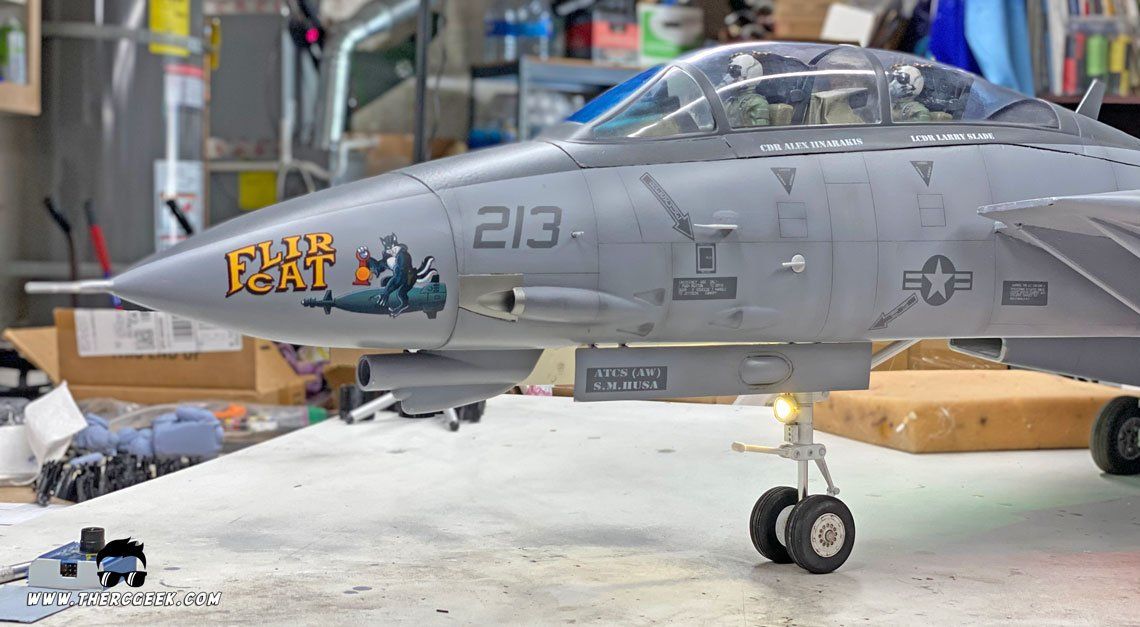
Oh, and I love the looks of the low viz Navy camouflage by the way, especially with the Flir Cat nose art. The low viz gray is not the greatest color against a blue sky, but a dirtied up Tomcat flying around just presents so authentically! I may have to consider this or a similar paint scheme when it comes time to build my 1/10 scale DCU F-14. All in due time of course… :)
Well, in wrapping up this series, I thought I'd touch on some of the final F-14 modifications I made in finishing the airframe up, talk through the programming in more detail since I've had a number of questions about that, and then talk through how she flies in her refinished state.
SOME FINISHING TOUCHES
One thing I was never fully happy with upon finishing the F-14 in our last installment was the look of the nose gear. While it was perfectly functional and didn't look bad, it lacked the scale look I wanted. Well, at the recommendation of one of The RC Geek community members, I took a look at the Freewing 90mm T-45 nose strut which turned out to be an absolutely perfect and more scale fit to the airframe. One thing I did discover from a not so perfect landing was that the plunger shaft is pretty soft for the weight of the Tomcat. So, to rectify this, I took the strut apart, heated up the plunger shaft with a butane torch until it started to change to a more golden color and then dropped it in water to harden it up. So far this seems to be holding up quite well even against an off field roll out or two. Additionally, tcat.rc.creations on Instagram sent me a file for a more scale looking F-14 landing light. So, to finish up the look with the more scale looking strut, I printed this up and installed it onto the nose strut.

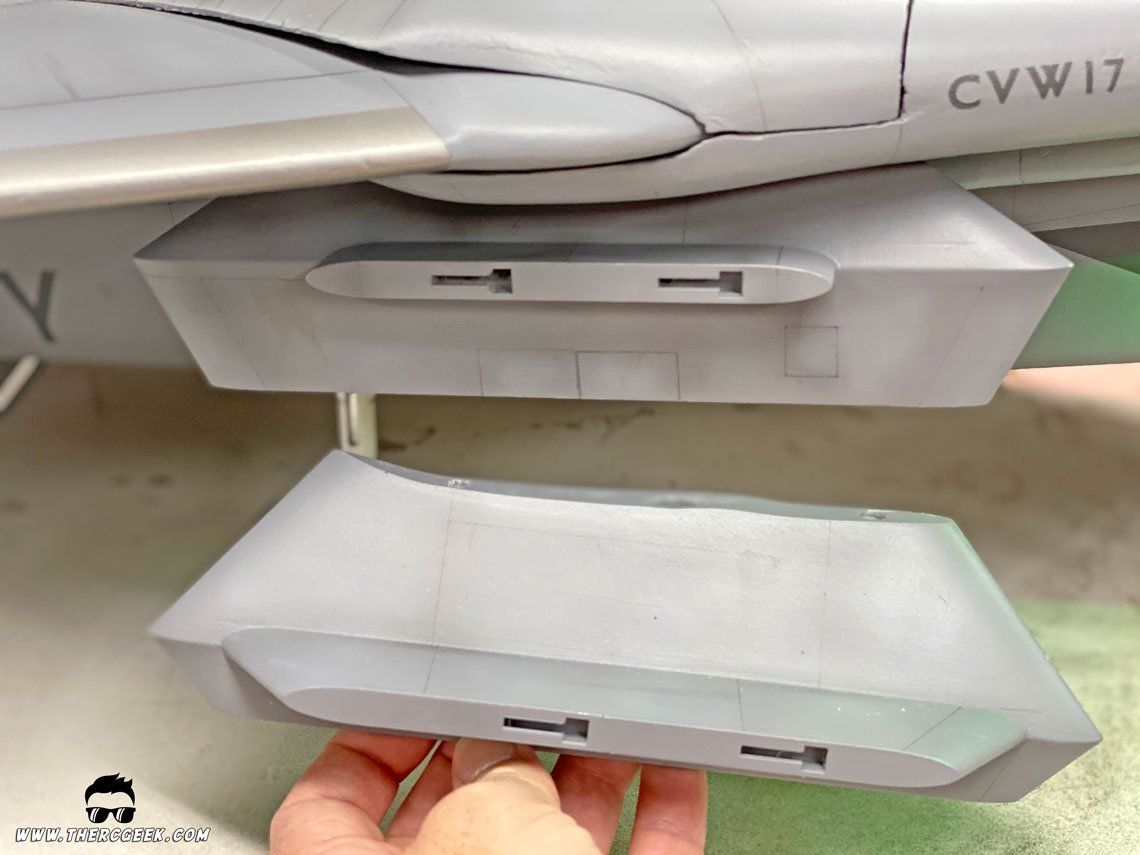
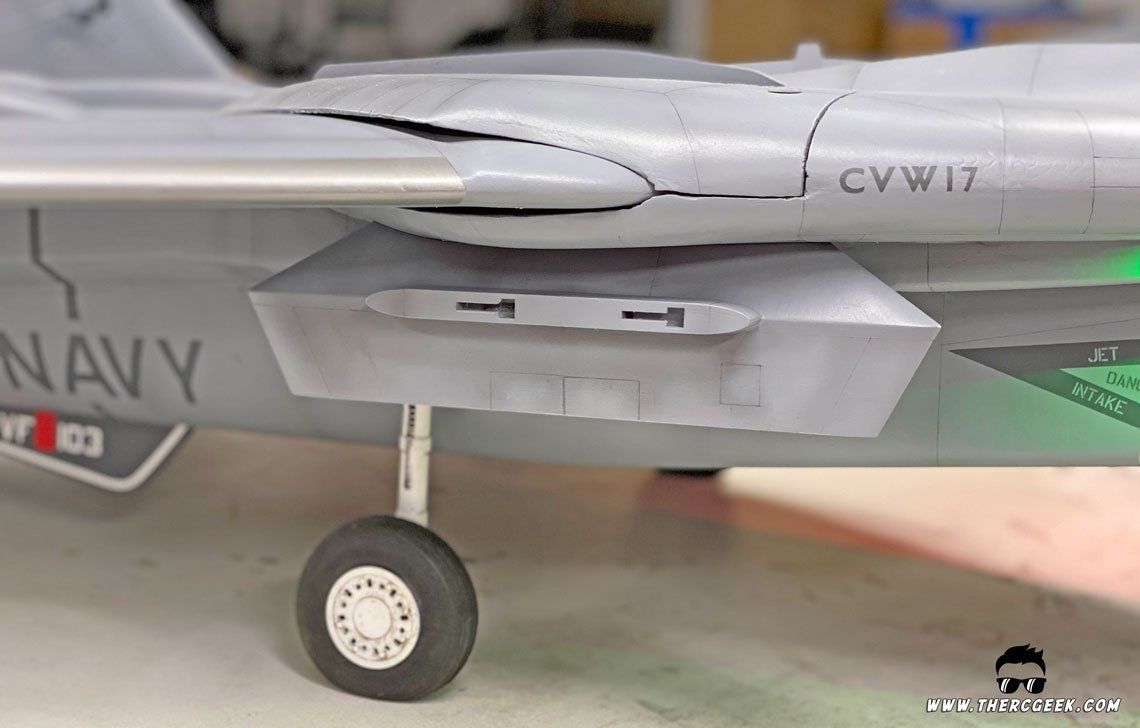
One additional item that I wanted to have on the airframe were scale glove pylons with the primary purpose of hiding the main tires when they are retracted. Originally, my friend and I developed and 3d printed a design that mimicked the freewing provided shape. In flying that design, I found that they really impacted the flight characteristics in a negative way and made the airplane never really feel locked in where as it felt solid with them off. Upon further investigation, we found that the shape was actually not very scale to the F-14 having the upper angled part too long and the lower vertical part too short. So a new, more scale pylon design was made and 3d printed which not only looked better but also didn't change the flight characteristics at all. So, it was definitely a win, win! :)

AIRCRAFT SETUP
AS3X GYRO SETUP
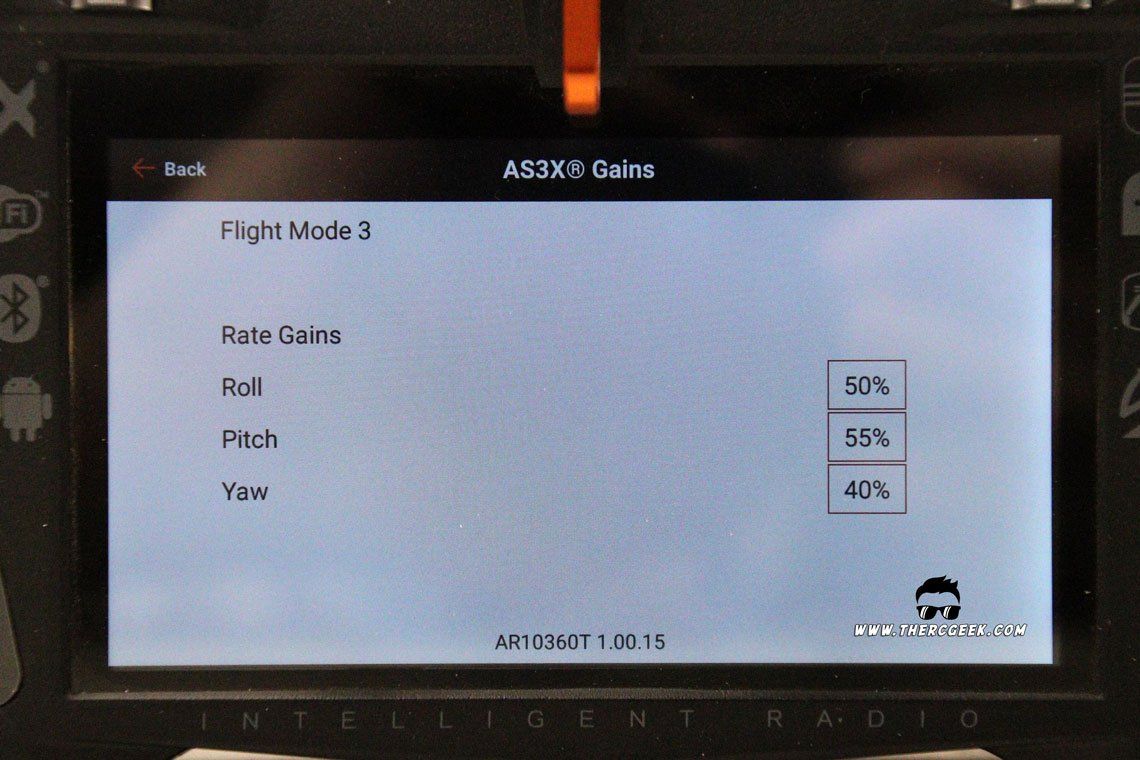
Related to the Freewing F-14 setup, I ultimately installed an AR10360T 10 channel AS3X receiver into the airplane. The primary reason was to have the benefits of the gryo with the wings swept since the airplane can tend to wiggle in atmospheric disturbances in that configuration. Tuning the gyro accordingly, it helped tame this wings swept characteristic which was quite nice, but I did find that I needed to increase my roll throw with the wings swept since I had the roll gain tuned pretty high. Otherwise, with the wings extended, there wasn't a huge difference since the airplane already flew rock solid in that configuration. I set the gains up on a switch so that they could be turned off if ever needed. However, I fly with the gyro active most all the time currently. The gains I settled on work well for both the wings extended and the wings swept configurations and are as follows:
AS3X GAINS
- Pitch – 55%
- Roll – 50%
- Yaw – 40%
AIRCRAFT SETUP
I knew from the get go that I wanted to setup the F-14 with the full span flaps and the functional spoilerons that I had setup in my original review a few years ago which has worked well. Interestingly however, the airplane required a considerable amount of left roll trim indicating an asymmetry somewhere in the wing potentially. So, to resolve that and avoid holding significant left roll trim at the tails, the left aileron was deflected upwards a touch to help offset. Additionally, independent trims were setup for the wings extended and the wings swept configurations through flight modes which made the transitions between the two a little easier. My only complaint is that there's no flight mode delay in the Spektrum programming, so the trims change immediately while the wings transition slowly. A flight mode delay would help the trims transition at a slower rate similar to the wings.
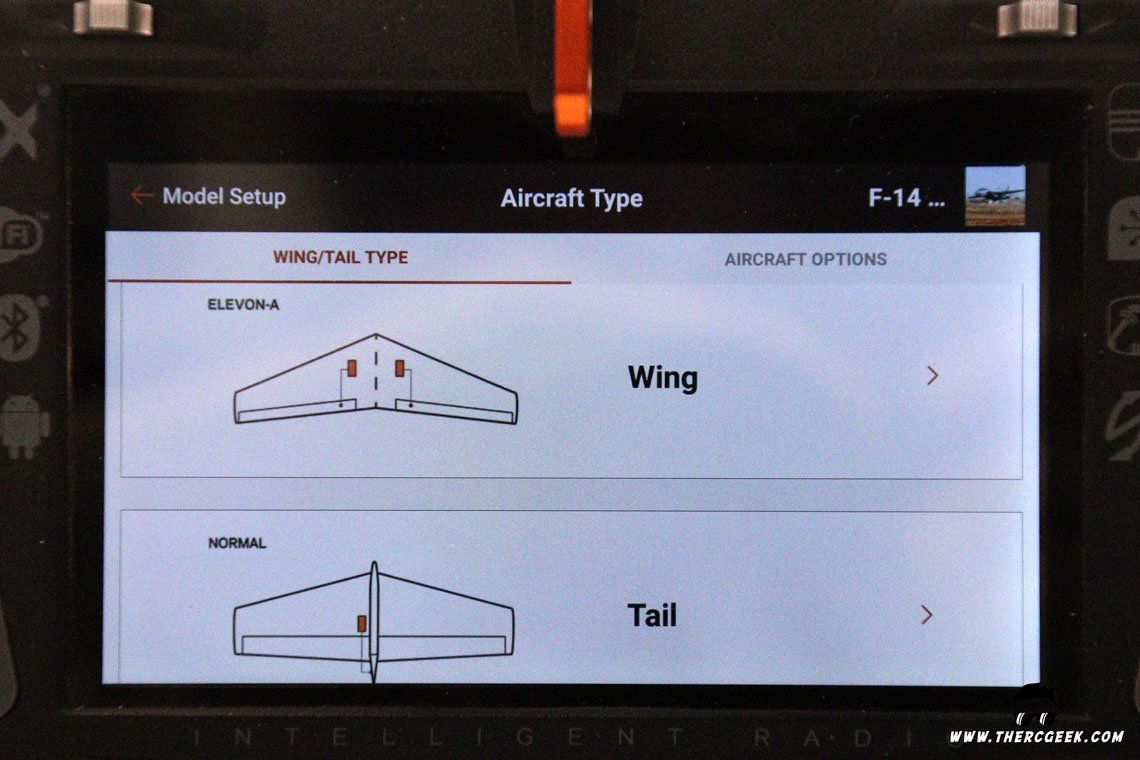
Related to the F-14 programming specifically, to work the above mentioned control scheme with Spektrum requires 9 channels and starts with an aircraft configuration set to elevon wings and normal for the tails. The rudder, tail, and flap functions were setup and then from there, each of the aileron functions were setup individually through mixes in the radio. Note, for this model, I setup the Tomcat on my ix20 radio (I really like the ix20!), but this can be performed on an NX10 or DX9 just as well.
AIRCRAFT TYPE
- Wings – Elevon-A
- Tails - Normal
Tails plugged directly into receiver (channels 2 & 3)
Ailerons plugged into Aux2 & Aux3 channels
Ailerons as Flaps
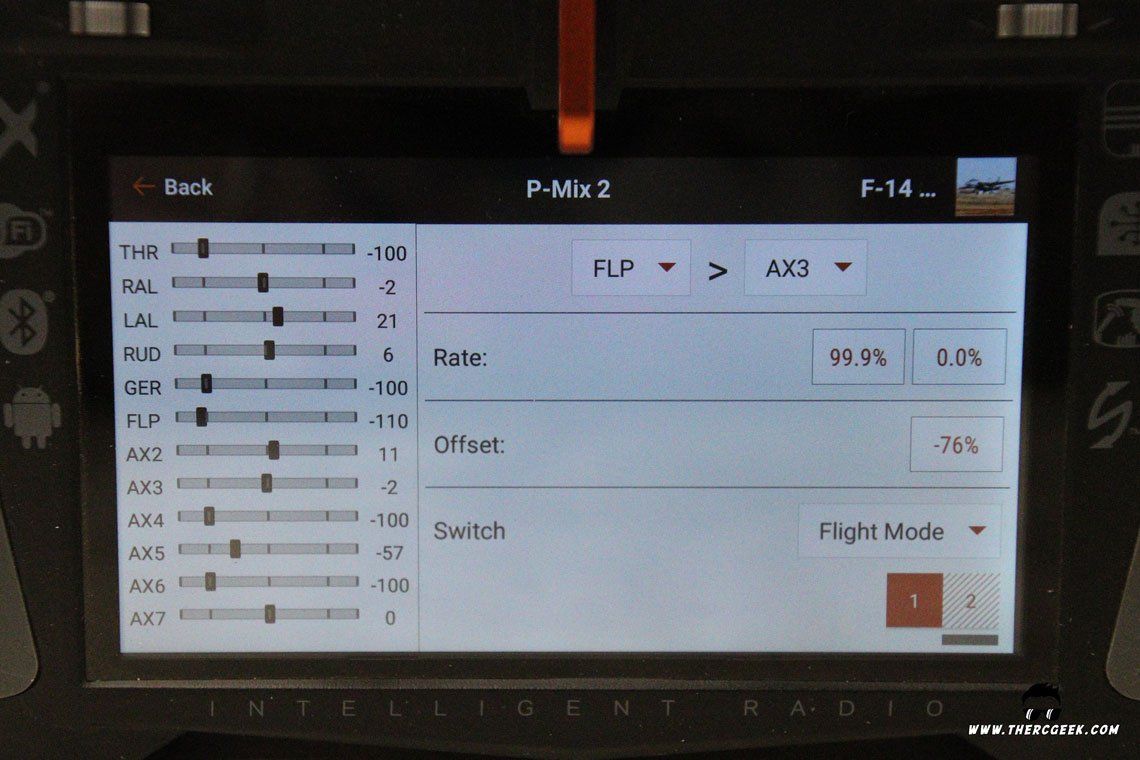
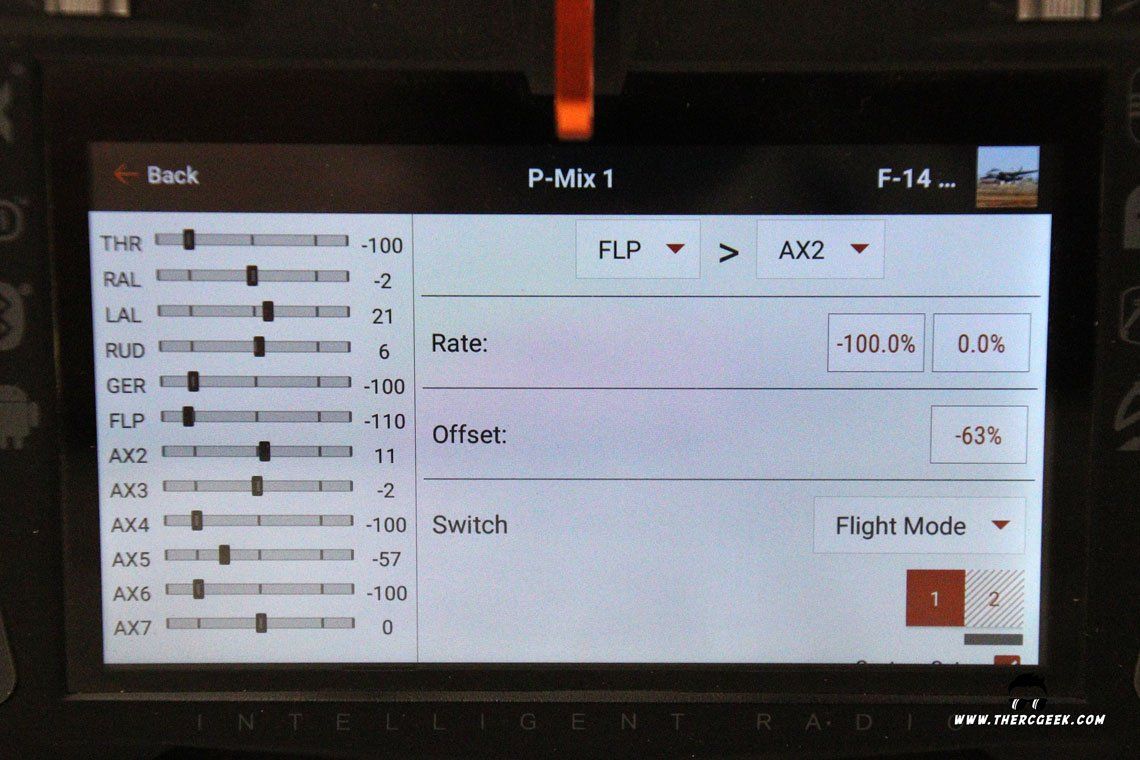
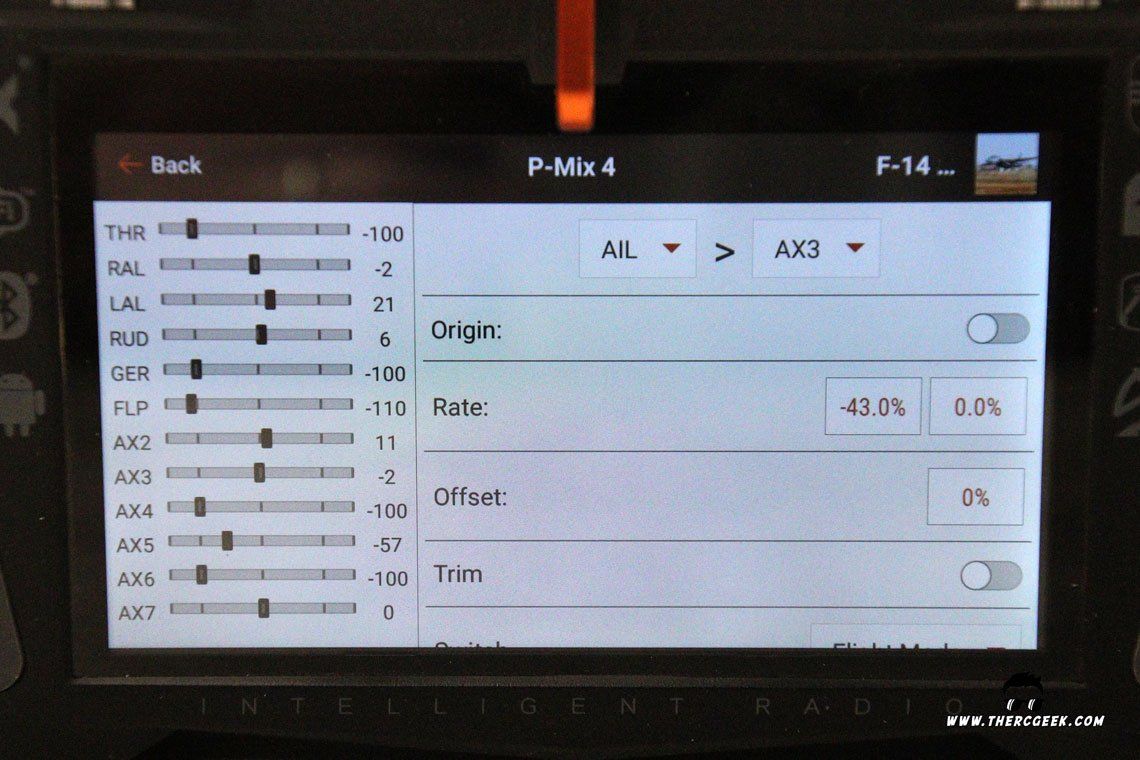
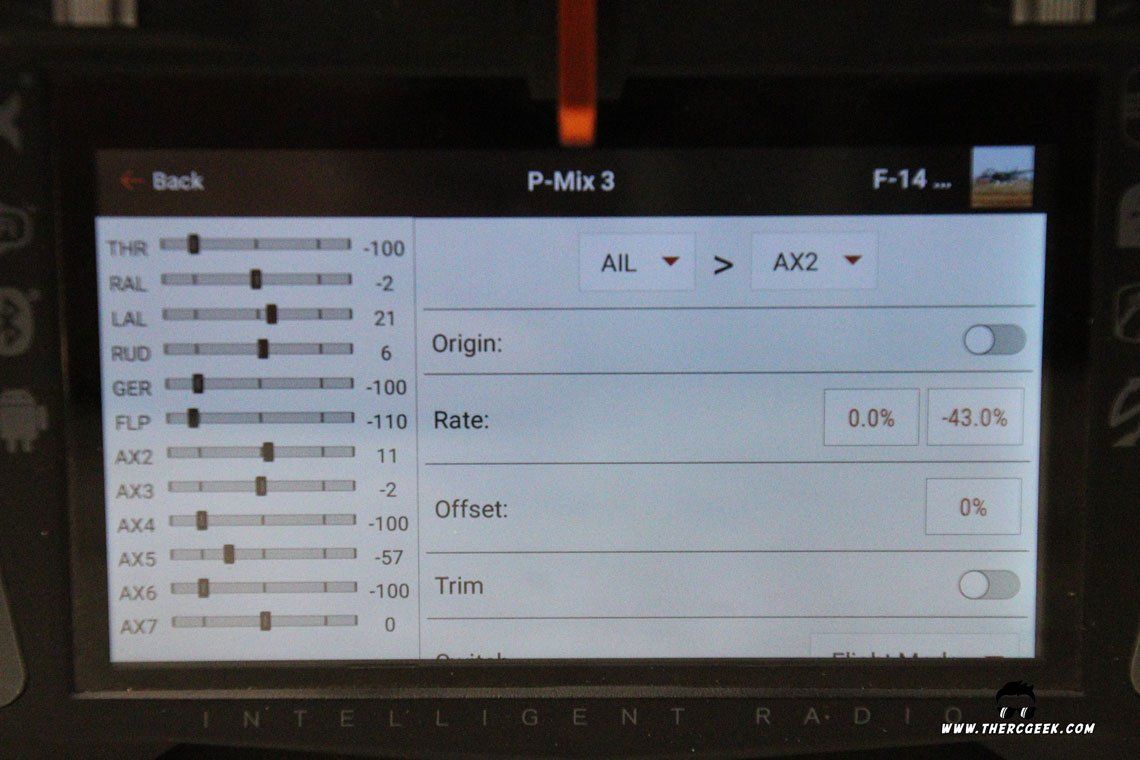
In setting up the ailerons as spoilerons and flaps, it requires multiple mixes. First an aileron to flap mix was setup for each individual aileron channel. The offset function was adjusted to get the proper movement for each aileron. Note that I setup the ailerons with slightly less cambering deflection than the flaps to help reduce the aerodynamic load at the wing tip some. One does have to be a bit careful with the elevator with the cambered ailerons as the airplane can be prone to tip stall with large and quick elevator deflections. The best approach is to fly the airplane to the ground in more or less the same pitch attitude and use the throttle to control the descent.
Ailerons as Turning Spoilers
To actuate the ailerons as a turning spoiler, a mix was setup for each aileron servo channel, to the standard aileron channel. Within the channel mix is where the deflections of the aileron servos are set and adjusted. Since I'm using them acting trailing edge up only, it required adjusting only the trailing edge up rate function only. Lastly, this channel mix was then assigned to my swing wing switch such that the channel mix is active with the wings extended and then inactive when switched to the wings swept position. This disables the ailerons in the swept wing configuration.
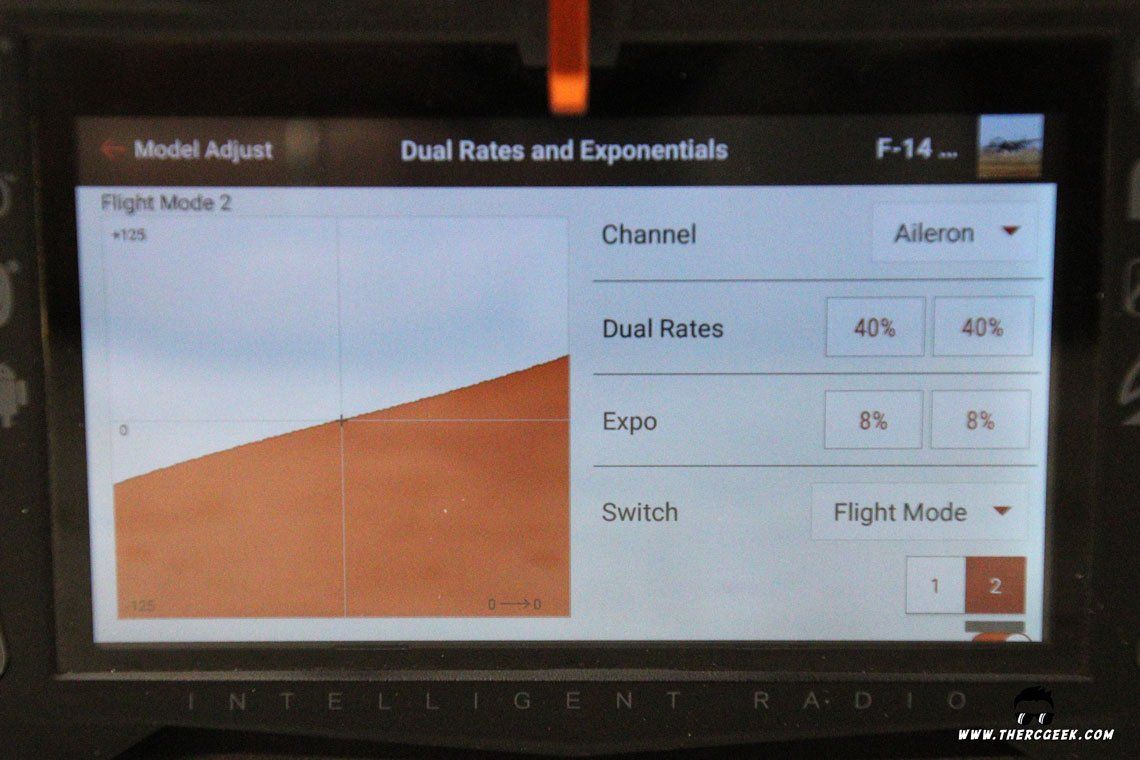
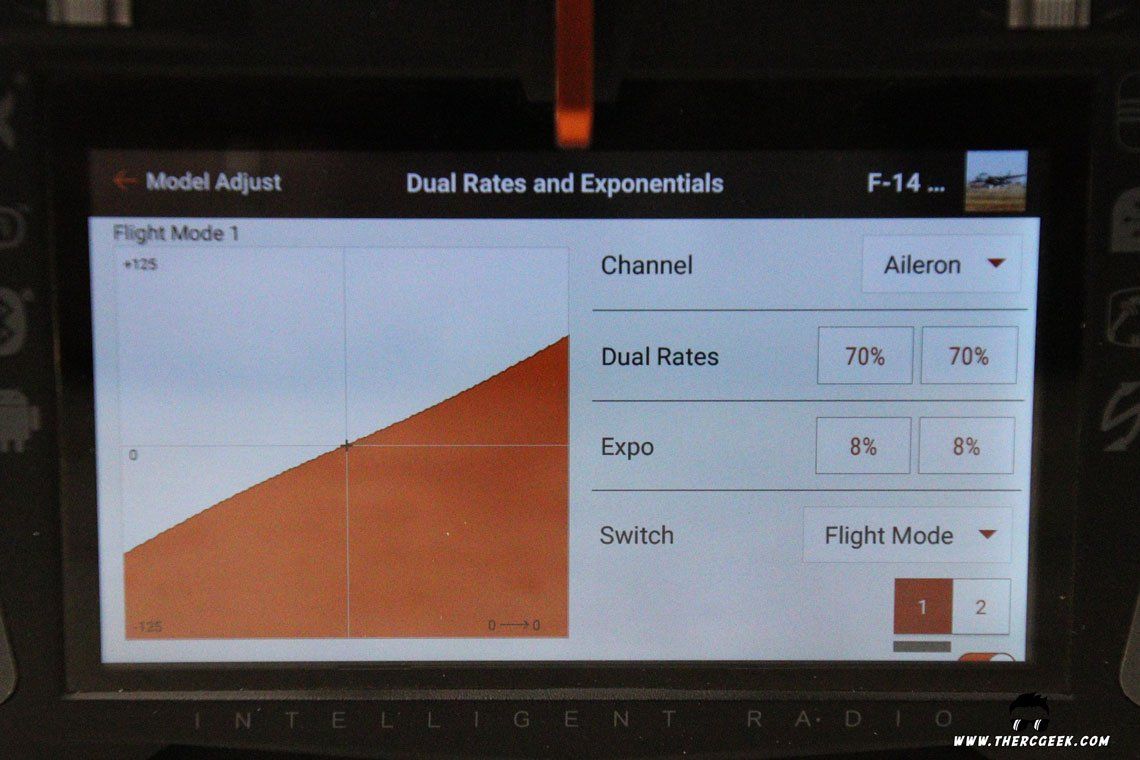
Taileron/Roll Rates with Wing Position
In addition to the above, I assigned my aileron dual rates to the swing wing switch so that with the wings swept, the tailerons automatically reduce to low rates. This is quite important as the airplane will otherwise be extremely touchy in roll with the wings swept if the tailerons remain at high rate. I should note however that while the wings transition slowly, the rates instantaneously change. So, it's important to keep this in mind and be prepared for that immediate rate change. For example, when the wings are swept back, the roll will immediately be sluggish at first and increase in effectiveness until the wings are fully swept. The reverse is true for wings extended where upon flipping the switch, the roll becomes immediately sensitive and becomes less sensitive and the wings extend. Understanding that, you can perform rolling maneuvers while sweeping the wings and all kinds of fun stuff. My preference is to roll the airplane while extending the wings since this gives me more responsive roll through the maneuver. I do this by first hitting the wing sweep switch and then initiating the roll. It requires a continuous increase in roll command as the wings extend to maintain a constant roll rate and when executed right, is pretty darn cool!
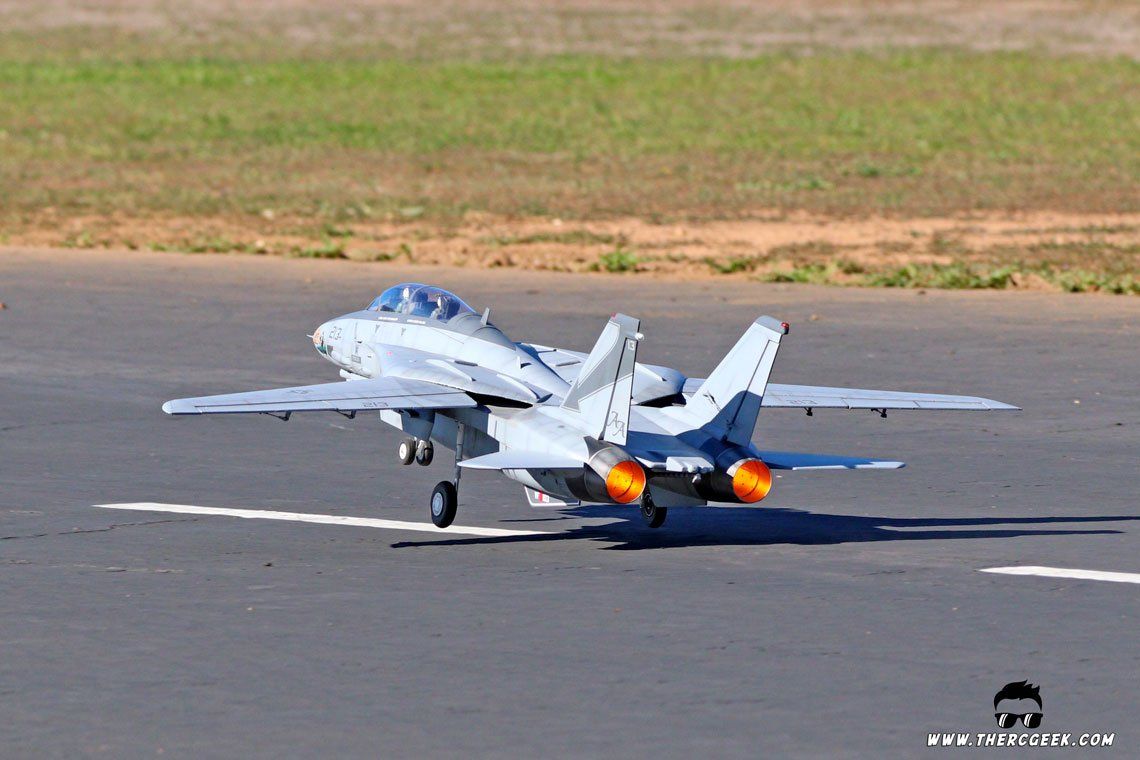
FLYING THE FREEWING F-14 "FLIR CAT"
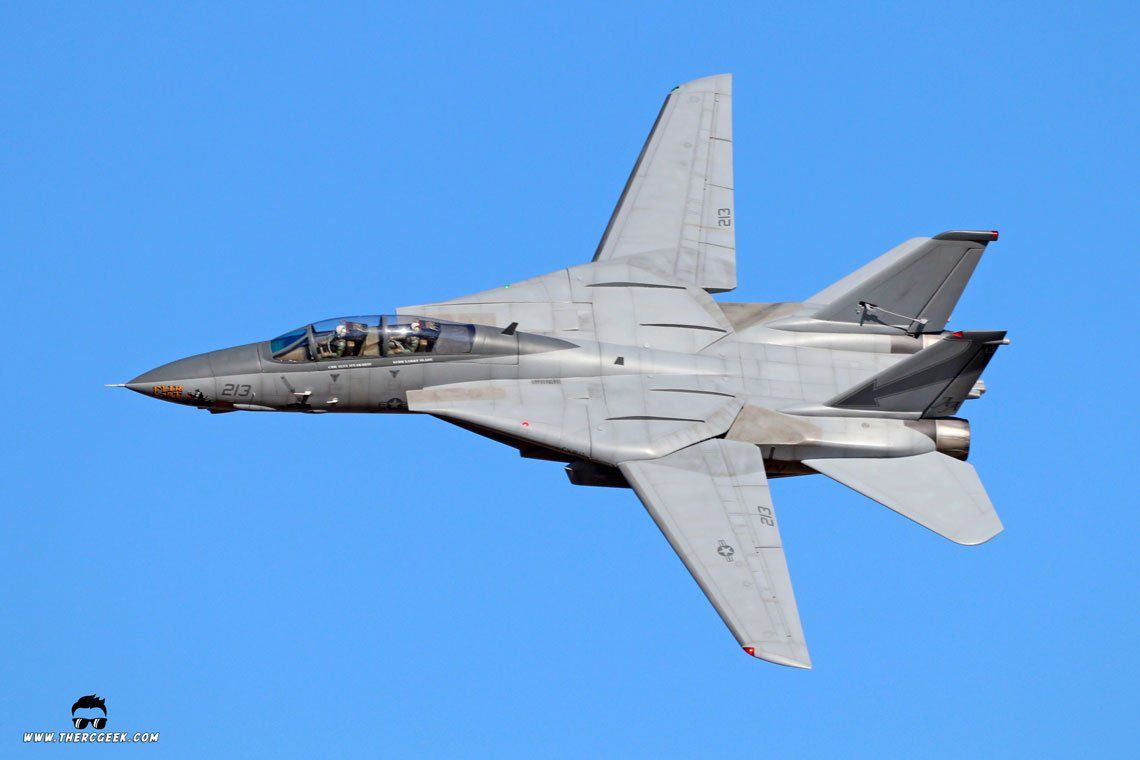
It is always interesting to see how a refinish project like this flies and this F-14 Tomcat really does fly well. The cleaner and stiffer airframe you get from the refinish really helps the airplane to cut through the air and the look of the model in the air is exceptional being able to almost pass as the full scale at some angles. The twin 9-blade outrunner fans from the Freewing A-10 which provides good power through the entire flight envelope (more on that below) and actually sounds quite authentic on the landings having a high pitched whine to them. The model flies rock solid all around and with the wings swept, the gyro locks the model in making it less susceptible to atmospheric disturbances.
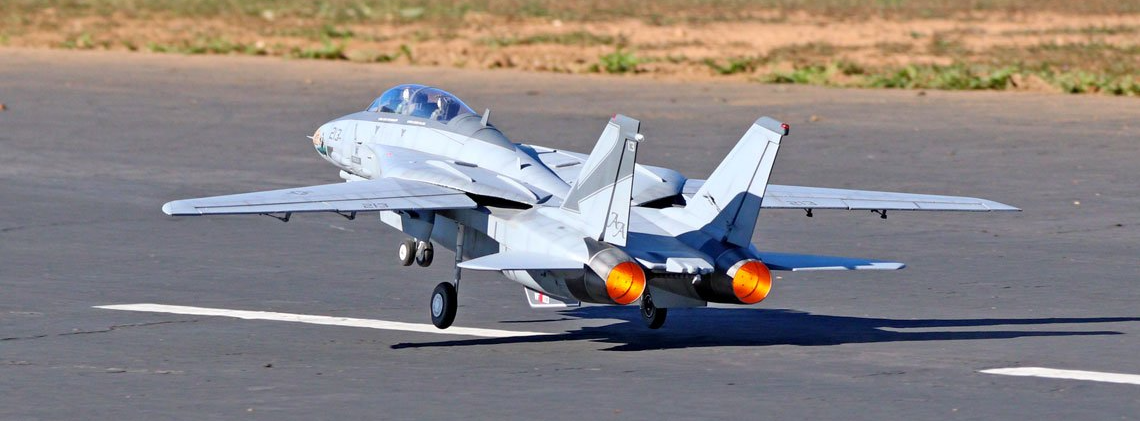
Where I had my biggest challenges with this airplane were the landings actually. The model did increase in weight from the refinish and so it took me some time to find the right balance of airspeed and attitude on the landing approaches compared to the previous stock model I flew a few years ago. The key is to set the model into a slight nose up attitude and keep more or less constant elevator input to the touchdown using the throttle to control the descent. While that's not necessarily new for this airplane, it just took some time to find that right combination. Once I sorted that out, the landings became much more consistent and were better overall. It is important to note that with the full span flaps, excessive and rapid elevator deflection can initiate a tip stall, so keeping that constant elevator input all the way to the ground with only a mild flare really works the best and will avoid scraped wing tips.
At the time I started this project, the 9-blade outrunner fans from the Freewing A-10 seemed the best option. However, if I were to do this again, I would use the 9-blade inrunner fans that are now the standard in the 80mm Freewing kits. This is a sizable model and the refinish did add some weight to the airframe that you do feel in the takeoff and landing speeds and so the extra punch from the inrunners vs the outrunners would be beneficial. So…I think I see a fan swap in my future… ;) But until then, here's a flight video with the 9-blade outrunner fans captured out at the Riverside RC club field in Perris, CA.
FINAL THOUGHTS
Well, it took quite a bit longer to get here with the F-14 than I had hoped, but alas we have reached the conclusion of our Freewing F-14 Tomcat refinish journey. I'm so happy with how the model turned out and I'm glad to have a flyable tomcat in my hangar again. The tomcat is one of the most iconic jets ever built and having a nice representation of one to fly is about as cool as it gets! I do plan to swap the fans with the 80mm inrunner systems but that will come another day. Until then, I'll see you at the field!
The RC Geek Blog is your place to learn about all aspects of the RC hobby. Learn to build, design, drive or fly that RC project you’ve always wanted to build, but have been intimidated to try. This blog is here to help you on your journey and provide tips and tricks as you go! My hope is to inspire builders both experienced and new! So, welcome, please look around, it’s an exciting beginning! I’m currently documenting my latest competition scale RC jet build, a Mark Frankel F4D Skyray, along with some other fun tips and videos. If you can’t find what you’re looking for on this front page, click on any of the categories to the right and it will show just posts related to those categories. Please feel free to add comments and/or contact me directly if you have questions, I’m here to help! And don’t forget to check out my YouTube Channel, I post new videos every week!
Subscribe To Our Blog Now